Dominate is a great scenario for my Empire of Dust. Almost all of my units have solid defence and nerve (some with regen too!) The Herd have some good access to CS/TC with bane chant so I’ll have to be careful that no one unit of mine gets swamped too much. My access to surge should mitigate his speed advantage somewhat as getting out of charge arcs doesn’t always guarantee safety. The plan is to use the priest to target the lighter Herd elements (beast pack and longmanes) with breath whilst the mummies and pharaoh go after the heavy hitters and hopefully win a war of attrition. Giant and skeleton horde to go wherever needed.
The Wilding Way:
The creatures of the wild, sometimes known as the herd, are as much a natural occurrence as the elements, the animals, and the trees. The herd, however do not always serve the Green Lady or her minions, and are said to have been created by the dark half of the Green Lady. They will fight tooth and claw to defend there herdlands, and often will move to expand their territories. The majority of the herd creatures are of above animal intelligence, but still driven by natural urges. The tribes are ruled by the strongest members, and the clashing of antlers is the way to prove one’s status. The tribes are also governed by the wisest and most mystical of their kind, the shamans. Horgaman, and his acolyte Therok, are the spiritual leaders of the Black Hoof tribe.
The Black Hooves are a smaller tribe, and they recently lost their great chieftain in a conflict with some creatures from the very depths of a nightmare. There chieftain tried mightily to overcome the great Void Lurker, Sottot, but in the end paid with his life. Other tribes surrounding the Black Hooves sensed weakness in them with the loss of their chief, and began regular incursions to steal territory from them. Horgamann received divine advice from one of the great Avatars of the Father that there was a new Herdland, complete with a stone altar to the great Father available far from the Black Hoof territory, and that he should lead the tribe forth from the forest and move to claim this new land, where the Black Hooves could grow and thrive, and that the journey itself would lead them to new adventures, new allies, and serve as a proving ground for the mightiest warriors that one would eventually emerge as new chieftain.
With the words of the Avatar still fresh in his mind, Horgamann assembled the whole tribe and relayed the message from the Father. Some in the tribe were hesitant, but none would openly challenge the shaman’s vision. Thus the tribe packed up its belongings, gathered forth everything it was thought they’d need, and they left the great forest, headed north east. Adventure, and the chance to prove themselves, was all that the veterans of the tribe needed as inspiration.
Game 1: Herd Vs League of Rhordia – Pillage
Initial Thoughts:
Rob: The one thing I really have going for me in this game is speed. I need to get into the mix fast and shut down his shooting if at all possible. The drawback for me is he has a flying Duke, and I have nothing that flies right now. That means I will be out-maneuvered by something hard hitting and nasty if I’m not careful. Since I do have an army full of pathfinders, I can used terrain to my advantage, but the smaller board and less terrain is not going to help me quite as much as I’d like.
Set Up:
Rob: Once the terrain is down and the objectives set, we roll off for sides. I win the toss and elect to take the south side of the board. With the placement of the objectives and terrain where they are, I feel this is my best option. The one drawback to taking bottom is that he can park a unit behind that north eastern wall, and there’s little chance I can break it. I will cede that objective though, if he really wants it, as the hill will provide me a lot of protection from that quarter, and the other 4 objectives are all safely where I can snatch them up with my superior (for the most part,) speed. I deploy my forces, from west to east: chimera, guardian brutes regiment, spirit walkers regiment followed by shaman, longhorn veterans regiment, mounted shaman, and beast pack troop followed by centaur long manes troop.
Sned: First thing I do, I depart from my initial idea, and don’t park a pike regiment on the top objective, from where they would never have been shifted. Instead I put the archers there, which would have been sound if there hadn’t been a hill in the way. Clever. Pretty straightforward setup otherwise. Volley gun behind the forest getting ready to move into position first turn, centre held by the pike blocks, ready to hide on the other side of the wall: -2 to hit and no TC? Come at me, Brio. I’ll just slowly walk in your general direction. Very slowly. Sp4 sucks. Honour Guard on a flank ready to hunt some sheep, Wizard in easy bane chant range of the whole army, and the Duke sort of in the middle where he can get to wherever he’s wanted quickly. Kind of wish he’d been supporting the dogs, actually.
Turn 1:
Rob: I cautiously advance up the western flank. I know I’m going to take a blast from that volley gun, but I think I can survive it if I only get hit once, so this turn, I am staying just out of range. I move the center infantry up to the edge of the forest, again, staying just out of range of that gun. On the east flank I slide the fast movers up to the edge of the hill, making sure the beast pack can see the Halfling archers to charge them next turn. I also am using this to see if I can bait the duke in and reduce his threat. Even if he kills the pack, the centaurs have a solid chance of wounding him pretty hard between CS, TC and a bane chant from the shaman.
Sned: Sure, I’ll charge a beast pack with my duke, and then take some centaurs in the face… followed by some drunk goats, probably in a flank. No, I realise my error and run off to go help my bodyguard, who were obviously missing me. Archers scour the horizon: what’s that hiding behind the hill? Is it a beast pack? With a little hocusy-pocusy help from the wizard, 3 wounds and a waver, thank you very much. Everything else just moves forward in the general direction of the stench.
Turn 2:
Rob: Well, the beast pack being wavered was something I didn’t want to see, but Sned’s good shooting roll hurt a bit more than it should. The Duke shifting West behind the forest also gives me a little extra space to move around, though I’m sure he’s going to be committing to the fight soon enough. In the east, I leave the beast pack in place, and move the centaurs up the hill. This means the archers will have to choose between either hitting on 5s and wounding on 4s or hitting on 6s and wounding on 3s. Either choice will result in a next turn charge on the archers. The goal being to shut them down, even though I know I have little chance of actually breaking them. The center shifts position staying clear of his massive 8 inch charge range. I love halflings, especially when basted and slow roasted over an open fire. In the west I move the chimera closer to the house guard and artillery. He will either have to shoot or charge, and either way, my brutes will be safe from harm for the time being. At the end of my turn, it is Herd 3, Rhordia 1 for objectives.
Sned: 8 inch charge range… I thought Dogs of War were supposed to be human mercenaries! Speed 4? What is this? Better to know one’s own list, huh. There I was thinking my opponent was baiting a flank charge which I was very happy to take, hindered or not. 30 attacks, even on 5’s, with a bane chant is still nasty, especially when the countercharge is going to be fairly ineffective. But no. That defense 5 comes from some pretty heavy armour, it seems. I had to make do with merely hinting at the possibility of doing it next turn (stupid, fat, lazy, procrastinating hobbitses!). After deciding that there was very little chance preventing the charge from the centaurs even hitting on 5s, especially after my wizard failed the bane chant, I plinked off the rest of the beast pack, limiting the damage that would be done from the charge. 3 wounds from the volley gun on the chimera very nearly brought the miracle of miracles: needing box cars to waver it, I rolled an 11. That would have made me very happy, especially with the Duke now facing its flank. But I’ll take what I get, 3 wounds is a start, and it really needs to decide whether it prefers 10 attacks from the duke or 12 from the honour guard.
Turn 3:
Rob: The beast pack is gone, but that’s ok because the centaurs will be moving to shut down the archers now. They charge in. The center is still a dance, but I move the spirit walkers into range of 1 pike unit. I can take a charge from them, and come back swinging, especially with a flank charge from the long horns. The chimera moves into charge range. With that winged duke sitting back there, I need to do something now. Fortunately he won’t be charging this coming turn since he’s facing the wrong way. The mounted shaman bane chants the centaurs, not because they need it, but just because I can. They’ll still be wounding on 2’s but it’s nice to say I got the spell off at least. The centaurs wound the halflings, and they won’t be shooting this coming turn. I hope they fight back.
Sned: “Phew, only 2 wounds. That could have gone worse. I think we’ll just stay behind our wall and get over that nasty shock, right , chaps? Let the wizard do some fireworks. What was his name again? Rincewind? Yes, that would explain his general uselessness… Here they come again! Nice horsies! Nice horsies!” The Aralez decide that they’re hungry and want some lamb chops. They make a damn good effort, but the nerve roll falls one short again… Ruh Roh. Hopefully the Duke can come and help, breathing down the guardian’s necks? Volley gun didn’t have a target, so I turned it to face the centaurs, ready to take a shot at them next turn. Might not have been worth it though. Pikes shuffle a bit and continue to hurl insults at the enemy from a safe(ish) distance.
Turn 4:
Rob: Of all the mean things to do, not counter charge with the archers. That stupid wizard needs to not be fireballing me. Oh, well. The Shaman attacks the wizard, and the centaurs again attack the archers. The chimera counter attacks the house guard, and is joined by the brute squad. This is what I wanted. Finally a fight worth doing. The shaman wavers the wizard, great work. The centaurs again shut down the archers from shooting, and the chimera and brutes crush the house guard and turn to face the winged Duke. Well, I think my chimera is doomed, but the duke will pay a significant price for killing it.
Sned: Only 2 things of note happened this turn. The volley gun blasted off the centaurs. Yay. And this time I didn’t miss the waver target on the Chimera. I hit it exactly. An improvement! But no. Not really.
Turn 5:
Rob: Well, the chimera being wavered is about the worst result Sned could hope for. The brute squad piles in on the duke’s flank. Figuring I can take this, the chimera reforms to face the flank of the pikes, or the flank of the gun which rather annoyingly blasted my centaurs into their component atoms. My infantry is starting to get antsy, and really want to commit, but they hold back for another turn to see what’s going to happen. The shaman again decides to shut off the wizard, and scores a wound. The brutes mash the duke and his aralez to a pulp. We’ll consider it tenderized for the victory feast.
Sned: Rather than just turn, should have moved towards the chimera, looks like I would have gotten out of range of the longhorns. Oops. Stupid hill meant the spirit walkers were out of sight of the archers, and the volley gun didn’t do enough. Everything basically falling apart at this point.
Turn 6:
Rob: I’m not shy about taking a rear charge, not one bit. Even if it is a hindered charge, 36 attacks on a 4+ and wounding on a 3+ (assuming successful bane chant,) is going to make a mess of those pikes. The gun zapping my spirit walkers has also confirmed that my chimera needs to eat the artillery crew, and it does. The brutes just move to secure the objective in front of the rock. The spirit walkers back up on the hill to be near the objective, and the mounted shaman charges the archers, now my biggest threat. As anticipated, bane chant goes off, and the long horns slaughter the pikes to a man (er, hobbit.) The shaman, however misses his attacks on the archers. It could get messy. At this moment it is a tie game objective-wise.
Sned: And here it would have been good to have a better grasp of the rules. I assumed that only friendly individuals could be ignored for LoS purposes, so I shuffled the halflings sideways to see the spirit walkers. Hitting on 6s was not good enough.
Turn 7:
Rob: Well, this is it. If I can survive just one more turn of shooting with the spirit walkers, the game is mine. I turn them south, and try to hustle off the hill, but don’t quite make it. The mounted shaman tries one more time to shut down the Halfling archers, and the long horns and chimera charge the remaining pikes. The shaman manages to wound the archers, whoo-hoo! They will not be shooting. It all comes down to the wizard now with his lousy fireballs. The combat in the center is indecisive, unfortunately, and the pikes will likely kill the chimera, and contest the center objective. This game either ends a draw in my favor, or a win at 2 to 1.
Sned: Don’t quite understand why rob didn’t just go for the rear charge with the spirit walkers, I guess the possibility of a snake eye nerve roll was too big a risk. Did not expect to be in with a chance of a draw at this stage, and it wasn’t to be. The wizard had another poor turn with his fireball, and that was all she bleated. The remaining Dogs unit cleaned up the Chimera, but the goats won the day.
After Thoughts:
Rob: It is always a good game when it comes down to the final toss of the dice. This was no exception. Snedwos was very careful not to charge into any of my set traps, and he used his shooting to his advantage. In the end that one nerve roll gave me the victory, and I’m grateful. Kudos to Snedwos for a hard fought battle. Despite his short legged guys, he made it one hell of a fight.
Sned: Ugh, I hate those smelly goat people. You have to be so careful with the Herd, because once they break through they’re devastating, not leaving many opportunities for damage control. One small chink, and everything collapses. Brave Kyron should be proud of what his children achieved this day.
******************************************
Herd Vs Empire of Dust – Dominate
Initial thoughts:
Stephen: Dominate is a great scenario for my Empire of Dust. Almost all of my units have solid defence and nerve (some with regen too!) The Herd have some good access to CS/TC with bane chant so I’ll have to be careful that no one unit of mine gets swamped too much. My access to surge should mitigate his speed advantage somewhat as getting out of charge arcs doesn’t always guarantee safety. The plan is to use the priest to target the lighter Herd elements (beast pack and longmanes) with breath whilst the mummies and pharaoh go after the heavy hitters and hopefully win a war of attrition. Giant and skeleton horde to go wherever needed.
Rob: So, I have the tools to fight these guys, If I can get my combo charges going right, which I should be able to do with superior mobility. I fought this army to a draw with a different force when I played it, but he has 3 units with De5+ so I really need my TC and CS, enhanced with banechant when possible to deal some real damage. I also have a mounted shaman who will be going after his priest if he has the opportunity. 2 attacks at 4+ and TC means I might be able to keep him from casting.
Set Up:
The terrain was randomly placed in an alternating fashion.
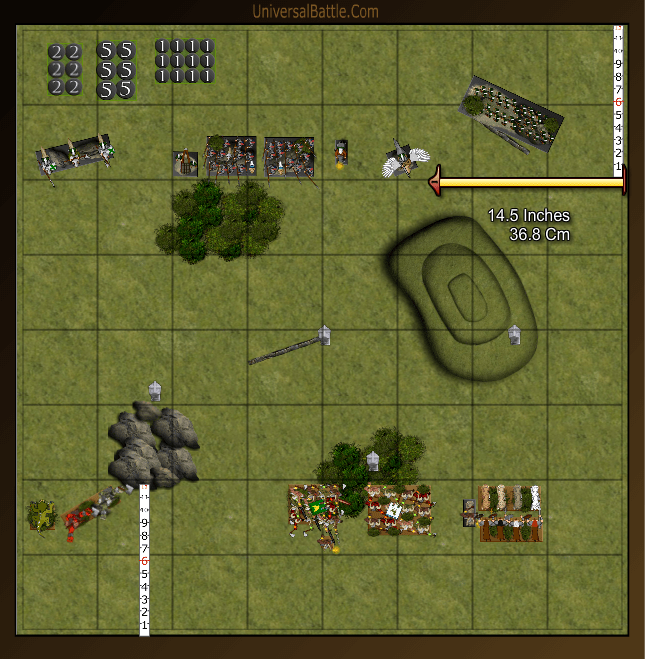
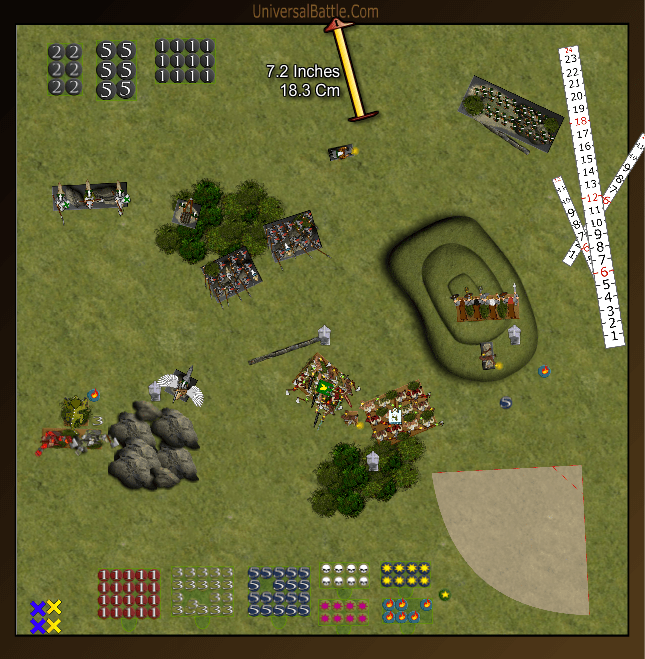
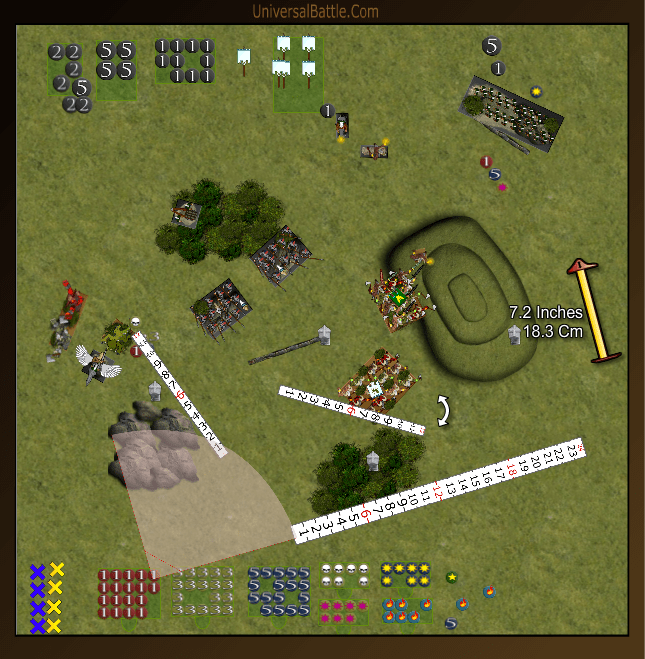
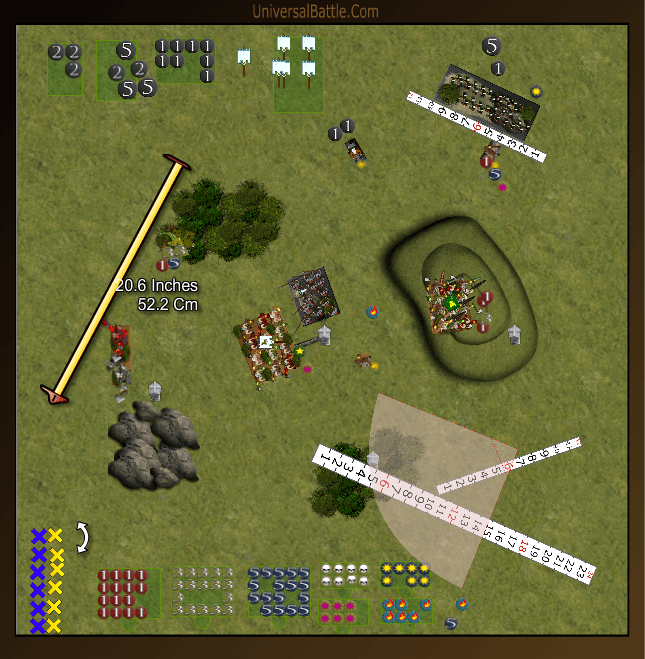
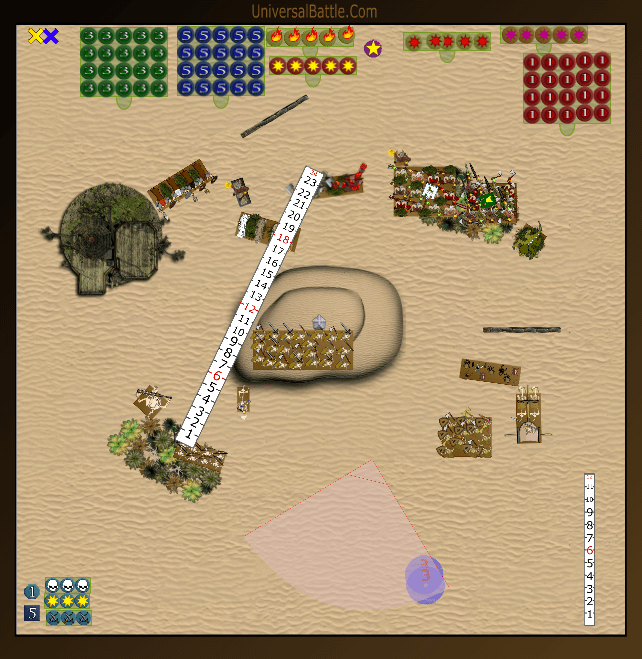
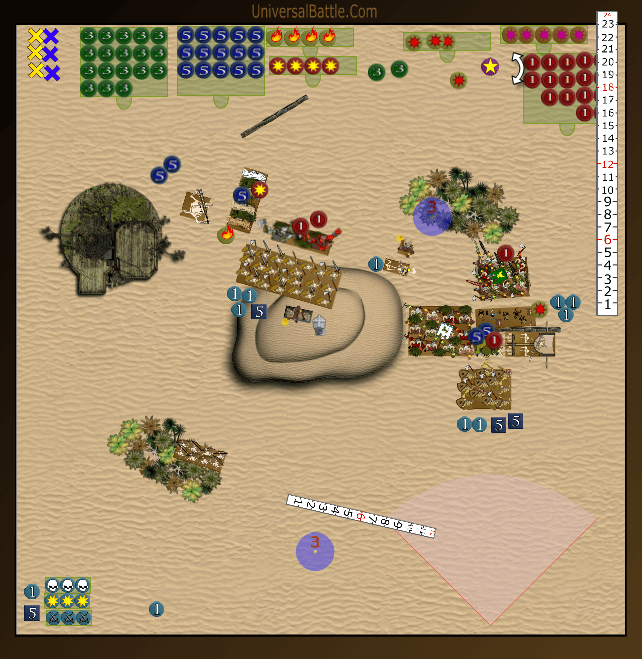
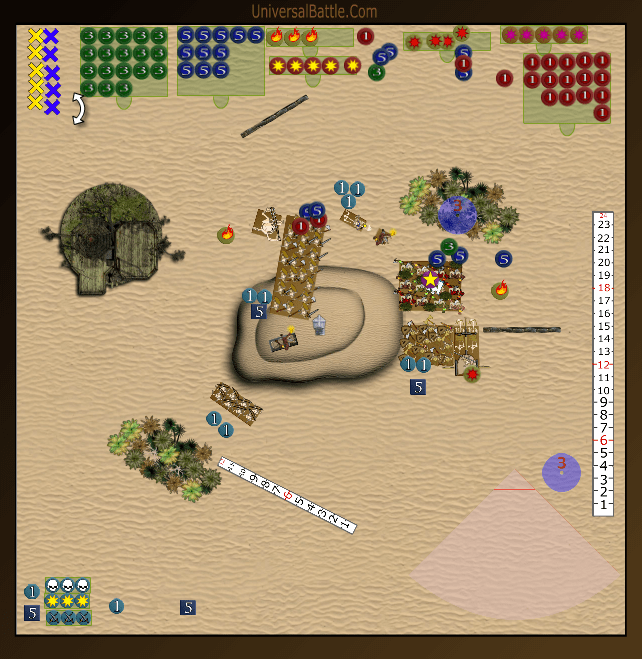
Stephen: I chose the south side and managed to mostly get the match-ups I was after. Priest and skeleton archers to counter the faster elements, with a giant to support them and mummies with pharaoh countering the heavies. Swarm and skeleton horde were placed centrally so they could help out wherever needed. From left to right: bone giant, archer troop, mounted priest with bad breath, skeleton horde, swarm (already vanguarded), mummies and pharaoh.
Rob: I end up with the north side for deployment, and deploy my faster forces on the western flank and my infantry in the east. My full force is, from left to right: centaur longmanes, mounted shaman, beast pack troop, guardian brutes regiment, long horn veterans regiment followed by shaman on foot, spirit walkers regiment, and chimera.
Turn 1:
(Forgot the turn 1 pic, but nothing significant to report.)
Stephen: Almost everything shuffles forward as enthusiastically as undead creatures can. Swarm angles in to try and cut off the chimera from flanking or combo charging with the regiments. Priest takes cover behind the hill ready to toast some targets next turn. In the meantime, he encourages the skeletons to put a spring in their step. The skeletons react more enthusiastically to the dark magic than expected and surge forward 7 inches, on top of the central hill.
Rob: Not much I can do for turn 1. I advance the west using the hill as much as possible for cover, and push the infantry into the forest in the east. The beast pack can see the archers, and are in charge range for next turn, if I can get away with it. They can, however, be shot at in cover by said archers. Where I screwed up was not pivoting the long horns enough to the west. This could matter in the grand scheme of things.
Turn 2:
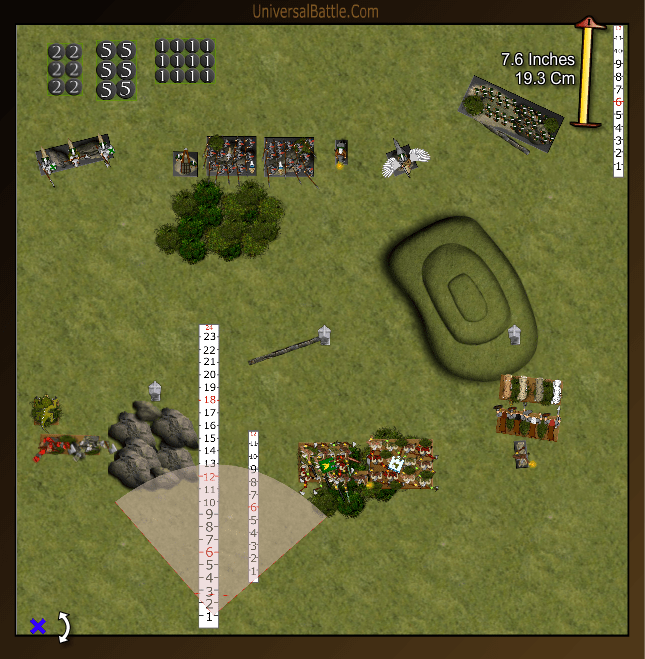
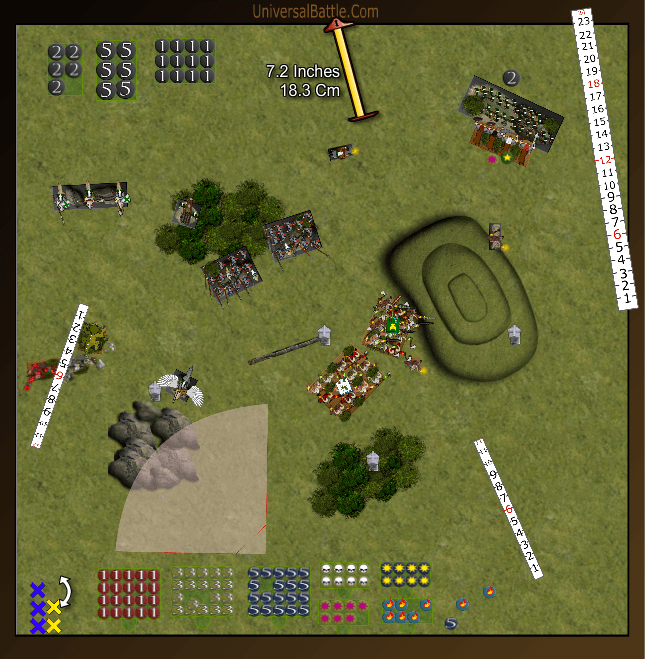
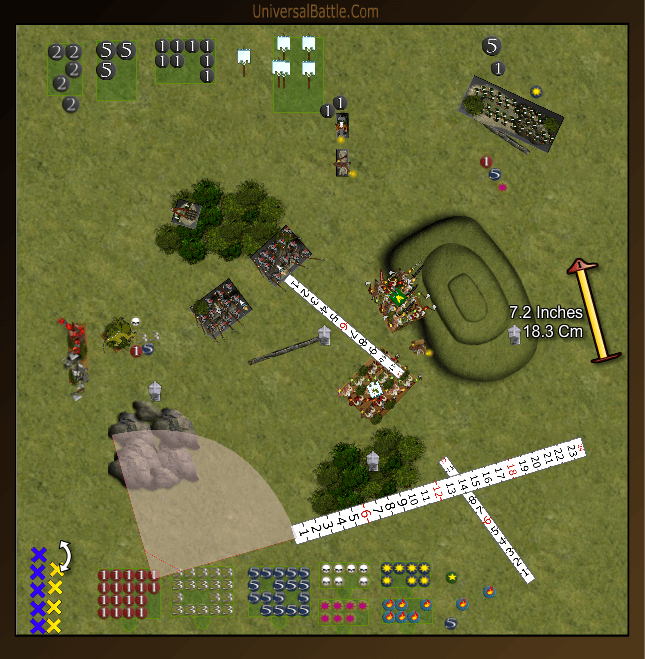
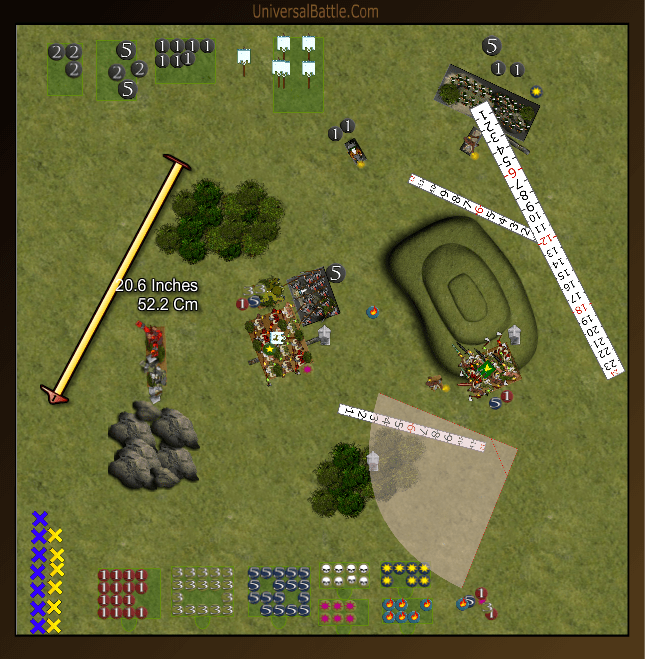
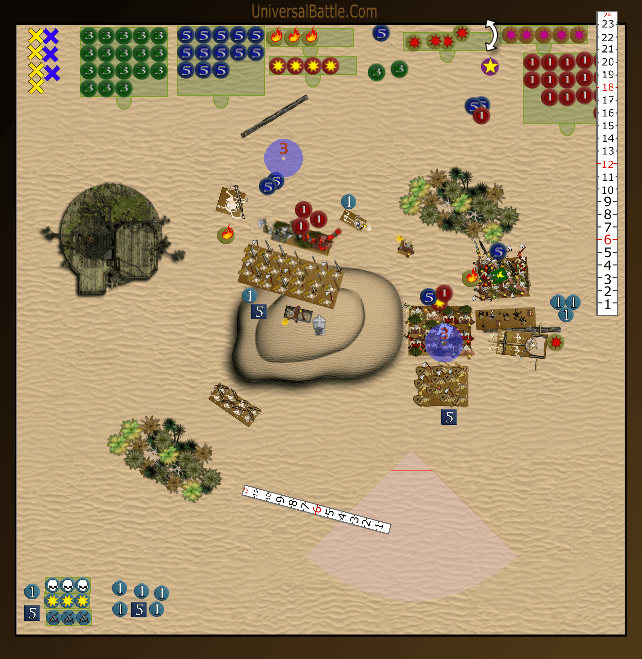
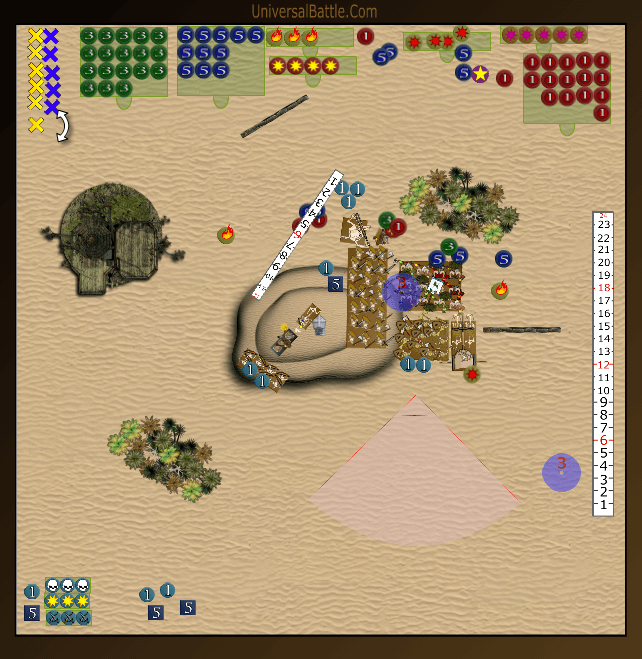
Stephen: It looks like the Herd are taking defensive positions, so undead forces go on the attack. Sensing that they are in relative safety, the skeleton horde charges the beast pack in front of them. Priest uses their cover to breathe on centaurs. Combined with a wound from archer fire, this is enough waver the bestial troops. Swarm advance to try and block chimera and spirit walkers from combining with the longhorns on the mummies. Pharaoh takes a flanking position in case mummies are charged. In combat, skeletons manage a few wounds but don’t waver the pack of beasts.
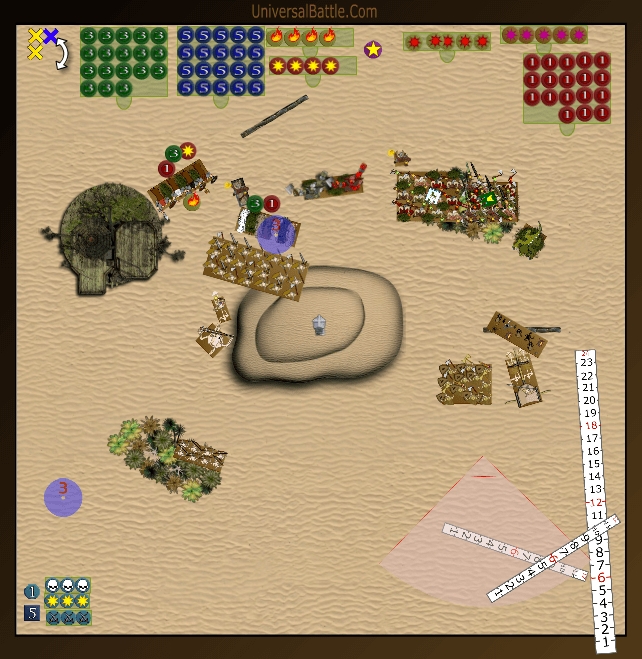
Rob: The intent was to have my longmanes flank the skellies, but that waver took care of that for me. Sad. The shaman surprises the priest a bit by charging him and causing a wound. The beast pack and brutes do only 6 wounds to the skllies which will not even be close to what they needed. Had I pivoted those long horns they could have taken the skellies’ flank, but instead they charge the mummies with the chimera, and despite getting a bane chant, needing 3s to hit and 2s to wound, they manage only 3 damage. The chimera gets 4 damage thanks to a lucky vicious roll. I should also have taken the hindered charge on the swarm, but didn’t for some reason.
Turn 3:
(Started moving before I got the pic, but not too much.)
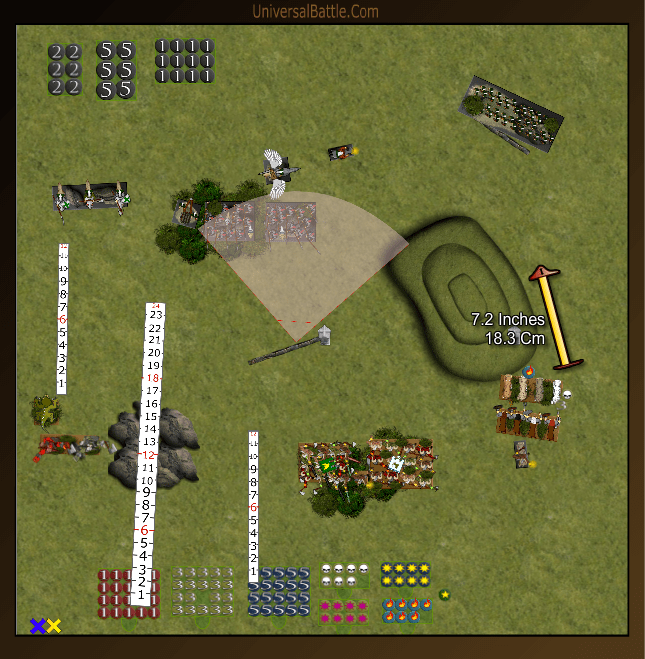
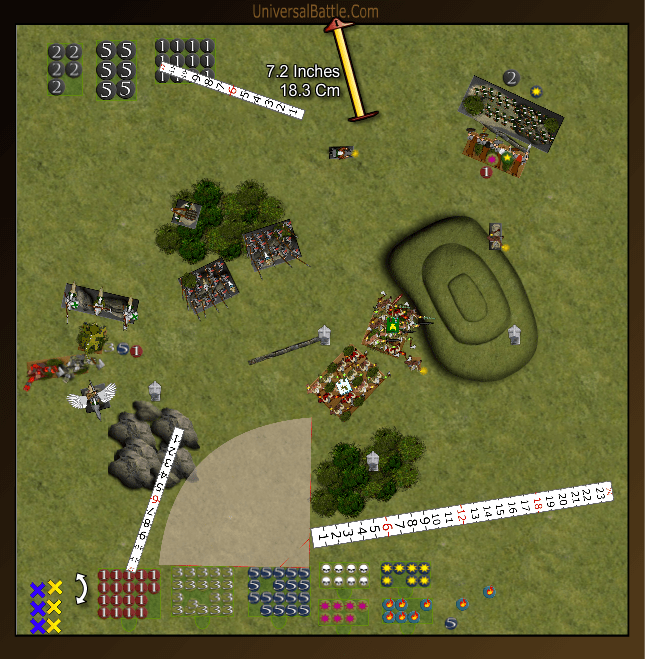
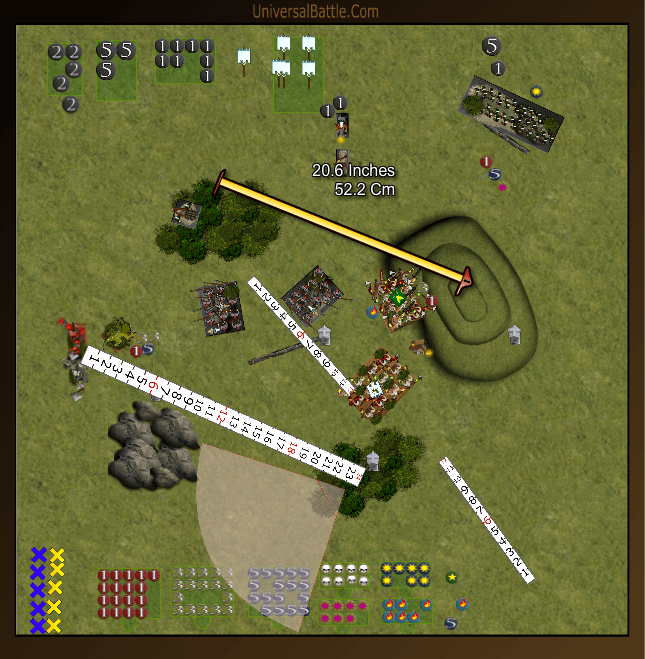
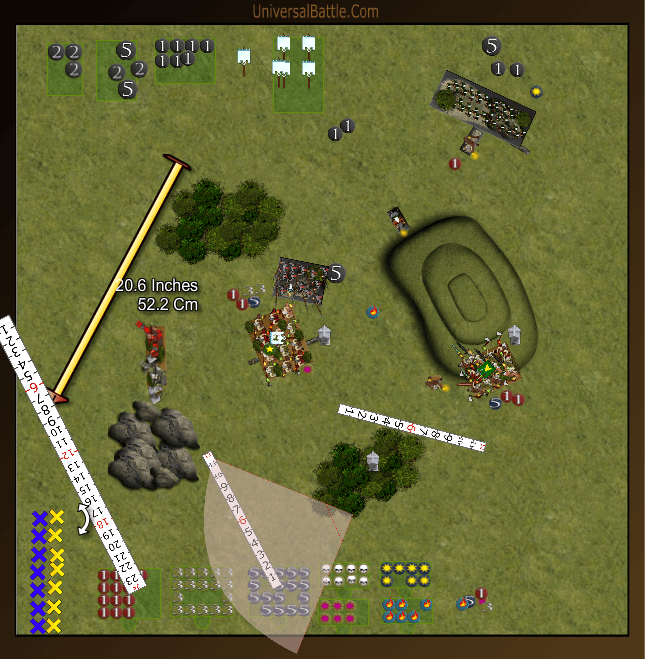
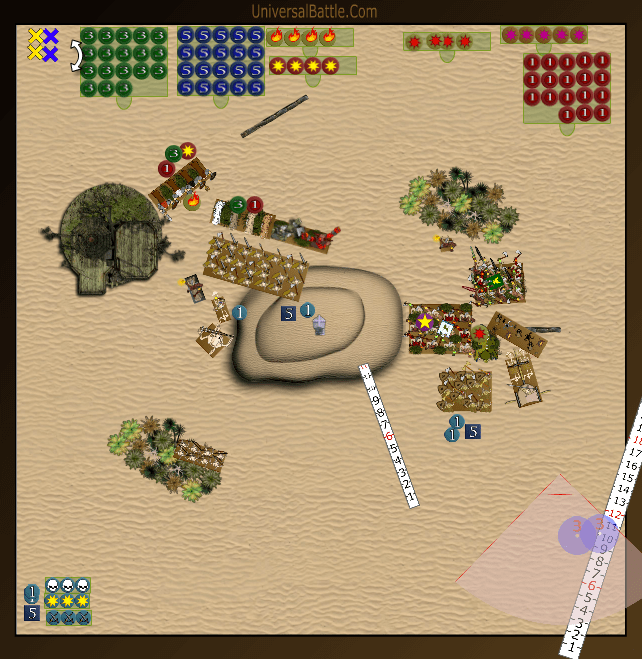
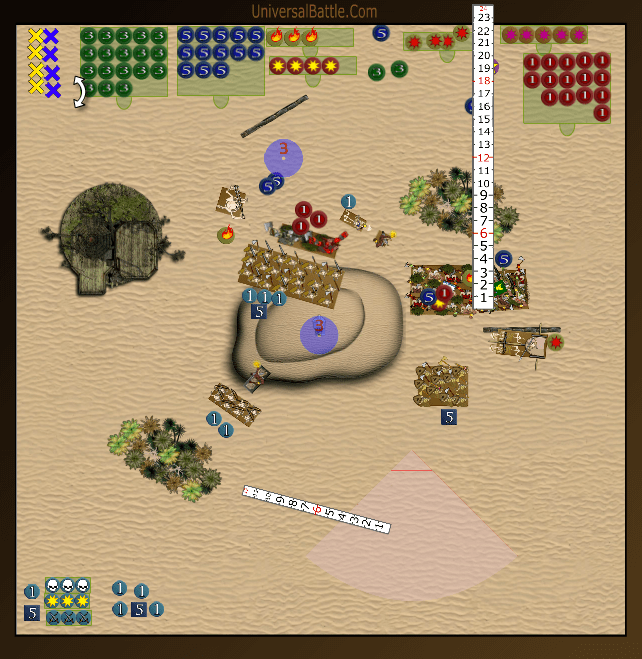
Stephen: Well I underestimated the power of longhorns with bane chant! Luckily, poor rolling on my opponents part gave the mummies a second chance at un-life. The mummies and pharaoh in the flank combo charge the chimera, confident of a sure rout. However the beast is not even wavered and now this flank is looking a bit shaky. Skeleton horde charges brutes which leaves enough room for the giant to lope past and smash into the already shaky centaurs. After disposing of the half-men, the giant turns around in search of more bone replacements. He twisted his ankle on that last charge and needs a nice long bone. The brutes look promising but some mangy beasts are still in the way. In a show of excellence, the skeleton archers manage another wound on the beast pack, wavering them.
Rob: Well, that’s 2 units in 2 turns those archers have wavered much to my detriment. The mummies’ regen and lifeleech hurt as well. At least my chimera is still in the fight, and he and the longhorns have another go at the mummies. They are a scant couple of millimeters in the front rather than the flank, which really sucks. My attack rolls really go south in this fight, and we succeed in routing nothing. The swarm, at least should have been gone, but no such luck. Instead 20 attacks do a total of 3 damage instead of the 7 they should have done. The shaman on foot fails to hit the priest as well, so his breath weapon will be operational this coming turn.
Turn 4:
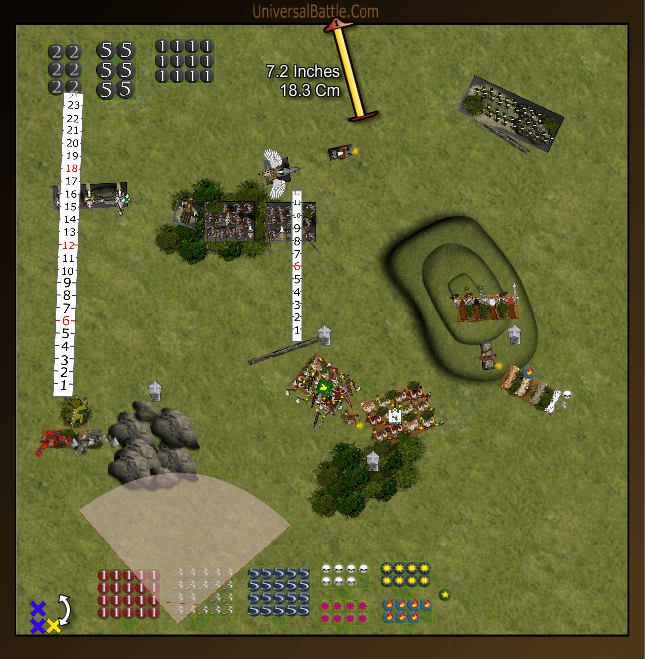
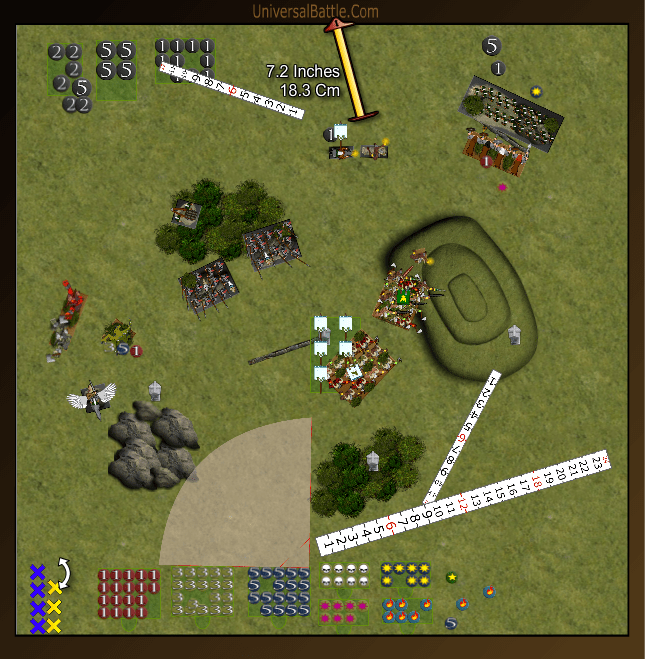
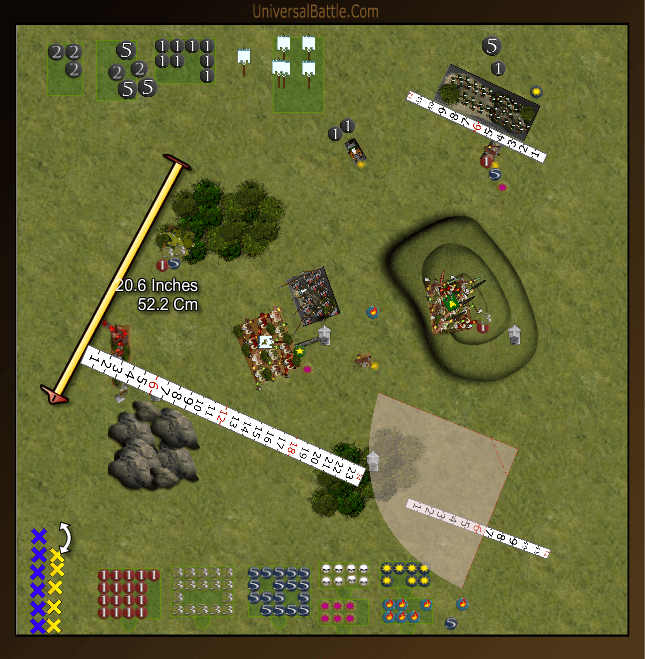
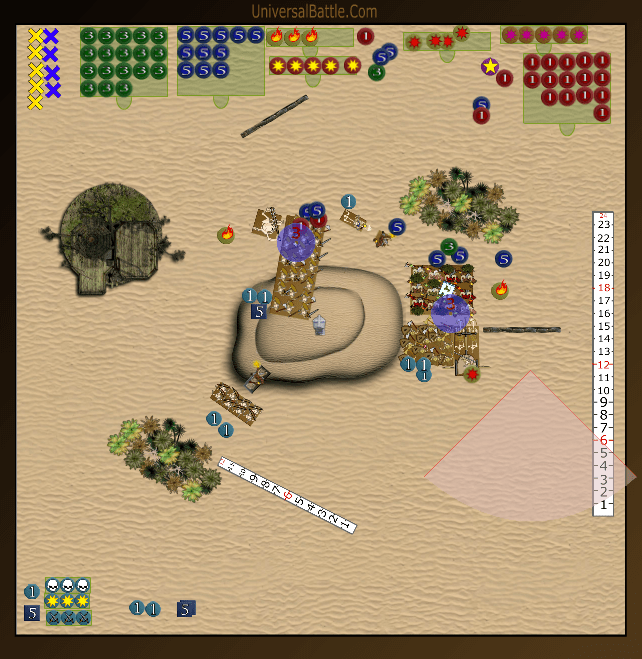
Stephen: My right flank is getting ridiculously lucky at this point. Neither the mummies or the swarm routed, both of which I had given up as lost. With this being the case, the mummies decide to charge the as yet unwounded longmanes whilst the pharaoh finishes off the chimera in the flank. Protecting both of these is the swarm which decides to hold back and let the priest do some damage with his 1000 year old garlic breath. A lucky nerve roll sees the longmanes wavered, which should give the mummies even more time to regenerate their wounds (between regeneration and lifeleech they recovered 7 wounds just this round!) Giant routs the poor beasts in his way and skeletons continue to chip away at the brutes. With no tasty targets to shoot at, the skeleton archers start shuffling towards the middle scoring zone.
Rob: Come on now, three turns of shooting, 3 units wavered. Where will it end? I had a chance, never mind how slim of killing those damned mummies, and my rolling sucks, while his is devastating. On a 5+ he regenerates 6 of 12 wounds, then life leeches another back. At least the spirit walkers finish off the swarm, but only after taking 4 more wounds from a unit that should have not been there. Yep. My frustration is beginning to show. Naturally, the shaman on foot misses his attacks on the priest as well, and the brutes do nothing to speak of. The highlight of the turn is the shaman causing 2 wounds on the archers, who naturally are just fine.
Turn 5:
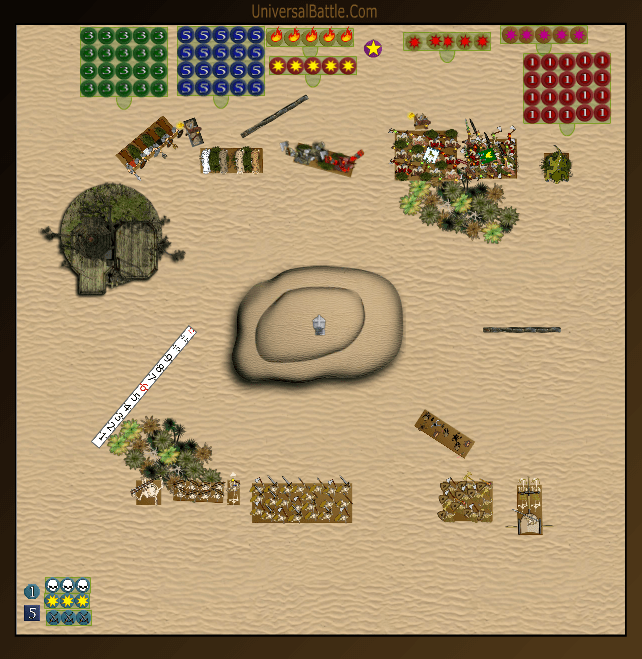
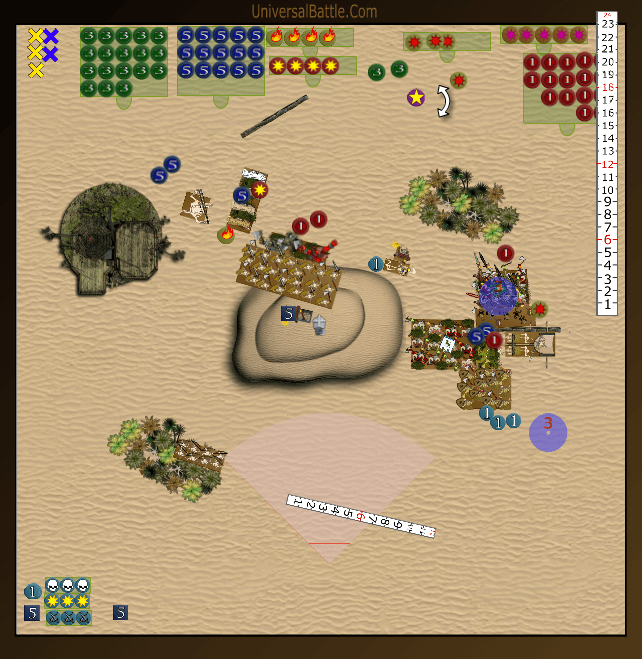
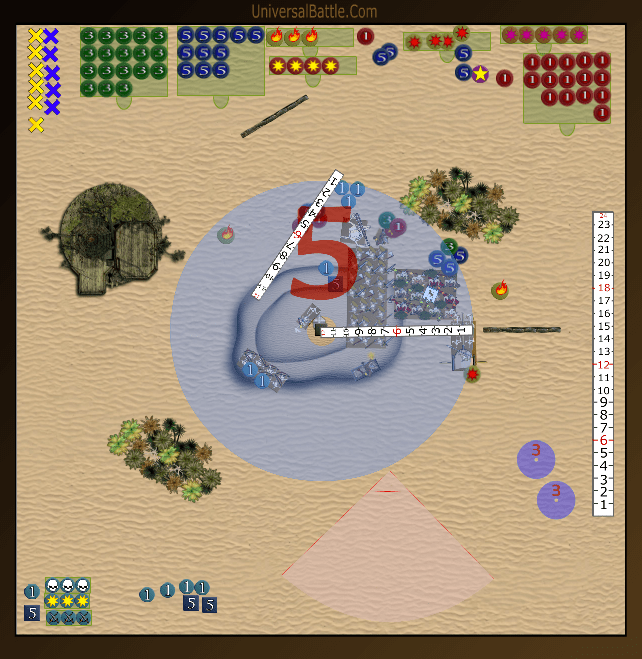
Stephen: With the giant now helping, the skeletons make short work of the brutes (giant finds a nice ankle replacement). Priest again breathes on the spirit walkers who can’t take the stench any longer and decide to spirit away. Mummies and pharaoh combine on the longhorns and decimate them. Miraculously though, a few survivors stand firm and repulse the undead royalty back (rolled double ones for nerve).
Rob: Now my spirit walkers are extinguished with another amazing roll. 9 hits and 7 wounds. The nerve roll wasn’t even close. At least the snake eyes kept my long horns in the fight. Things are looking grim though. We damage the mummies again, and this time, at least, the shaman wounds the priest. Not that it will matter.
Turn 6:
Stephen: OK, now the skeleton horde has joined in with the mummies and pharaoh against the longhorns. Surely they can’t survive. But, again they do. Skeleton archers and priest combo charge the mounted shaman but can’t work out where they left their melee weapons. They last used them about 1000 years ago to be fair. Giant storms in, intent on another kill but this time the shaman is able to repulse the hulking mass of bones with only a few scars to show for it.
Rob: Well, the amazing has happened! Now if I can only capitalize a bit. The longmanes have one last go at the mummies. The mounted shaman casts bane chant, and the attacks begin. Holy crap! We hit 10 and wound 9. The mummies are routed. The die is cast and there will not be a turn 7. Final score: significant win to Dust. Devean gets a 17-3 victory with 650 points killed to 275 for me.
After thoughts:
Stephen: There is a sense of poetic justice (fairness?) in the longhorns surviving throughout the game and finally managing to take out their nemesis. Although it was too little, too late in the context of the game, it was a moral victory for the Herd in a showing that didn’t have many highlights. Better rolling and the herd may have been able to wipe out the mummies in one round which would have made for a far different outcome for the game. Thanks for the game Briohmar, you played well, much better than the result shows. If nothing else, we established that mummies CAN die!
Rob: I think my thoughts on this game have already been noted. I rolled bad, really bad. I did make 2 mistakes in the early game, 1 not pivoting the longhorns, and 2 not charging the swarm earlier. Those should have been recoverable errors, but they clearly weren’t. Well played to Stephen, and wow! To the heroic long horn veterans.
