Formations
When you array your forces for battle, how do you choose to do it? Do you just wait and see where your opponent will place his biggest, nastiest unit and place yours opposite? Do you pair your units so that each has a wingman for a hammer and anvil? Do you set up your forces in a mix of strong and supporting units to try to draw your enemy off of his battle plan? The game starts not on the first turn, but before the first unit is placed upon the table. Knowing your enemy can have a lot of impact on how you place your forces, as can knowing the strengths and weaknesses of their army. You wouldn’t expect a cavalry heavy Kingdoms of Men to sit back and wait for you to come to them; neither would you expect a cannon heavy dwarf army to charge you just as fast as they can. If the dwarfs have a hill in their deployment zone, where will their cannons be? What forces will be set around the hill to protect them? If you are fighting ogres, will they be all across the deployment zone? Or will they be in one or two rather tight knots with a lot of force to attempt to break through your lines?
One dimensional armies do one thing well, understanding what they do, and countering it is the quintessential piece to being a good general, and bringing all of your models home alive. I am going to write out for you four separate formations for your army and discuss with you how to use each one. For demonstration purposes, I will use a 1000 point Goblin list as my aggressor force. The goblins consist of a horde of sharpsticks, a regiment of spitters, a regiment of fleabag riders, a regiment of mawbeasts, a regiment of trolls, two sharpstick throwers, a big rocks thrower, a Giant, a wiz, a flaggit on foot and a flaggit on fleabag.
Before I go on here, let me say a quick word on force selection. I know conventional wisdom tends towards the specialist lists, but I am a huge fan of the combined arms approach. The list above has a little of everything, which means it does everything ok, not great, but ok. I am not a fan of the rock, paper scissors lists that permeated the Grand Tournament scene until they were done away with. With those armies you either won big or lost big, depending on what you played against. I always started middle of the road, so could face off against all comers.
The Echelon:
The echelon formation is a very basic formation that everyone knows in one form or another. In the infantry, this is known as battle drill 1A. Drills are done without thought. The lead element lays a base of suppressive fire while the flanking force over runs from the side. That is it in a nutshell. The echelon is designed to envelop your enemy from one flank while pressuring from the front.
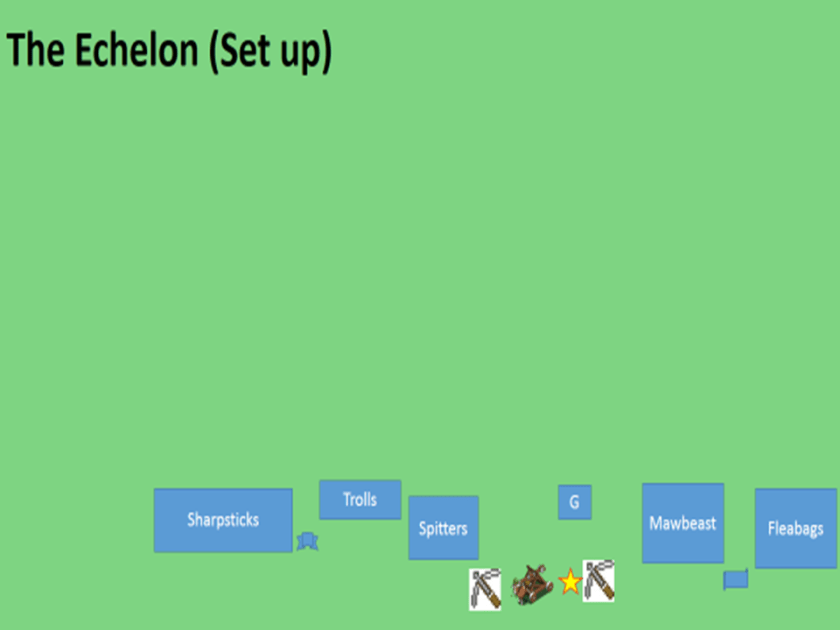
The basis of this formation is that all of your units are arrayed from fastest to slowest so that as they advance upon the enemy they form a diagonal line, with each unit protecting the flank of the unit slightly ahead of them.

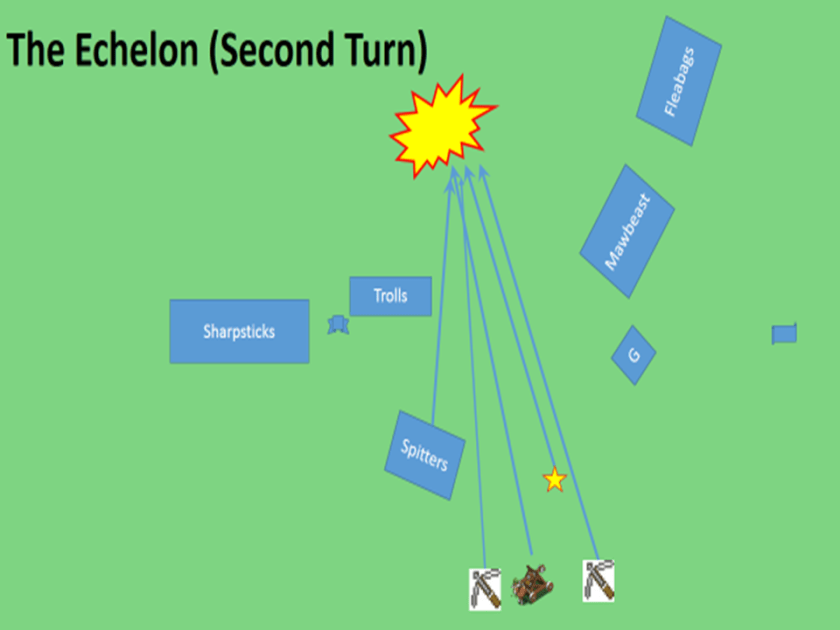
As the lead units pass the enemy’s main battle line they turn inward and roll the flank of the enemy line. Obviously, this type of formation will not work well if your opponent positions all of his heaviest infantry opposing your lightest cavalry, so in a battle where you plan to use this formation, it is wisest to position some of your stronger infantry units first, thus drawing your opponent’s heavy infantry to face off against you.
This type of formation works really well if you outnumber your enemy, say against an ogre, or if your enemy has his forces in a tight formation either in the center of the board or on one of the corners. If you play it right, instead of just hitting an enemy unit head-on, you can hit him head on, in the flank and in the rear all at the same time. This equates to the principle of mass, or getting the right amount of force to destroy your enemy at a critical point on the battlefield.
You may also notice that the shooters, wiz and artillery are massing their fires to weaken the line where the flankers break through. This is by design as well. Artillery prepares the objective, the troops seize it.
There are drawbacks to using this formation, such as what happens if flyers hop right on over your forces? Well, if the flyers are focused on your war machines while your infantry and cavalry are tearing apart his forces, then I guess you can sacrifice your war machines. If you’ll notice though, I have maintained a tactical reserve in the form of my little wiz and my spitters regiment, who will remain back to cover that aspect. If a unit of flyers does threaten, they will face up to 3 zaps, two sharpstick throwers, 10 arrows, and possibly a big rock (depending on how close they get). Again the principle of mass comes into play, in this circumstance it is massing of fires on a single target to destroy it, instead of massing forces to rout them. Most units of flyers are small anyways, and with lower nerve, enough hits will make them think twice about what they’re doing.
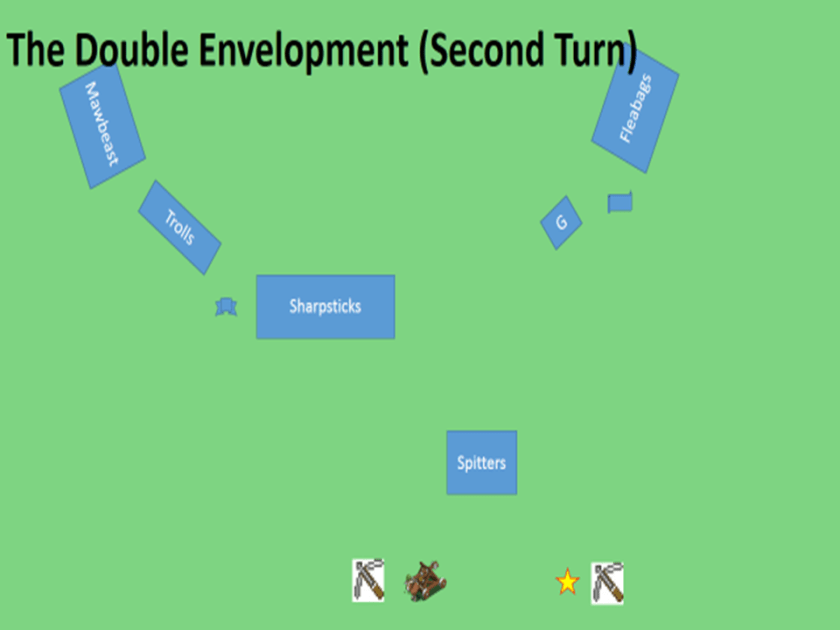
The (Dreaded) Double Envelopment
Anyone familiar with the movies Zulu and/or Zulu Dawn are familiar with the bull beast horns. The Zulus lined up their forces into three different formations, the head, the horns (one on each side) and the loins. The head advanced straight up the middle, drawing the attention and brunt of the enemy commander’s force, all the while the horns were encircling the enemy formation, and the loins (which contained the best and most elite warriors) would hold back until it was time, and then the head would fall back, the loins would attack frontally and the horns would attack flanks and rear, all simultaneously. LT Chard was warned about this formation by the Boers, and maintained a 360 degree perimeter for the entire siege of Rourke’s Drift, effectively fending off a second massacre of British troops in a three day period.

The secret to making this work is to keep your enemy focused right in the center. A bold frontal strike with a large display of force gathers, and holds, the opposing general’s attention, while the faster weaker forces make their way around on the flanks, until suddenly, the whole thing collapses in on him. Obviously on a table top battlefield this is slightly harder to do because he can see the whole table, just as you can. Still, the principle is sound.

If your enemy’s force is smaller than yours, you need to make a strong showing in the center of the field to force him to deploy the majority of his forces there, opposite yours. This allows you to place your faster forces towards the end of the deployment, unopposed.
Gods forbid if you are allowed this privilege, as the battle is over before it even starts. Even if your opponent can flex from his initial deployment to respond to the threat on one flank, the other is still there, messing up his day.
If your forces break through on both flanks, it gets really messy really quick for the enemy.
The Wedge
Yes, the wedge, no not the wedgie. This was a favorite tactic of mine when I used to play my Medieval Knights in the 5th edition of that other game, and the paladin in the lead lance always had virtue of the impetuous knight so that even if my lead unit was charged, I could counter-charge. A friend of mine said I was a one track mind: “hey diddle diddle, everyone up the middle.” but, it worked.

The main intent of the wedge is for the fastest, hardest hitting unit (or two units) to punch through the center of the enemy line.
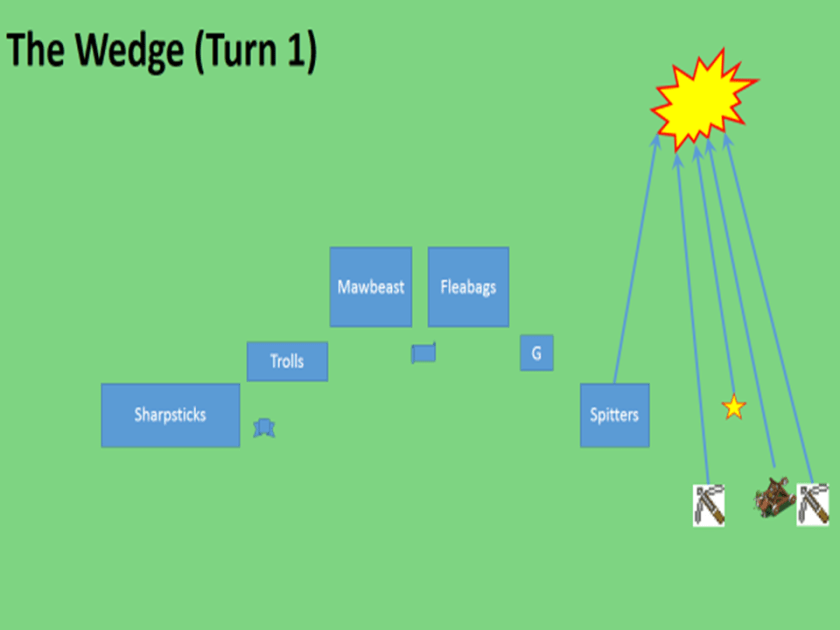
Again, as you notice each subsequent unit is stacked left or right in a supporting position, thus protecting the flanks of the lead elements.
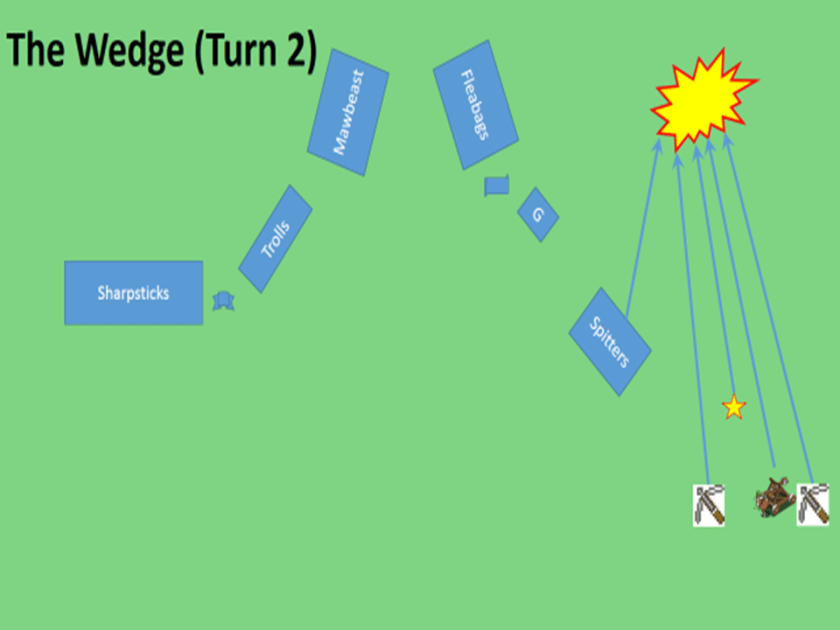
The second tier strikes next, as the leaders punch through, thus widening the gap. Once the gap is formed, the enemy now has two separated forces, and is less capable of supporting both. The lead forces, as they punch through are now able to peel of left and right and romp through the enemy secondary, doling out flank or rear charges at their discretion.
Some of you have already identified the tactical flaw in this plan, which is, what if flyers plop down in the center of your wedge, just where they can’t be charged by anyone. Well, you are correct, and this is where we play risk management. If you have a reserve unit that can fill that gap, then problem solved. If you don’t have a reserve, well, it’s a risk you have to face.
The key to using this or any of the other tactics I have discussed so far is that you have to strike swiftly and with force. You have to get inside your opponent’s decision cycle, and force him to react rather than allow him to act. This is the principle of offensive (or initiative) in action.
The Castle
What does one do when one has short legs, a short temper and a lot of heavy armor? Well, you either climb onto the back of an equally short-tempered animal, say a badger, or you hunker down and wait for your enemy to come to you, shooting the hell out of him as he approaches. Castling up into a strong defensive position can give your enemy a huge headache. Just ask the Zulu commanders who attacked Rourke’s Drift. When I was infantry, we used to say if we have to dig in, we’re going to dig well, because the hole we create is likely the one we’ll be buried in. Defense is not my favorite tactic. I will admit it, I am fairly impatient when it comes to getting stuck in, sometimes to my own detriment. When I run a shooting heavy (well heavy for me) KoM list, I know that my greatest strength lies in weakening my enemy as he approaches me, and then knocking him out when he gets close enough. That doesn’t mean I always do it, it’s just that I know it’s what I should do.
The castle doesn’t really lend itself well to some armies, but forces like the dwarfs can definitely benefit from it. If I castle up I like to have alternating units of shooters and melee troops with some reactionary forces (ala the Mawbeasts on the wings in the graphic.) This is ye olde pike and shotte routine.
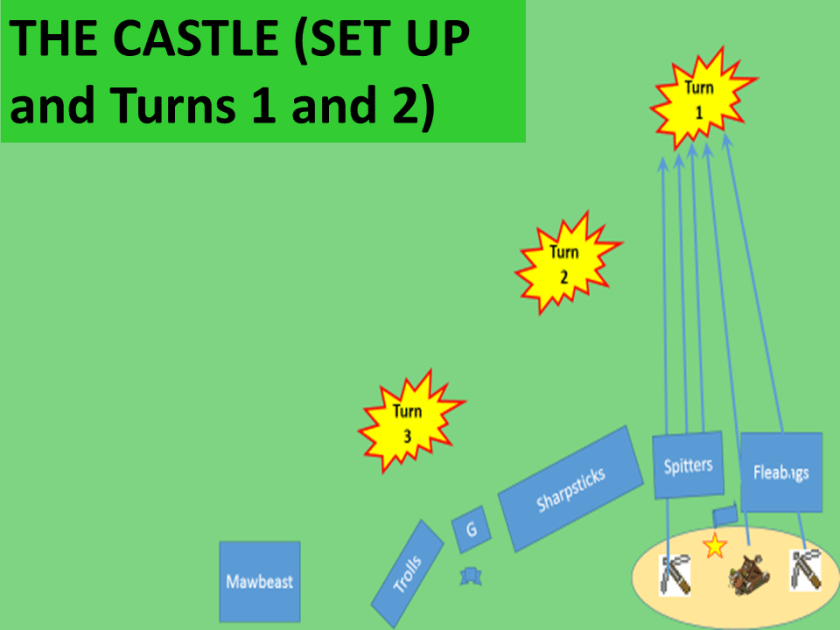
Force your enemy to come to you while you shoot him, a lot! Then either charge him when in range, or wait until he charges you and stab him with everything you’ve got. It is important to remember when you set this up that every missile troop should have interlocking fires with the next ones over. Again, mass is not just massing troops, it is also massing fires. This is the downfall I have seen with many players who castle up: they tend to shoot at multiple targets across their entire frontage instead of focusing their fires on one or two units a turn.
When fighting from a defensive formation, it is important to hold your ground, if someone charges out of the formation, it creates an exploitable hole in the line, unless it is patched with the reserves. The break out unit will almost certainly be run down as well, since he no longer has security around him. When you go to do this, ask yourself: “Am I really going to win this combat? What is the secondary effect of me doing this charge?” If the break out unit can win the combat, and it gives him free access to the rear or flank of the advancing enemy, then by all means execute, but ensure you dress the line so that no one will get through. If you are taking on the castle defense, here are some things to consider: there is likely no weakest point, how much damage have I taken getting here, do I smack into the wall piecemeal or strike at multiple locations simultaneously, where is the defense situated, and have I kept a reserve to exploit any breakthroughs.
To get into the decision cycle of a castled enemy, you have to be willing to sacrifice units, but also offer up a target rich environment. The defensive player wants to mass fires on your units to wipe them out, while you want him to have to split his fires across the width of his line, thus spreading the hits more evenly and allowing more units to charge simultaneously. Obviously, the defender wants to mass fires on fewer units causing greater casualties and then charging out only when units are wavering or on the borderline. For dwarfs, this puts rangers into a significant category, if you were trying to figure out a use for them. Rangers can both shoot and fight well, so why not hold them right there in your line as shooters until it is time for them to fight. Elsewhere, alternating Ironwatch with close combat troops gives you a huge potential for turning a doomed defense into a significant victory. Oh, and keep your brock riders somewhere close by, you never know when they just might be offered up that tasty enemy flank or rear.
An important thing to consider on any of these formations is what you may be matching up against. An echelon left or right may be the best choice when fighting against a castle defense as all of you units will approach the defensive line at approximately the same time. This causes the defender to spread his shooting out over a wider area instead of massing fires at one location. A wedge formation is likely not the best choice against a castle as the defender then need only concentrate fire on the lead element, and work his way back in subsequent turns. An Echelon may work well against an opposite echelon or double envelopment, a double envelopment is amazing when fighting a wedge. In essence, the fastest forces of each side hit the slowest and strongest of the enemy’s forces. Then it comes down to a slug fest and see who breaks through first.
The final thing to think about is how the terrain and the enemy will impact the battlefield. And that is the topic for chapter 3.
