METT-T
I mentioned in the first chapter that I should probably address METT-T and OCOKA in follow on chapters, but I didn’t mention what they are. METT-T is Mission, Enemy, Troops available, Time and Terrain. OCOKA is Observation and fields of fire, Cover and concealment, Obstacles, Key terrain, and Avenues of Approach. METT-T are the factors to consider when making your battle plan, while OCOKA are factors directly related to the terrain you are fighting on, and thus fall under the Terrain portion of METT-T.
MISSION:
So without further ado, let’s talk about mission. Mission corresponds directly with the Objective principle, but it should be a bit more formal, and over-arching. When I used to teach my client units about writing a mission statement, I made them write it with the 5 W’s (who, what, where, when and why.) This is also referenced as task and purpose. The scenario for the game you are playing will dictate a strong portion of your mission. If the scenario is a kill, then that makes your life fairly easy. The mission statement becomes The Azertians obliterate the enemy in the center of the board not later than turn 12 in order to win the game. Now your army, or in this case my army, know exactly what they have to do, where they have to do it, when it has to be done, and why. But what about the individual regiments, do they know their specific roles in this battle plan?
The above mission statement meets all of the requirements, but it doesn’t really help me all that much on the table-top. And what if the scenario is pillage rather than kill? I spoke in chapter I that when you put each unit on the table it must have a specific purpose.
- When I put down my heavy cavalry, their mission is to punch through the enemy line in a soft spot and flank attack the rest of the enemy army to create the necessary mass I need to defeat the enemy units.
- Medium cavalry and/or flyers have the mission of destroying enemy artillery to protect the main battle line, or to prevent the heavy cavalry from getting shot to pieces before they can get their flank charges off.
- Elite Infantry may have the role of taking and holding an objective, or of providing the anvil for the unit the heavy cavalry will crack with their flank charge.
- Standard infantry may be assigned to seize an objective, be the flank protector of the heavy infantry, or anchor themselves against a piece of terrain to deny the enemy access to their area of effect or influence.
- Missile troops are to soften enemy units before they are hit by the heavy infantry or cavalry, or may be to protect artillery from being hit by the enemy’s medium cavalry or flyers.
- Artillery has the job of pounding the enemy’s strongest units to soften them up before making contact, to weaken an enemy unit at a possible breakthrough point, or to mass fires with other missile troops to try to create a break in the enemy battle line. (For the record, massing fires from archers, crossbows, or arquebuses and cannon, rocket, or mortar fire can remove a unit from the battlefield on the first or second turn. I have both done it, and had it done to me.)
- Monsters may have the task of holding a flank against enemy penetration, or of being a hard hitting unit that can function similarly to heavy infantry.
- Light infantry or cavalry/fliers, at least in my armies, have the dubious honor of being the first to die. They are there to screen a more important unit, draw attention away from another portion of the battlefield, or be the bait for a trap. The old game I used to play allowed me to have 30 point units of dogs who were heralded as heroes if they made it past the third turn of a game. My current Abyssal army has 2 units of gargoyles named “Meatshields” and “Fodder” who are elected to this rather thankless task.
ENEMY:
When developing a battle plan, it is always important to remember that the enemy gets a vote. Your perfect battle plan may not work if the enemy’s perfect battle plan is better. The lesson here is that you must take into account the forces your enemy has, and what they are likely to do, because, as they say in Murphy’s Laws of War, no plan survives first contact intact. Defining your missions/objectives pre-deployment will help you to place the right unit in the right position to achieve mass at the critical point, but your opponent is likely doing the same. I will discuss the art of deployment in Chapter 5 of this treatise.
When your opponent unpacks his army in preparation for the game, what are you looking at? Does he have an infantry heavy force supported by some cavalry, shooters and artillery? Does he have base upon base of cavalry and other fast moving forces like flyers? Does he bring out artillery piece after artillery piece? A pure cavalry force lends itself well to a fast attack strategy such as an envelopment (single or double), or a wedge. Against a combined arms force you should expect an echelon left or right, based upon which side of the board the terrain favors most. A gun line is going to most likely castle up either right in the center of the board or to one side or the other.
You should also try to guess what your opponent is planning to do with each of his units is planning to do as he places them on the board. Try not to let your enemy’s deployment interrupt your own battle plan, but be mindful of what he is likely planning to do.
The above are key factors of the E in METT-T. Understanding what your enemy is planning, right from the start of the battle will give you a huge advantage in the game. If the opponent places a screening unit on the far right or left of his deployment zone, you can just bet that the unit he most wants to protect (i.e. his heaviest hitters) will be right behind them. Light or medium cavalry/fliers on the flanks of one’s force is always a good solid first placement unit as that is what you’d expect to see them do. Though that first unit may just be a ruse.
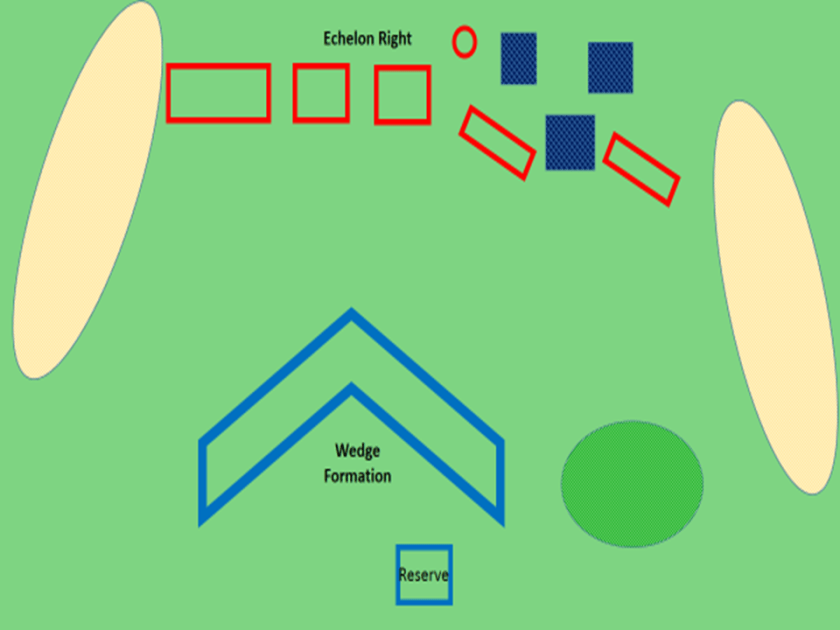
If you think the terrain favors your forces in an echelon right formation, and your enemy appears to be lining up his in a wedge, where is the defining combat of the battle likely to take place? If you said on your side of the table in the middle of the field, you’d probably be right. What unit should you have there to meet that unstoppable force? I would say an immovable object. A horde of pikes or spears is exactly what you want in the center of your force, with a covering force of great weapons or pole arms, and maybe a bane chant enabled mage to give you some armor piercing extra oomph.
TROOPS AVAILABLE:
This brings us to troops available. As a general, you may not always have the exact troops you need to crush the enemy. Thus you have to make do with what you have on hand. The discussion on selection of armies has happened so many times, and on so many forums, that I don’t really want to rehash it here. I have stated that I favor a balanced, combined arms force more often than not. In the example above, I mentioned having that spear phalanx or pike horde right in the middle of your line to repel the cavalry charge. What if you don’t have one?
If you bring an all cavalry army, and your enemy shows up with dwarves, complete with 4 war machines, 3 regiments of Bulwarks, and 6 troops of shooters, you already know you’ll be facing down a castle or denied flank defense, but none of your forces are the right ones to charge. What if you had three trebuchets to support all your knights and mounted sergeants? Would you stand a better chance? What about flyers? A Hero on a winged beast could fly over the shooters and spearmen to chew up the artillery, but your cavalry are going to be hard pressed to get there.
Also bear in mind that there are 6 (actually 8) possible scenarios you will be fighting. If you are prepared to fight a strict defense using your gunline, how will you do in an Invade, Dominate, Loot, Control, or Push scenario? The answer is: you’re going to lose. More than 50% of the scenarios do not favor a gunline list. Thus I, personally, don’t recommend this build to anyone unless you are absolutely certain that you will be playing a kill scenario, and thus points denial.
The question you have to ask yourself is: “What list do I take that will perform well on all 6 (8) scenarios against enemies from 22 different army lists, each with multiple viable builds?” That right there is the real question when playing Kings of War. My current build with my abyssals is proven to function fairly well with 7 of the 8 scenarios (Push is the one scenario I really have not yet mastered.) The list is also built to give any army a run for its money and the majority of my games come down to which force has superior tactics, rather than which has the best gimmick.
TIME:
Time is a critical resource. Napoleon once told his generals that they could have more of any resource they wanted, except one: time. I can’t tell you how many games I’ve played that have been draws or losses because I simply ran out of time. I tend to think my moves ahead by considering this: “Action – Reaction- Counter Action.” What this means is when I move my figures this turn, I am anticipating my opponent’s response to the move, and what I will do on the next move. This means I have to think this way about my enemy’s movements. If you are playing a pillage scenario, when do you want to seize the objectives? Do you want to make a mad grab for them on your first turn? Do you want to wait a couple turns to soften up the enemy resistance before grabbing them up right at the end?
A game I played yesterday on a loot scenario, neither I nor my opponent picked up a loot token until turn 5 of the game. I have seen games where a unit will snatch up all 3 tokens on turn 1 or 2 and then it becomes a Tom and Jerry cartoon. One cat grabs the mouse and runs, the other cat hits the one and takes the mouse the other direction until he, in turn, gets hit just as hard. Managing your time available really does matter in this game, especially when it comes down to certain scenarios. I can’t tell you how many games I’ve snatched victory from defeat because of a 6th turn master stroke, or lost a game because of 1, or because a turn 7 was rolled (or not rolled.)
TERRAIN:
Aside from understanding the enemy’s force, you also need to look at the terrain. A fairly open battle field can be a benefit or a hindrance, depending on your, and your opponent’s, force structures. Generally, 4 – 8 terrain pieces makes a good enough table top for gaming, but you as the aspiring general need to know how to use that terrain to the best of your advantage. The 5 letter acronym for terrain analysis is OCOKA, or: observation and fields of fire; Cover and concealment; Obstacles; Key terrain; and Avenues of approach. Let’s take a look at each of these individually, shall we.
Observation and fields of fire. It is important to note that terrain, just like tracers, work both ways. If you can see the enemy, then he can see you. If you are taking extra care to get your knights into a position to flank charge that enemy unit, the enemy may have figured out what you are planning and have a surprise for you. Just as you finally get into perfect position, a barrage of artillery fire may just ruin your day. Using terrain to mask your movements from the artillery and shooters is the preferred method to doing this, but remember your enemy may be using that same piece of terrain to do the same to you.
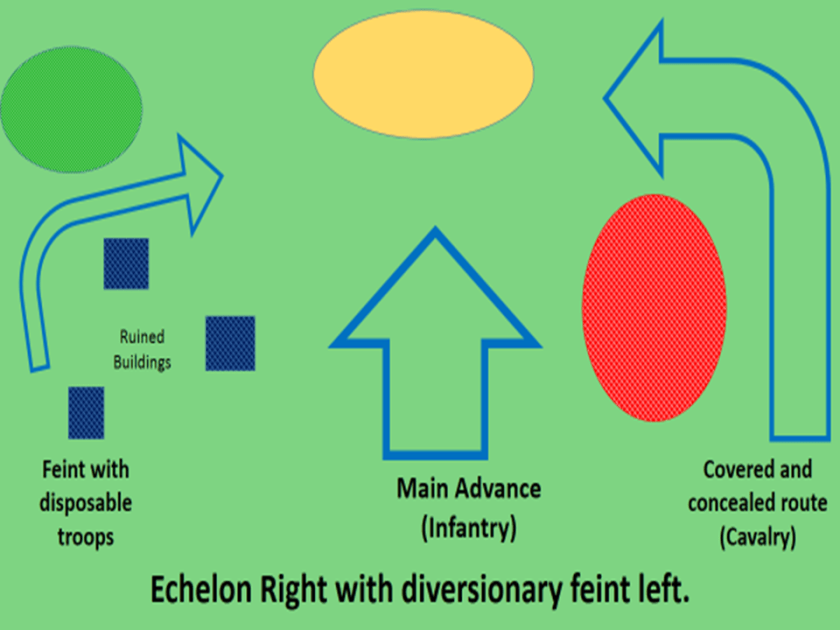
Cover and concealment. Cover protects you from being shot, concealment keeps you from being seen to be shot. It’s important to remember the difference. Use a covered and concealed route to get you forces into position to hit the enemy at the decisive point (see mass from chapter 1.) There is a delicate balance in the covered and concealed route plan. If you can have cover and be out of line of sight from the artillery, you stand a strong chance of making it into the enemy’s line. That being said, in order to charge, you will have to leave yourself open to one round of shooting before you charge in. If you have other threatening targets at the same time, your knights may not take the brunt of the shooting. A small diversionary unit of flyers or scouts in range to charge the artillery on your third turn will be a higher priority than your knights about to break through a unit of enemy infantry.
There is a difference between risk management and risk averse. Risk management means being willing to take a chance to achieve your goal, and using other factors to reduce the risk. Risk averse means not being willing to risk at all. In one game of Kings of War, my opponent, playing Kingdoms of Men, had his entire force castled up in the center of his deployment zone with a mix of artillery, shooters, foot troops and cavalry. He chose to incorporate the knights into his defense line, and they refused to charge out, even when they had a perfect opportunity to crunch a troop of chariots. The end result was that his knights ended up dying to a man in their original position, when charged by said chariots and a troop of gore riders. My opponent was risk averse, and paid for it, while I was risk managing, because I had multiple units in place to charge, which caused him to split his fires over a wide area instead of massing in one or two critical points.
Obstacles disrupt charges. They do this well. In this discussion we shall refer to obstacles as both manmade and natural. Natural obstacles are difficult terrain. Difficult terrain hinders units without pathfinder or strider when charging. It is quite beneficial to keep your anvil units just in a piece of terrain so they are protected from a charge, while a hammer unit to the side has unhindered flank attack options. If you have the opportunity to defend a manmade linear obstacle (such as a wall or hedge,) with your troops, do so (unless you have a specific reason for that infantry to advance.) A gamism of Kings of War is that you want your Infantry, especially your spear or pike phalanx to defend said obstacle from one inch back. This means that a charge against them will already be hindered, and when your unit counter charges, they will not be. The obstacle also provides cover against shooting. Cavalry should not defend, that is not their role. Obstacles can also defend you. If you can anchor your troops in a position where an obstacle or terrain piece protects your flank, by all means, do so. I love it when I can anchor the flank of one of my units against a ruin, building, forest or other piece of difficult terrain. This gives me an economy of force option. I no longer have to use one of my units to protect that flank, and instead can send them elsewhere.
Key Terrain is just that; the most important pieces of terrain that you must control in order to win the game. Key terrain for a gun line is the hill they are castled up around. Key terrain is that building marked as an objective in a pillage scenario. It can even be that hill in the center that protects your forces from being shot until they are in position to charge. However you look at it, there will only be one or two pieces of key terrain on the table. What makes them truly key is that they must be in your control throughout the battle, if possible. When you designate a piece of terrain as key, it means you will dedicate the resources necessary to take and hold it.
Avenue of Approach, sometimes called axis of advance, is one of the most important factors in deciding what tactical formation you should adopt. A clump of trees on your right flank when facing off against a defensive opponent is practically begging for an echelon right formation. All of your fastest units will use this terrain to screen them while moving into position to break through while your infantry advances in plain sight up the middle.
Significant difficult terrain on both sides of the board could dictate a wedge formation, fast and furious right up the middle.
Matching your Formation
Now that we’ve provided some of the basics, let’s discuss some matchups especially as they relate to METT-T.
There may be good reason to advance all your forces online up to a point. If you do this on your first turn, it may mask your intentions. In some games, I may not launch the envelopment force until the second or third turn, but this is acceptable. I am doing this for a specific reason. I am trying to create a “target rich” environment or keep my opponent off balance. If all of my forces advance online towards a defending enemy, who do they shoot at first, or do they disperse their shots across the entire frontage? This is what I am attempting to do by this type of advance; cause my enemy to not mass fires on any one element, of course.
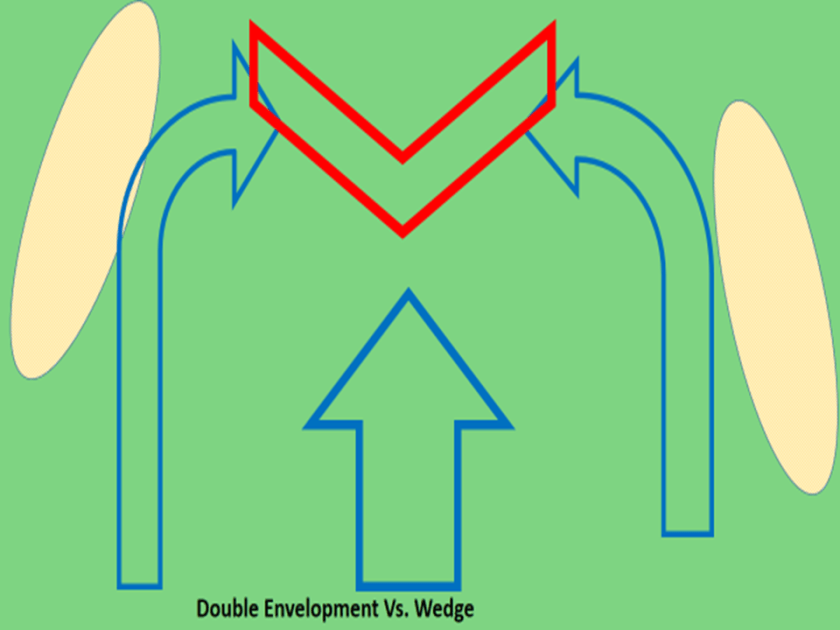
Looking back at my wedge formation from earlier. If I were the enemy, I would set my forces so that I could use the terrain to my best advantage, in this case, an echelon right. A double envelopment might also be the choice, but it wouldn’t be as strong.
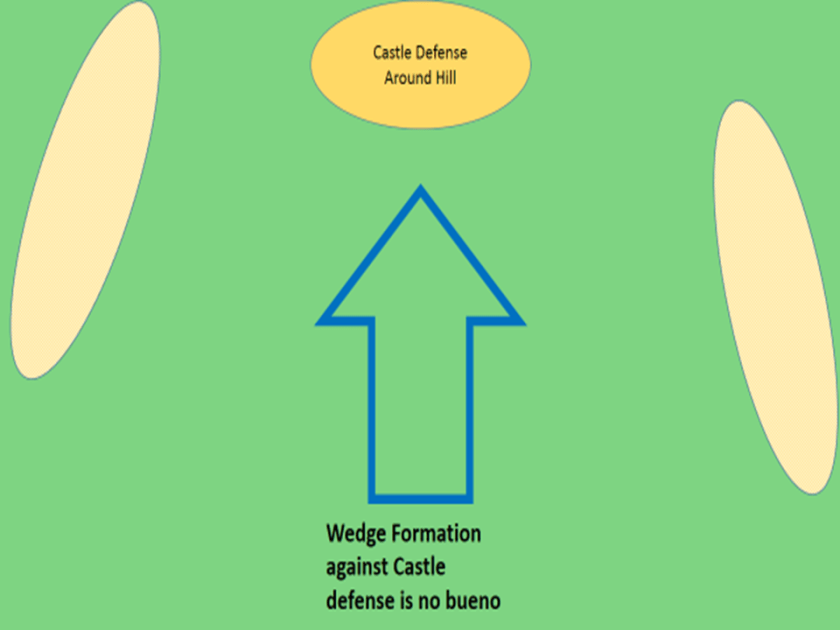
If my enemy were castled up around a hill in the center of the battle field, a wedge would not be the best way to go. As I advance my wedge, it allows the defending enemy to mass fires on one unit at a time. This is a sure fire way to lose your most critical units.
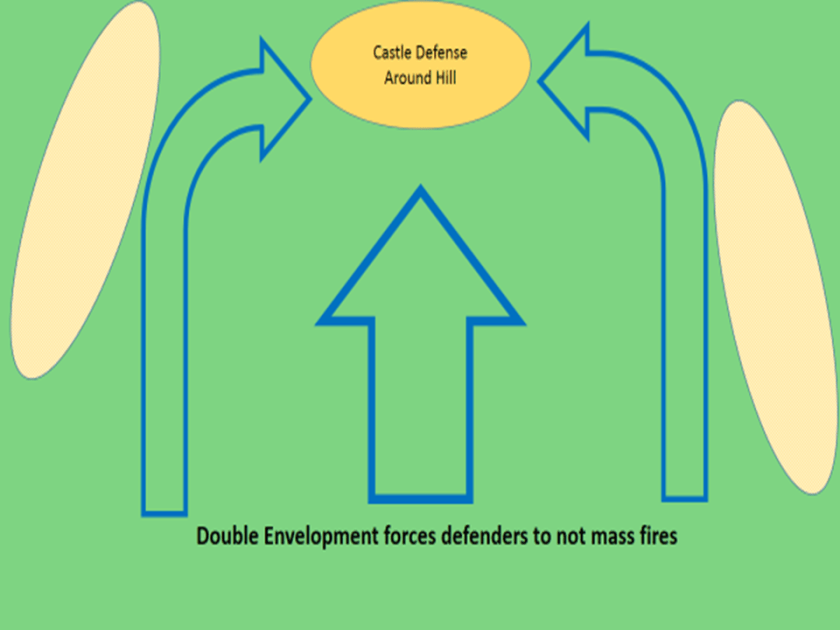
Instead, consider the double envelopment. In this instance, the cavalry should be moved only slightly ahead of the infantry in a reversed wedge formation. The intent for this is to hit all sides of the defense at the same time, and not allow him to mass his fires as all elements will likely hit the formation at the same time.
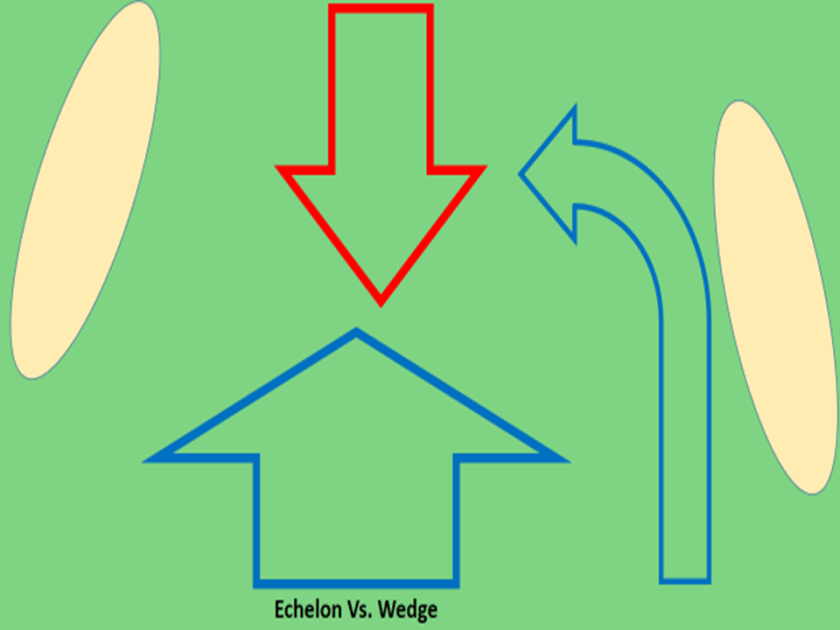
Enemy castled up in a corner, also known as a denied flank defense does not lend itself well to an attacker in a wedge or double envelopment, instead, a strong echelon (left in this case) provides the same effect of a target rich environment, and the ability to stop massing of fires.

What if your enemy lines up in a wedge? A double envelopment forces a slugfest across the entire battlefield. A wedge against a wedge also will force a slugfest right in the center as units from both sides pile in.
An echelon left or right gives you more power against a wedge as you mass more force on a single flank, thus causing a breakthrough, and forcing your enemy to re-route his forces to counter.
These are just some suggestions for you to consider. For now, I have provided you with just enough tactical advice to make you dangerous to both your enemy and yourself.
Chapter 4:
