C
Kings of War Historical Battle Reports
With the release of KoW Historicals, we have found some new ways to play the game. It’s a good book for the most part with some notable exceptions. We are starting a tournament soon, but the TO, Jayden is banning Mongols and Huns from the tournament since the skirmish rule is too good for cavalry regiments and hordes, and the units which have those rules (think 1-2 free 360 degree pivots per turn plus stealth and nimble, and they either have vicious, elite, or both, and all for 10 points less than a unit that doesn’t have those special rules.) It could easily be fixed if the Mantic Games Rules Committee would just agree that units with the individual rule are individuals, and therefor incapable of claiming objectives, loot, etc. Otherwise the book is solid.
Some thoughts about the book itself: the armies are built using a master list of regular troop types, spears, warriors, pikes, shooters, etc. Each of the 30 specific lists has some unique troop types, and leaders of renown. With each special army, you do have restrictions on what you can take from the master list, but in many cases you can also get upgrades. You can also purchase Veteran upgrades for units that are the same as purchasing arcane items, meaning only 1 per army, some other restrictions may apply. The game is identical to regular KoW except there is a new special rule about hills, and the rules for skirmishers. When charging up a hill at a unit, the charger is hindered. If both units are on the hill, this is not the case, and units charging off the hill are also not hindered.
These are the battles of the Barbarians (and other armies as I proceed down the line.) I chose the barbarian list originally because I have an awful lot of Wargames Factory Celts sitting around in a tote that I haven’t done anything with yet. The next list is going to be Norse since I also have a significant amount of Foundry metal Vikings that are equally untouched. Without further ado, on to the reports.
Barbarians Vs Macedonians -Control
Barbarians Vs Mongols – Dominate
*********************************************
Barbarians Vs Macedonians – Control
Army Selection:
I will be playing the Barbarians. As mentioned above, I have lots of Celtoi to play with, so I tried to make my list using the models available. The first special unit entry for Barbarians is fanatics. These guys are Berserkers but with higher nerve, greater speed, but lower defense. They do cost significantly more than berserkers though: 25 points more for a regiment, 40 points more for a horde.) They are a very flavorful unit though, so I’ve decided to build my army around a horde of them. To defend their flanks, I will take 2 regiments of standard berserkers. To stop them from getting peppered with arrows since they are naked, literally (De2+) I have purchased a screen line of 3 slinger troops. Slingers are interesting. They are basically useless when it comes to shooting since they don’t have nimble, and they have piercing (-1) that means they need a 5 to wound De4+ troops.) They do have a 30″ range though, so they should be shooting turn 1. The next very flavorful unit is Boudicca, sometimes spelled Boadiccia. I have a model for the Breton Queen on a chariot, so might as well add her. To roll beside her, 2 regiments of chariots. Again this is for flavor, not because I think they’re any good. KoW still hasn’t really gotten the balance right on chariots, so they are somewhat weak in terms of game play. I may drop them since most Barbarians ceased to use them, with the exception of those insular Celts on the British isles. To round out the list, I’m adding a horde of spears (very ubiquitous, but also very useful as phalanx actually has some use in this version of the game.) To aid the spears, I’m throwing in 2 warrior regiments. With each of these units, a cavalry regiment, and the chariots, I’m spending the special rule of +10 points to give them all fury. To add some characters, I’m adding 2 standard bearers on foot, a musician and a Carnyx blower (effectively grants all units within 9″ the special rule of Brutal.)
Jayden (AKA Swastakowey) is taking the Macedonians and successors. The periods are acceptable atch ups since the Barbarians did co-exist at the time, though the chariots are a little out of place for the Barbarians Alexander would have faced. He is taking a legion of companion infantry. This is an elite unit with pikes, so elite phalanx and ensnare. He has a regiment of silver shields and persian archers as well. So far everything is elite. He then adds in 2 regiments of companion cavalry and 2 troops of Numidian mercenary cavalry. Finally he threw in two skirmisher troops with bows, 2 standard bearers and a musician.
Set Up:
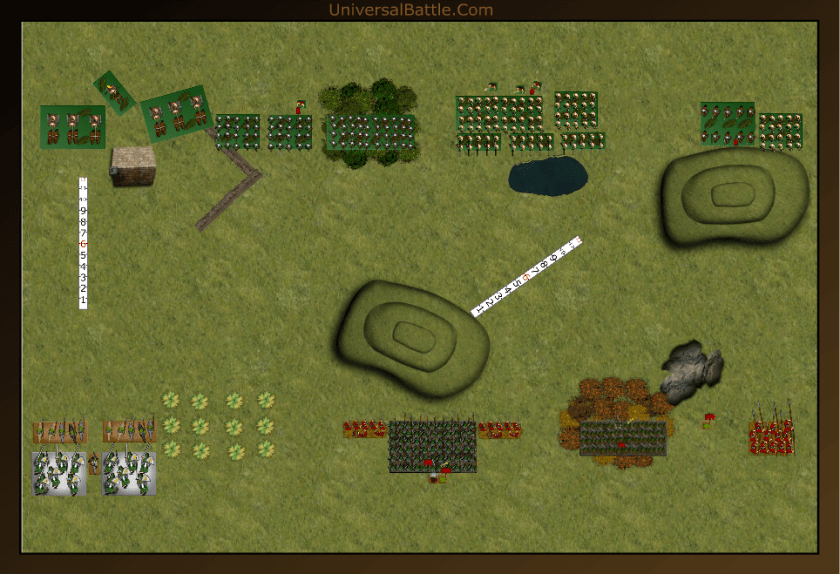
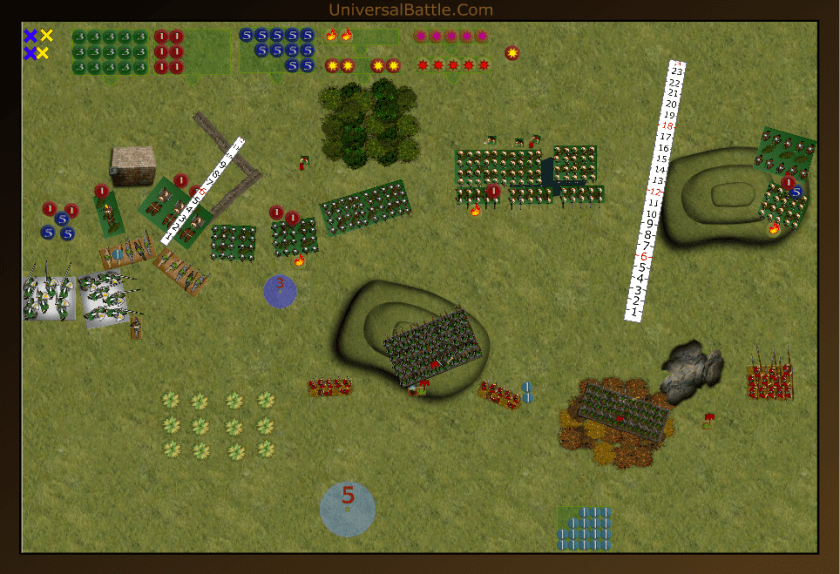
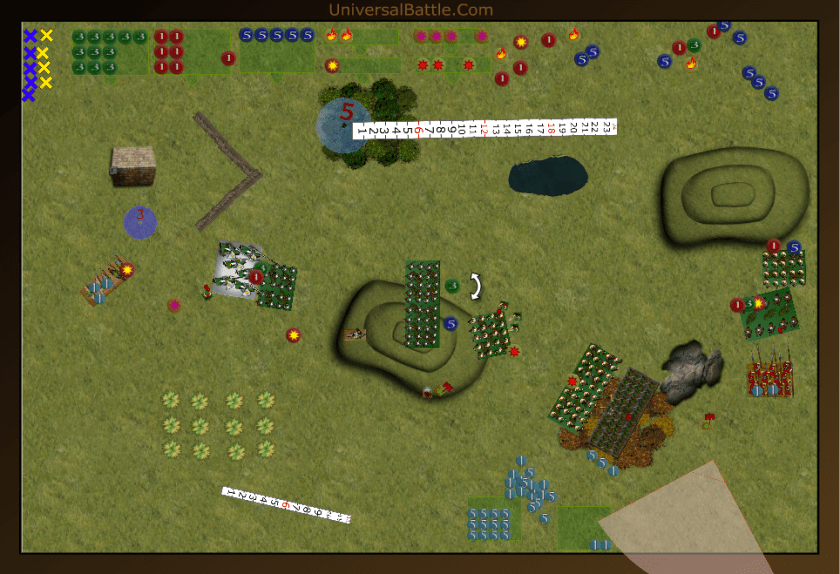
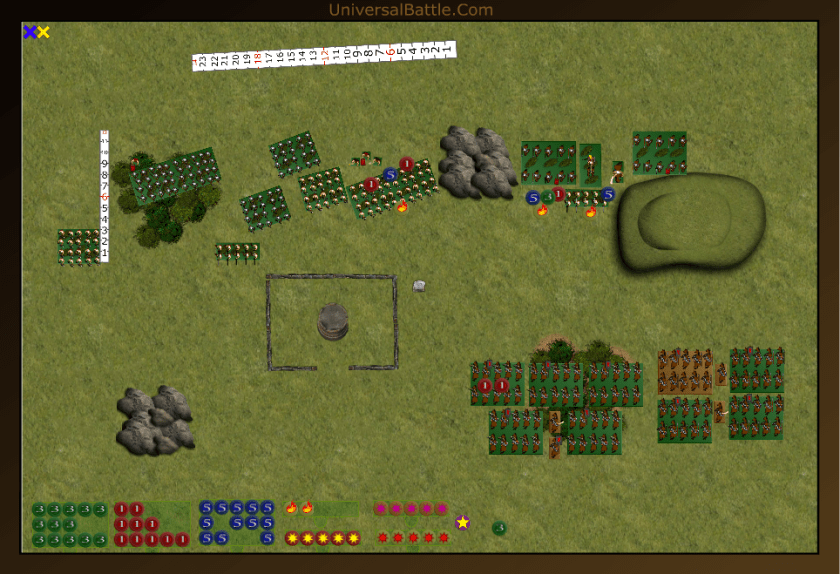
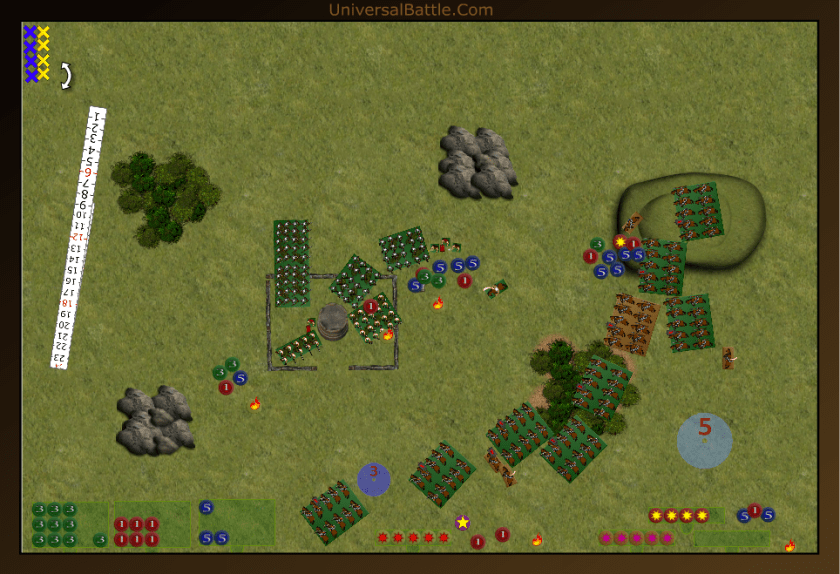
So for my set up, I was cautious, and spread my forces across the width of the table. With this being a control scenario, I needed forces everywhere to prevent him from massing in any one place. I don’t know why I put the chariots over there on the wall, but it seemed like a pretty good idea at the time. So, my forces, from left to right: Chariot regiment with fury, Boudicca, chariot regiment with fury, warrior regiment with fury, another warrior regiment with fury followed by standard, and spearmen horde with fury. Next I have a cluster of stuff: 3 troops of slingers, horde of fanatics, regiment of berserkers, carnyx, musician and standard bearer. Over on the far right I have a regiment of cavalry with fury, and another berserker regiment.
Jayden lined up against me cavalry heavy on the left with 2 troops of Numidian cavalry followed by 2 regiments of companion cavalry and Alexander the pretty good. In the center he has 2 skirmisher troops, a legion of companion infantry, a musician and standard bearer. On the right, he has a horde of Persian archers in the woods, a standard bearer and the regiment of silver shields.
Turn 1:
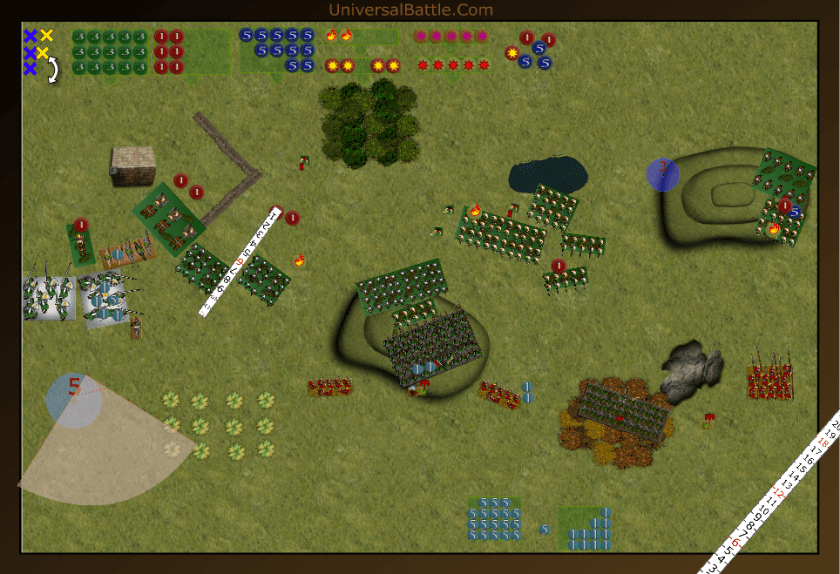
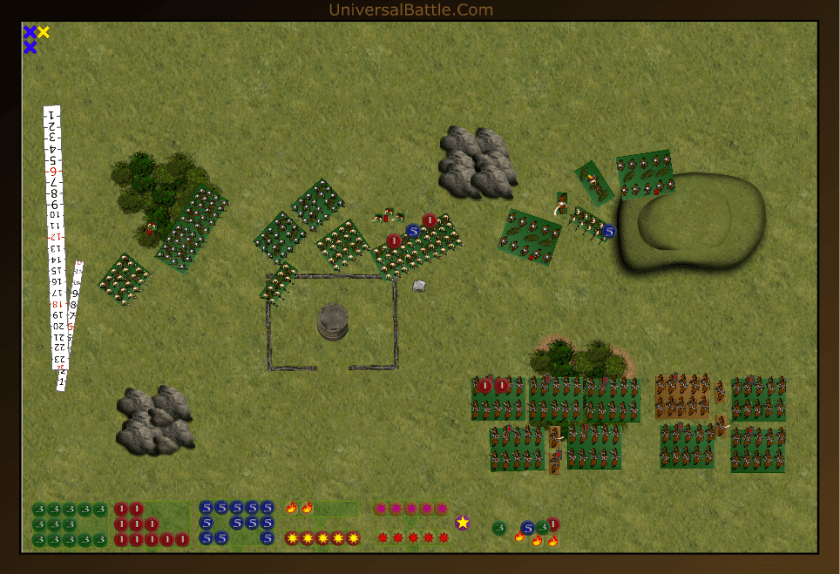
I won the roll for firsties, and opted to take it. I advanced the forces on the wings, but held the infantry cluster in the center back to shoot. On reflection, I should have advanced that mess as well. The right side berserkers marched onto the hill, and the cavalry stayed behind to avoid getting shot by the archers. Knowing the rules is critical. Had I realized the hill is only difficult terrain when charging, I’d have moved further forward and brought the cavalry into play. The slingers let fly on the right side skirmishers, and waver them.
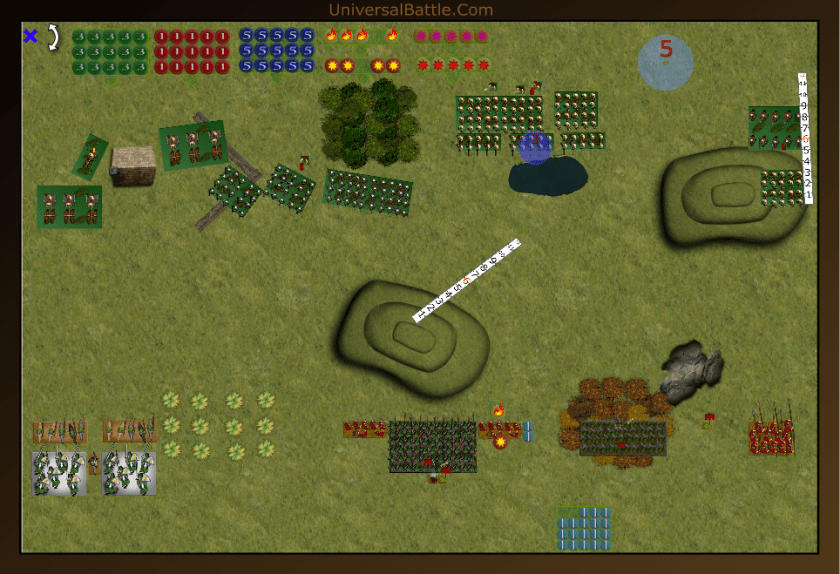
The Macedonians advance as well. The cavalry on the left holds back. The infantry in the center move onto the hill, and the archers shift to fire at the berserkers on the right. Shooting see the skirmishers cause a wound on the warriors, and the Persians manage a single wound on the berserkers.
Turn 2:
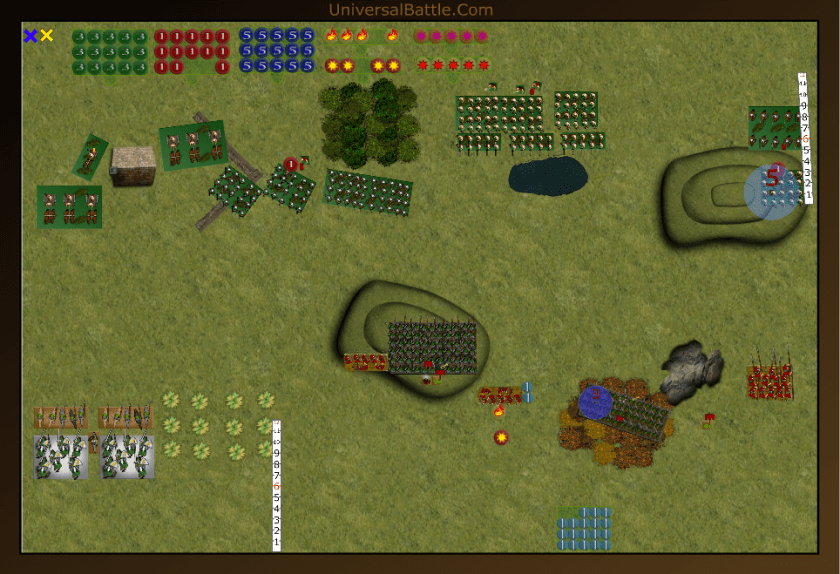
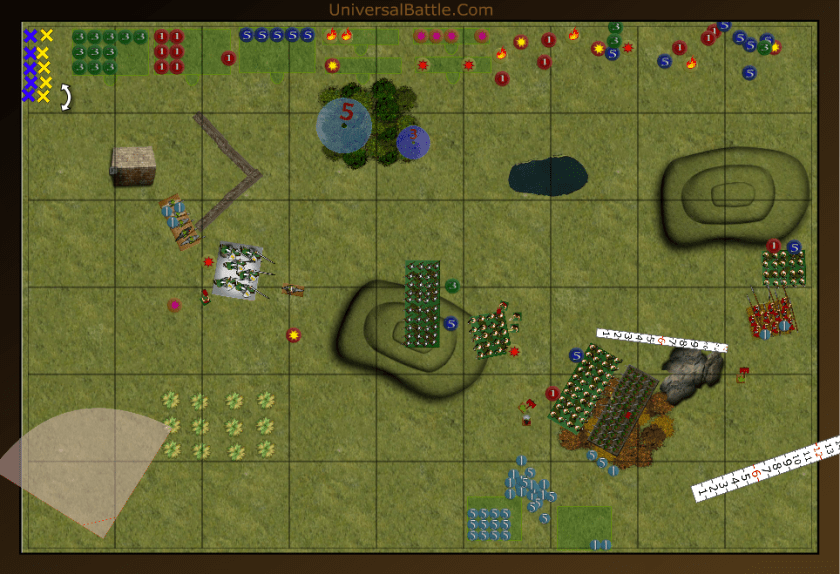
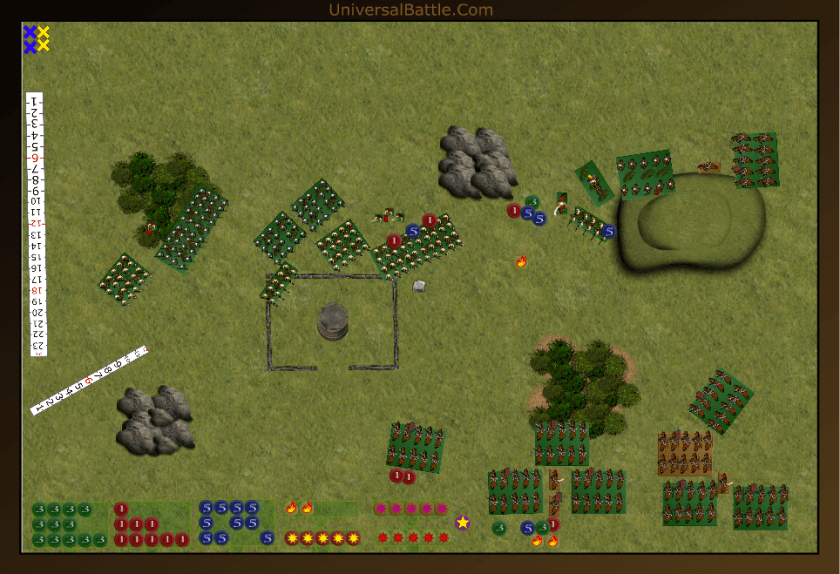
It occurs to me that chariots can throw javelins, so the chariots all advance, sadly, only one regiment can reach. The infantry all advances, which I probably should have done the previous turn, On the right, I still have in my head that the silver shields are cavalry, so only inch forward. Foolish of me. The slingers fail to cuse a single point of damage to the skirmishers, and I pass the dice.
The Cavalry commits. The Numidians charge Boudicca and the right side chariot regiment. The companion cavalry double charge the left side regiment. The left side skirmishers wound the warriors again, the other skirmishers wound the left slingers, and the Persians shoot the berserkers again. Combat sees the left chariots slaughtered, but the Numidians bounce off Boudicca and the other chariots.
Turn 3:
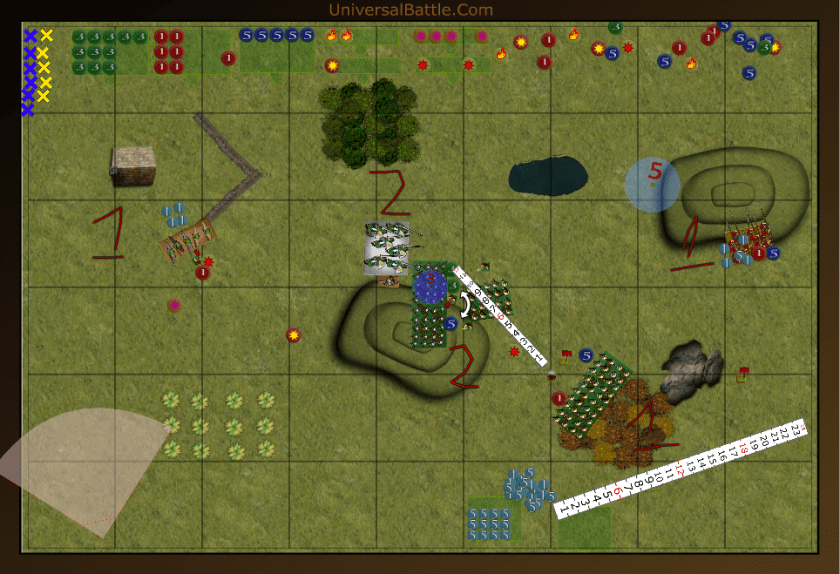
Swas makes his first mistake of the game, and forgets chariots are Ht3. Boudicca pivots to avoid the Numidians and slams into the flank of the companion cavalry. The chariots and the left warriors dual charge the Numidian cavalry, The spears and other infantry all advance. I charge the companion infantry with a slinger troop to move the spears up behind them onto the hill. (If you’re on the hill charging another unit on the hill, you’re not hindered.) I am still way too cautious on the left, expecting that (not) cavalry to charge my berserkers. I did move the rest of the slingers out of the way to give the fanatics a clear charge on the companion infantry next turn. Boudicca Scores 9 damage, but the re-roll of nerve keeps the companion cavalry fighting. The Numidians go bye bye though. Shockingly, despite having only 5 attacks on 6s, the slingers score 2 wounds on the infantry legion.
The Numidians charge the chariots, the companion cavalry flank charges Boudicca, and the other regiment charges the warriors. The skirmishers and Alexander charge the other warriors and the legion counter charges the slingers. The other skirmishers and the Persians open up on the damaged slingers, and kill them. Boudicca is removed, but the Numidians bounce harmlessly off the chariots. The other cavalry wavers the warriors, but Alexander and the skirmishers only manage 2 wounds to the other warriors.

Turn 4:
Remember what I said about how important knowing your own rules are? Well, this is proof. I completely forgot that my wavered warriors have fury, and so didn’t counter charge with them. (It’s a shame, because it would just take a wound or two to take them down.) The other warriors counter charge the skirmishers, and the chariots counter charge the Numidians. The spearmen charge the legion, and a titanic battle is about to be fought on the hill. Because the Fanatics are in front arc, they opt, instead to charge the skirmishers. The berserkers move up behind them into a flanking position on the legion. I finally charge the silver shields with my cavalry. The chariots waver the Numidians, the warriors waver the skirmishers, the spears fail to waver the legion, despite 12 wounds, and the cavalry botch their rolls and only manage 2 damage on the silver shields.
Counter charges all around. The companion cavalry charge my chariots after the nimble light cavalry back away. Those cavalry I forgot to counter charge again charge the warriors. The legion counter charges the spears, the silver shields counter charge the cavalry. The Persian Archers eradicate my last slinger troop. and combat is joined. Both my chariots and warriors are run down by the companion cavalry, the legion bounces off the spearmen, and the silver shields waver the cavalry.
Turn 5:
Man, I really should read my own army lists. (Also note, I didn’t get the pic before Swas started moving.) The wavered cavalry should be counter charging, but I naturally forget they too have fury. That’s 20 wasted points this game alone. I decide to charge the Persian archers with the fanatics, counter charge the legion with the spears, and flank charge them with the berserkers. I charge the skirmishers with my warriors, and the standard bearer opts to try to hit the damaged companion cavalry. The standard bearer scores a single wound on the cavalry and routs them. (See, they should have been dead a turn ago.) The warriors rout the skirmishers and turn about. The spears and berserkers rout the legion, but the fanatics fail to rout the archers.
The remaining cavalry charge my warriors. The silver shields charge the cavalry, and the archers counter charge the fanatics. The cavalry and warriors are broken, but the archers bounce off, despite actually getting some good rolls.
Turn 6:
I charge the silver shields with the berserkers, finally. Counter charge the archers, and charge the Numidians with my standard bearer. Hey he got lucky once, might as well try again. I make one final error, and don’t reform the spears in my turn or shift them over enough to get them into my center zone half way. The berserkers fail to rout the silver shields, again, had I counter attacked with the cavalry, they might have had some extra damage which would have been enough to break them. The standard hits and wounds the Numidians, but rolls really low for nerve and they remain. The fanatics slaughter the Persians, and turn to face center.

The Companian cavalry Charge the spears. Looking at it now, he put Alexander on the hill so that he could stop the cav from running up the hill, but the most direct route should have still taken him up the hill. Oh, well. We both made some mistakes this game. We’ll gain familiarity. The Numidians counter charge the standard bearer. The Silver shields counter charge the berserkers. The berserkers die, and the silver shields over run into the control zone. The cavalry roll very poorly and bounce off the spears. The die is cast and there will be no 7th turn. Swas wins 4 to 3 on control points.
***************************************************
Barbarians Vs Mongols – Dominate
Initial Thoughts:
SO, I have yet to find anyone willing to play against the Mongols, even though the RC says they should be fine to use. Thus, I decided to play against myself. The theory is that since both generals are equal, the game should be a draw. The randomly generated scenario came out as dominate, which then should favor the barbarians as the skirmishers are less able to hold terrain in the center as they don’t have any solid blocks of troops. They do have mobility though, and could therefore make that last ditch effort in getting units in on the final turn. So you don’t think I’m intentionally skewing things one side or the other take a look at the other batreps (above, and on the tourney page,) and you’ll see near identical deployment patterns for the barbarians. Take a look at my other KoW reports, and you’ll see that I frequently deploy small elite forces in only a single table quarter for a variety of scenarios and opponents. This way you’ll know that I didn’t intentionally try to tank one army or the other.
Set Up:
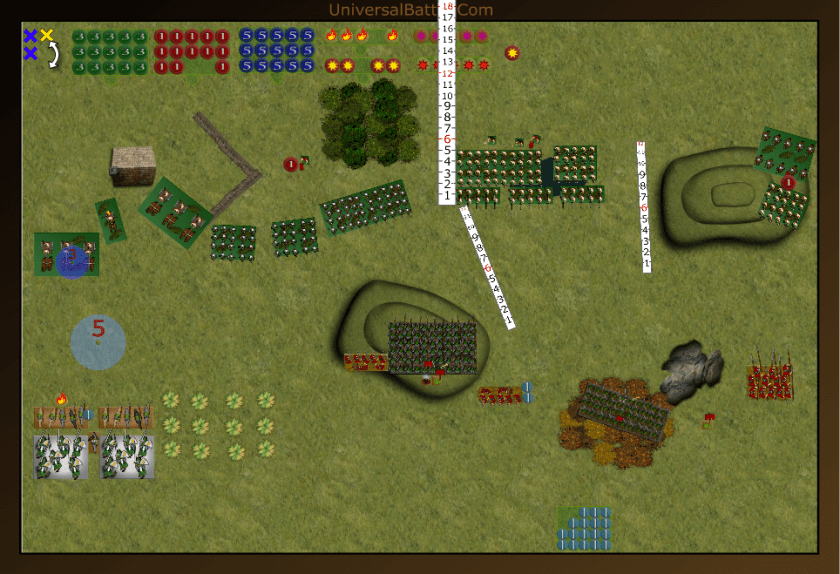
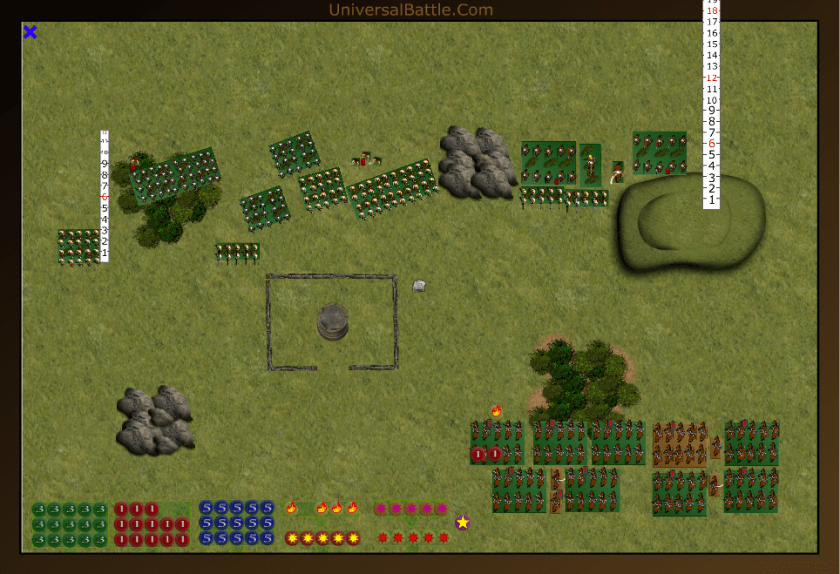
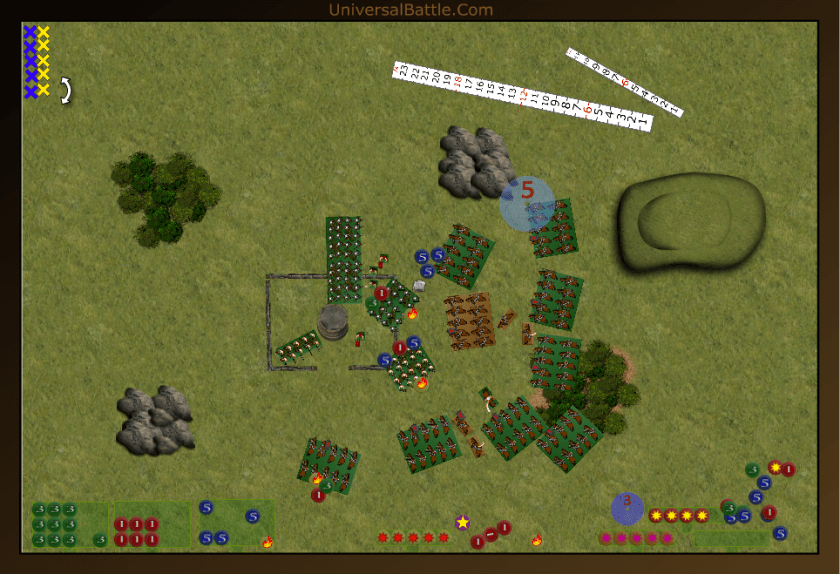
Mongols: To take advantage of the skirmish rule to its fullest potential all of the Mongols deployed in a single table quarter where they would also have cover, but since they don’t block line of sight, all 5 horse archers will be able to shoot on turn 1 with no penalty since they are also nimble. Thus for deployment we have 5 horse archer regiments supported by a mounted musician and mounted standard. Then you have 1 skirmish lancer with pathfinder (tan base) and 3 more skirmish lancer regiments supported by Ghengis Kahn and a mounted musician with advanced scouting.
Barbarians: The barbarians had to deploy 3 units at the start because of the scouting, so dropped the barbarians on the far left and the 2 slingers on the right. Then deployment went from there. I decided not to use the slingers in front of the fanatics as that would block their 12″ charg. So the Barbarian deployment is berserker regiment, spear horde with fury followed by standard bearer, slinger troop followed by 2 warrior regiments with fury, another berserker regiment with giant warhammer and the fanatics horde with hardy veterans followed by standard, musician and carnyx. Then 2 slinger troops followed by a cavalry regiment with Ambusher (pathfinder) and Boudicca, then a mounted musician, and another cav regiment with fleet of foot (haste.)

Turn 1:
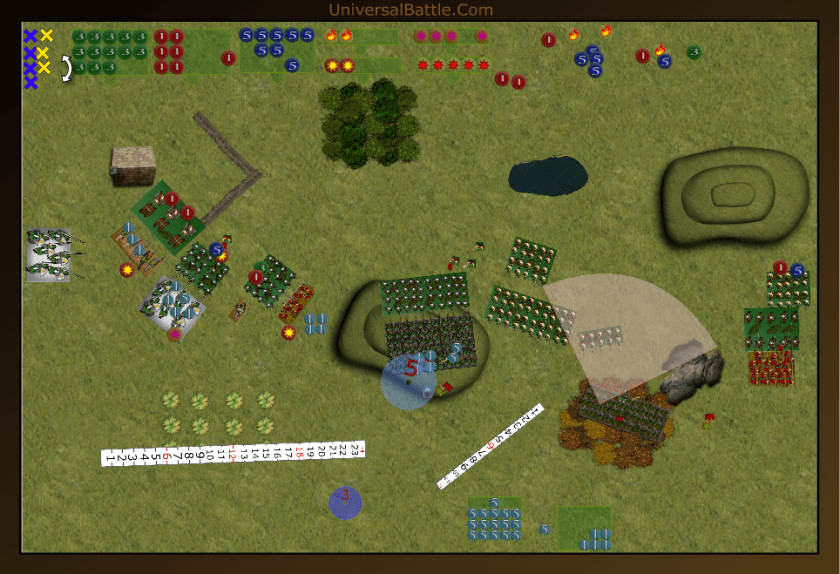
The Mongols won first turn roll off, and opted for second to use that last turn to get units into scoring. The infantry all advance towards the center, but the cavalry hangs back. The slingers are already hitting on 6s since the targets are all individual, so no sense in moving them this turn and only getting half shots on 6s. They do hit the archer regiment not in cover for 2 damage, but the nerve for them is way too high with the presence of a musician.
The Mongols advance all the archers forward into the woods so that they can gain cover and shoot out of it. They do stay out of 16 inch charge range of Boudicca and the pathfinder cavalry though, and this is to their advantage since they have better speed anyways. The lancers advance on line as well. 2 regiments of archers shoot at the fanatics, 2 shoot at 1 slinger troop, and 1 shoots at the other slinger troop. One troop goes down, but the other is fine despite 5 damage.
Turn 2:
The Barbarians have no charge, so all the units advance. The infantry is closing on the center and scoring positions, while the cavalry is attempting to get into charge range. The hasty cavalry starts up the hill since the lancers would be hindered if they try to charge. Both slingers fail to wound the injured horse archers, and the dice pass
The lancers are quite comfy where they’re at right now and they don’t move much except the one that shoots down the line to threaten the flank. The archers back up or reposition to where they can shoot but not be charged. Only 1 regiment will not be able to shoot this turn. The 4 that can shoot massacre the Pathfinder cavalry regiment. Thus far 2 turns 2 dead units.
Turn 3:
From here on, it will just be a single shot for each turn.
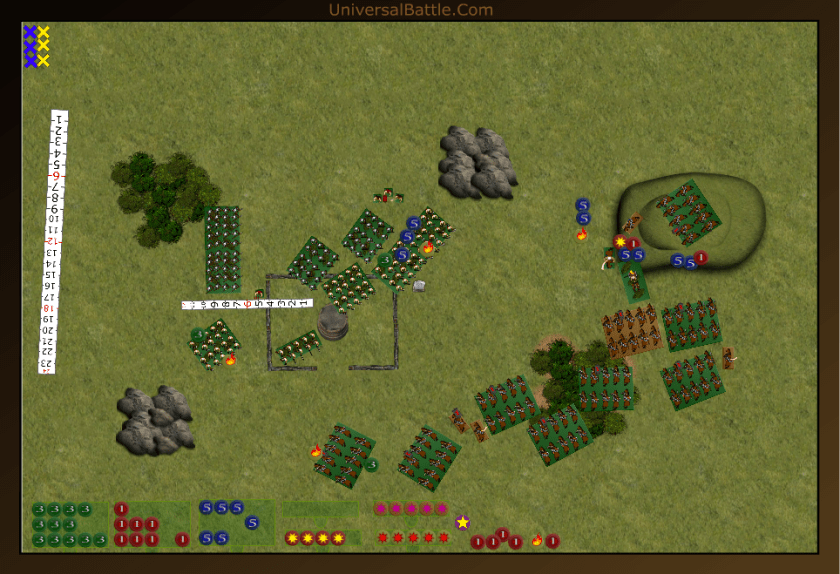
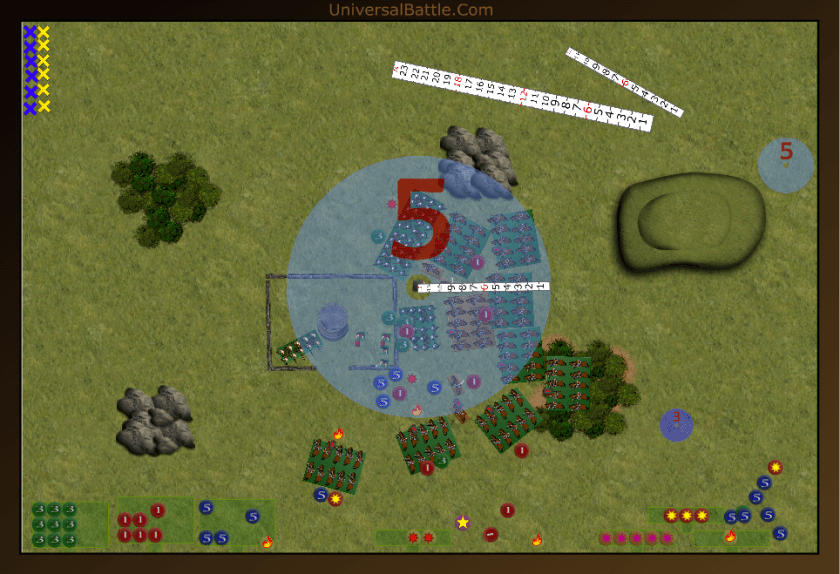
Barbarians: The Fanatics and other infantry are still bogged down by the obstacle, so the fanatics move to get clear, and line up a charge on any Mongol unit. With the lancers threatening on the far right, the cavalry regiment and Boudicca are looking for a safe space where they won’t get hit by multiple units. Remember skirmishers don’t double attacks for a flank, but they can charge in any direction because they get a free pivot before they receive an order; this equates to a 360 charge arc. It is also not safe for 2 skirmishers to charge the same facing because a counter charging unit that does well enough can over run into another skirmisher (possibly.) Thus finding a safe spot for Boudicca has become quite a challenge. The cavalry move onto the hill to at least force a hindered charge, and Boudicca moves forward so that the one upper regiment won’t be able to see her (height 3 for large cavalry.) The slingers again shoot at the wounded horse archers and manage a single wound, but fail to waver them.
Mongols: The right flank is in solid Mongol control right now, and they can pick and choose their battles. The upper right and other right side lancers dual charge the cavalry on the hill. The horse archers move out of the way, and back into the woods. The pathfinder lancers charge Boudicca. Shooting sees the injured slingers taken out, 3 regiments of horse archers add significant damage to the fanatics, and the final regiment wounds the far left berserkers. Fortunately, the fanatics are sitting at effective nerve of -/28 so they don’t break despite the 18 damage. The berserkers are -/16 and hold as well. Combat sees the cavalry regiment fall. While neither charger gets credit for a flank charge, it is still 32 attacks hitting on 4s and wounding on 4s with elite. In a solid roll, they do 11 damage and rout the cavalry regiment. The pathfinder lancers waver Boudicca, who does not have fury.
Turn 4:
Barbarians: With Boudicca wavered, and no other charges possible, the slingers try again to hit the damaged horse archers, but fail since there’s now only 10 shots hitting on 6s and wounding on 4s.
Mongols: The Pathfinder lancers are joined by the regiment on the hill in wiping out Boudicca. Another regiment rolls up onto the hill since there is no movement penalty for charging down a hill, only up it. The horse archers again consolidate into a good formation and let fly. This time killing off the wounded berserkers and the fanatics. The other regiment of berserkers takes a wound as well. As turn 4 comes to a close, the Barbarians have a solid lead, but the Mongols have a strong position.
Turn 5:
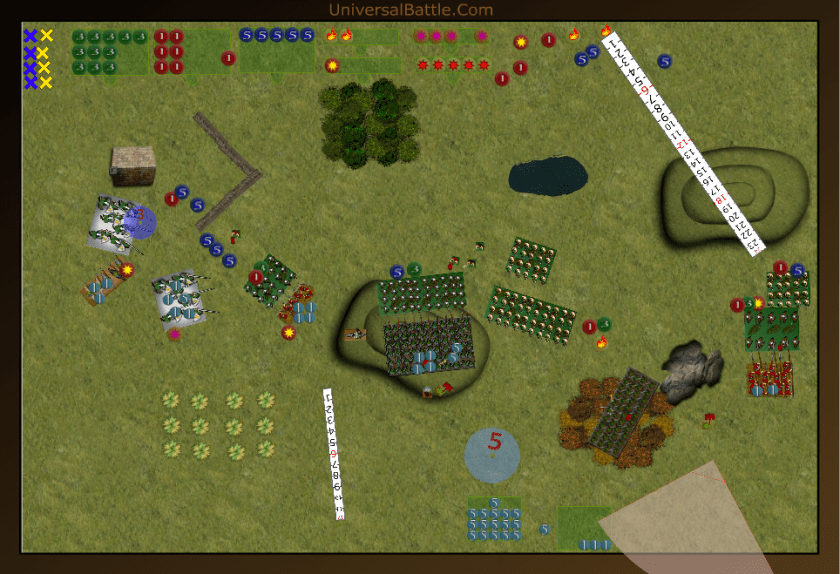
Barbarians: The barbarians actually have a charge to declare and the mounted musician charges into one of the archer regiments. The warriors and spears continue to maintain scoring position while the berserkers try to get clear of the wall to charge. The Slingers manage a wound on the far left archers, but again fail to rout or waver. The mounted musician fails to hit.
Mongols: Thus far the Mongol shooting has been out of sight, and combat has been good. The pathfinder lancers and the lancers straddling the hill do a combined charge on the upper warriors, and the other lancers follow in close behind. Shooting manages 4 wounds on the other warriors, and 10 on the berserkers. The charged warriors fall beneath the Mongol hooves.
Turn 6:
Barbarians: Wow, finally some charges to declare. The berserkers charge an archer regiment, the warriors charge the pathfinder lancers, and the spears charge another lancer regiment. All 3 charges are hindered. The mounted musician again charges another horse archer regiment as well. The slingers let fly against the far left horse archers, wound, and finally waver them. The berserkers fail to break the archers, the spears fail to break the lancers and the warriors fail to break the pathfinder lancers. Not good.
Mongols. The Horse archers don’t counter charge the berserkers, preferring to let the other archers take them down. The one regiment does counter charge the musician, and the lancers both counter charge their respective targets. Shooting sees the death of the berserkers, and the combats are all pretty much insignificant, except the archers manage to kill the mounted musician. The final die is tossed, and there will not be a turn 7. Final score is 835 points for the Mongols and 540 for the Barbarians. Victory to the Mongols.
After Thoughts:
So the Mongols did just fine in the dominate scenario. In order to win, I had to just remain on the periphery of the circle until the final turn, and wipe units out with shooting or combined charges. The Mongols are really an auto play list since there are no tactics actually needed to use them. They get a 360 arc of sight, as many as 4 pivots per unit for a turn, they can easily mass fires anywhere they need to and avoid combat when they choose. Had there been a turn 7, I might have actually lost a unit or two in close combat, but there was plenty of back ups to kill the offenders. I might also have lost one horse archer regiment to slinger shooting, but that is actually pretty iffy. Reason being, is if the slingers wanted to score they would have to move, thus be hitting on 7s instead of 6s. At least 3 more regiments would have gotten into scoring position as well, leading to an even greater margin of victory. I stand by my statement that allowing skirmishers to score in dominate, pillage, and loot is a poor choice. They are just too good.
