Game 1
Barbarians Vs English – Pillage
6 October 16
Initial thoughts:
Rob: So this is about as anachronistic a game you can have. The Bretons facing off against their descendants of more than 1000 years. The biggest threat to me is that longbow horde with elite. I am worried about it, as anyone rightly should. (Just ask the French at Agincourt.) He only has light lancers, so I’m not so worried about his cavalry force, but they are better than my cavalry; faster, better Me value, and pathfinder standard. My strength is in my infantry, and I must use that to my advantage. The berserkers and fanatics are a solid force, especially when supported with the combination of carnyx, musician, and standard. Hopefully that force will cause him to react.
Stephen: This being only my 2nd game with the English, I’m still feeling a bit uncertain as to how the list will gel. The fanatics horde and berserkers are a very solid infantry threat, able to delete almost anything if given a combined charge. The slingers shouldn’t worry me too much, the only vulnerable units are the organ guns which will need to be protected until mid-game at least. I should also try to use the pathfinder ability of the lancers if at all possible to get behind the Barbarian lines. They may be useful in getting rear charges or stealing pillage counters late game.
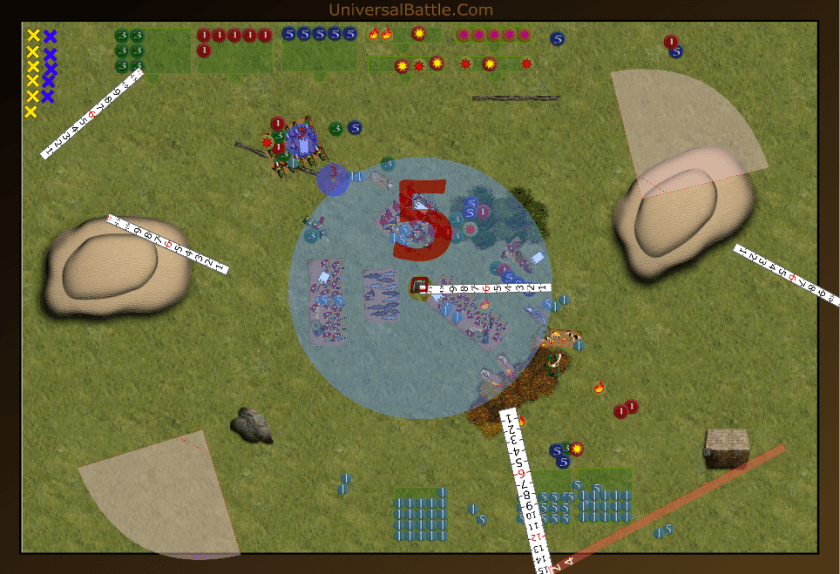
Set Up:
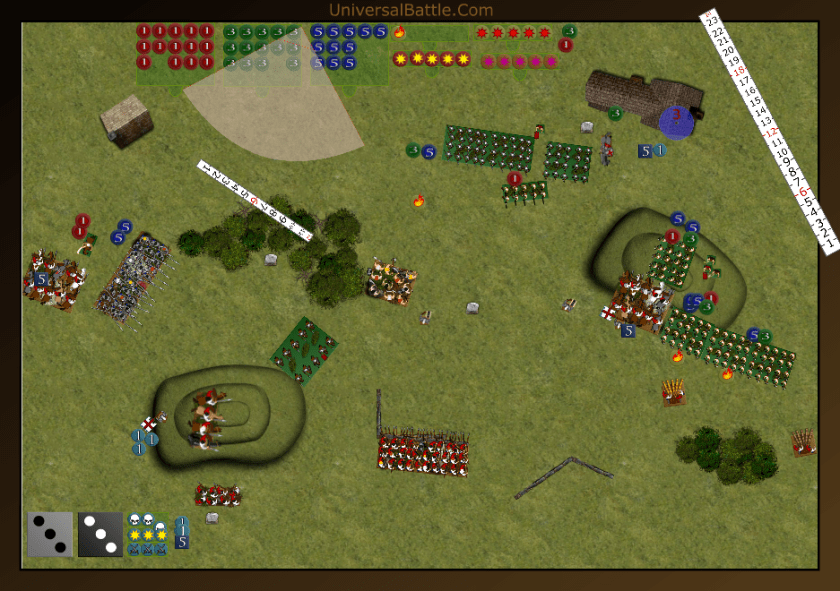
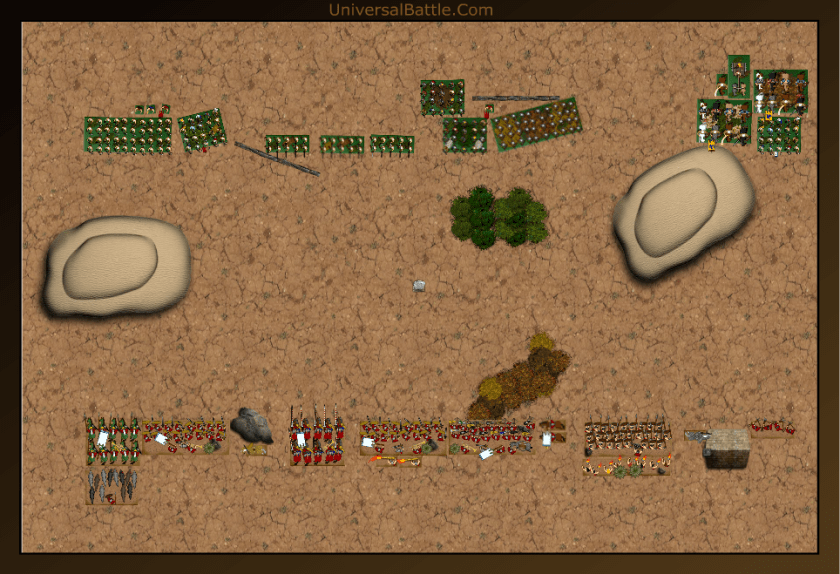
The terrain was randomly placed in an alternating fashion. We then rolled 5 objectives, and placed those as well. Stephen won the roll for sides, and chose to go bottom, had I won, I would have done the same because of the safety of that 1 objective behind the hill.
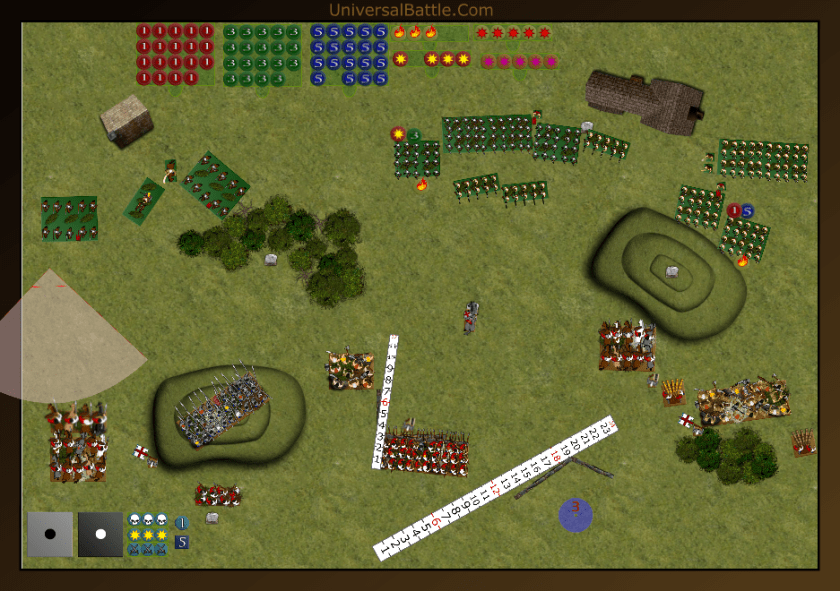
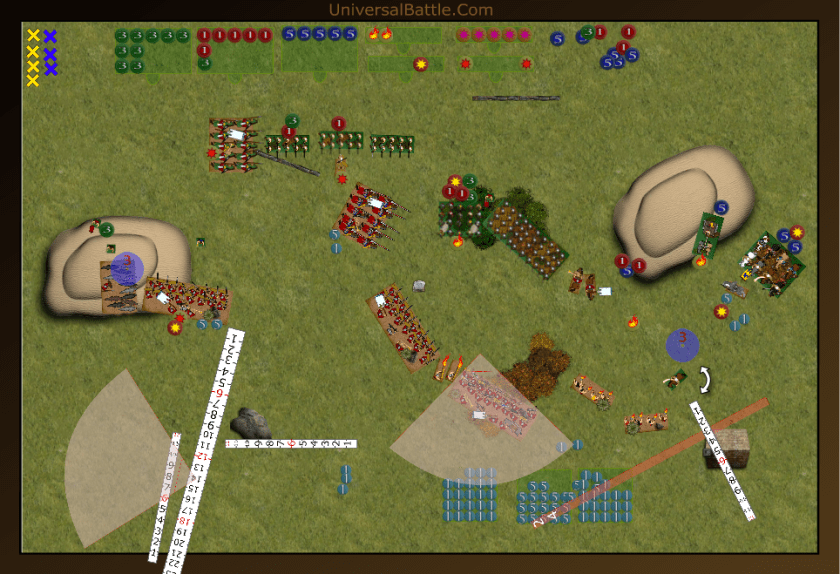
Rob: So, with the 5 objectives laid out as 3 in contention, I decided to mass the crazy infantry on my eastern flank, and the regular infantry in the center. That means my cav will be on the western Flank. I am hoping to break through on the west, and hook around to take on the longbows, but it’s almost a guarantee that the pikes will be there to face me. Avoidance using nimble on my cav is the key. With fury or fearless on most of my forces, I can take a few hits when necessary. Thus my forces, from west to east: cavalry regiment with fleet of foot and fury, Boudicca, a mounted musician, and a cavalry regiment with Ambusher and fury form my western flank. The center has a regiment of warriors with fury, a horde of spears with fury, a standard bearer and another regiment of warriors with fury, all screened by 3 troops of slingers. My eastern flank has a regiment of berserkers with massive warhammer, another regiment of berserkers, a horde of fanatics with hardened veteran, a carnyx blower, a musician, and a standard bearer. Obviously, the intent is to clean out the wings, try to take the eastern objectives, and then advance in the center to challenge the center objective. The crazies have 2 organ guns they’re facing, which means I have to move quick, and clear them out.
Stephen: Having the elite scouting item, I was able to have a slight advantage in deployment, though looking back there are a few dubious choices that I made. On the West flank, I have two fast cavalry units to counter the speed of the opposing barbarians and keep them honest. The heavy pikes are a bit of overkill but assuming I can lock the barbarians in combat, they will be useful to finish of the cavalry. They are also positioned to march up to the counter in the forest if I get first turn. I was loath to allow the slings any good targets so only the longbows went in the centre where they can see all 3 middle counters. Edward joined them in the hopes of making a nuisance of himself and hopefully knocking out some of the slinger troops. Lancers on the East are positioned to march up behind the hill first turn and perhaps get behind the barbarians lines in subsequent turns. I’m hoping that the 2 organ guns will dissuade the fanatics/berserkers from venturing too far from behind the safety of the hill.

Turn 1:
Rob won the roll for firsties, and opted to take it.
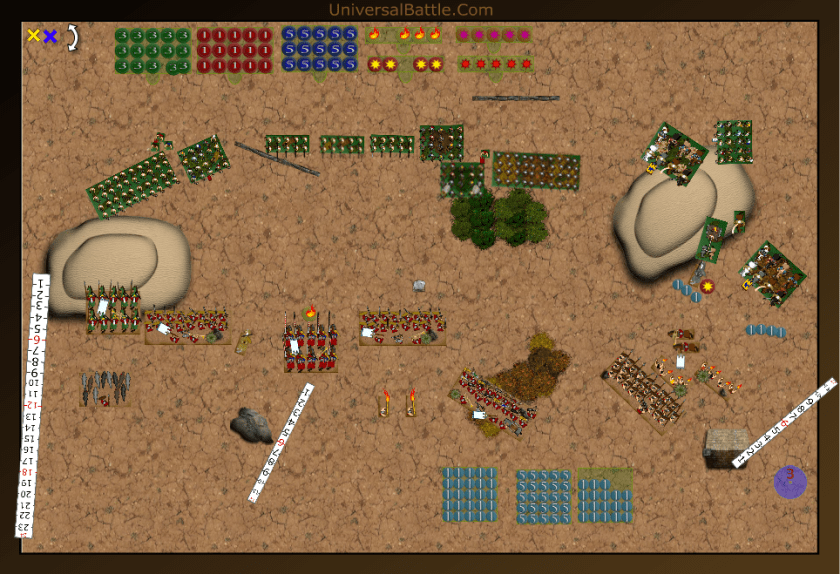
Rob: I advance the wings out, but hold the center tight. One troop of slingers is ordered to hold the objective by the building. The crazies all move up to the hill, though they will be subjected to 1 organ gun shooting them. The slingers let fly against the left side organ gun, but fail to cause a single wound. Yep, it’s already shaping up to be one of those games.

Stephen: Seeing that the pikemen wouldn’t be able to assist in time, the Western cavalry bide their time and allow the pikes to advance to a better position. Levy troop gets the cushiest job in the army and is instructed to sit tight and guard the counter behind the hill. Longbows elect to take a shot at the warrior regiment but do a disappointing 3 wounds. The shock of being shot at has some effect however and the warriors are wavered on a lucky roll. Edward, the English warriors and the lancers all march up the middle to make the Barbarians think twice about advancing and heavy warriors on the east flank position themselves to attack any berserkers that poke over the hill. To make their job a bit easier, the organ gun outdoes itself and puts 6 wounds on the rightmost berserkers.
Turn 2:
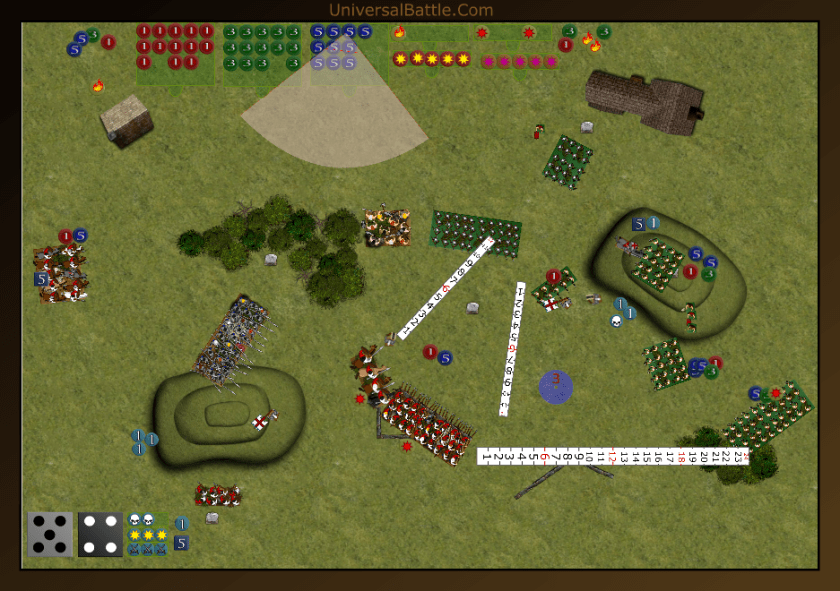
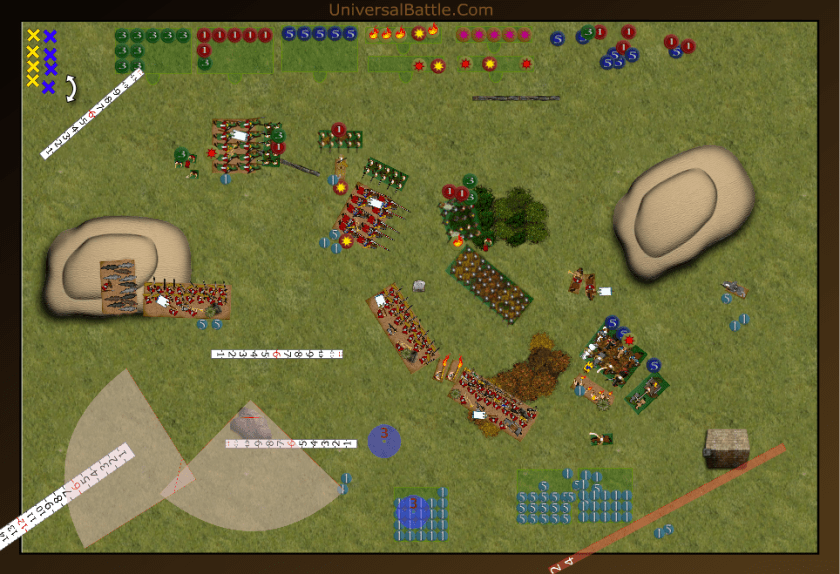
Rob: Well, having my warriors wavered on turn 1 is a bit of a blow, but it’s not horrid, and I can bounce back from that as my other units become a greater threat to his archer horde. He may have to consider other targets in the future. The pikes on the hill are a problem, but his original move of them gave me hope that I could pull off some nastiness. Unfortunately, he re-visited that move, and backed them up. I send the hasty cavalry in against the cavalry troop. I have a good chance of breaking them, and if I do so, I can position so that both the pikes and lancers will only have a frontal charge. That’s the idea at least. Boudicca and the pathfinder cavalry move to support. The center holds firm where they are, as it’s not yet time to commit them. The berserkers move onto the hill, and the fanatics follow up with a clear opportunity for charges next turn. The berserkers start their taunting with, “Your Father was a hamster, and your mother smells of elderberries,” and it went downhill from there. The slingers target the eastern lancer regiment, and score a rather amazing 4 wounds, and even more amazingly, waver them. Close combat is a failure however, and the troop takes a meager 3 wounds, and is not even wavered.
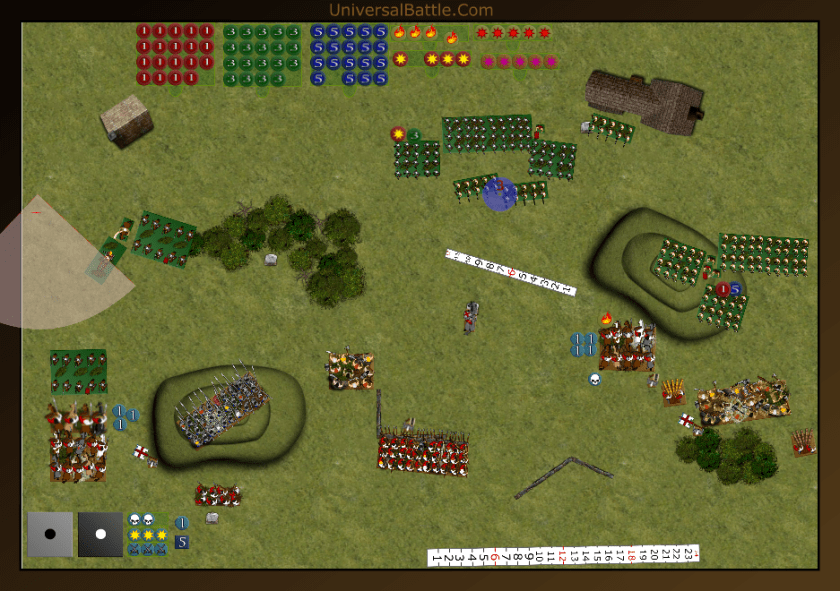
Stephen: Wavering the (rallied) lancers from mere slingers hurt a bit though the cavalry troop holding on the right was a boon. Seeing their opportunity, the pikemen and cavalry both charge the doomed hasty cavalry. Because Bouddicca is height 3, the lancers at the rear were just able to squeeze through the gaps using nimble and charge her. Being pathfinder meant they also wouldn’t be hindered from the hill. With only the pathfinder cavalry able to move freely now, this flank is looking safe so the warriors in the middle turn in and threaten the previously wavered opposing warriors. Longbows realize that sticks and stones do actually hurt so they shoot at and destroy a slinger troop. On the east flank, Edward teamed up with a musician to delay the other berserker regiment for a turn. Ideally this meant that the heavy warriors would only need to face the fanatics horde next turn after destroying the berserkers. Despite their high hopes of destroying the previously wounded regiment, even with Edwards dread terrorising the Barbarians, one man survives and the English are rebuffed (rolled double 1’s for nerve).
Turn 3:
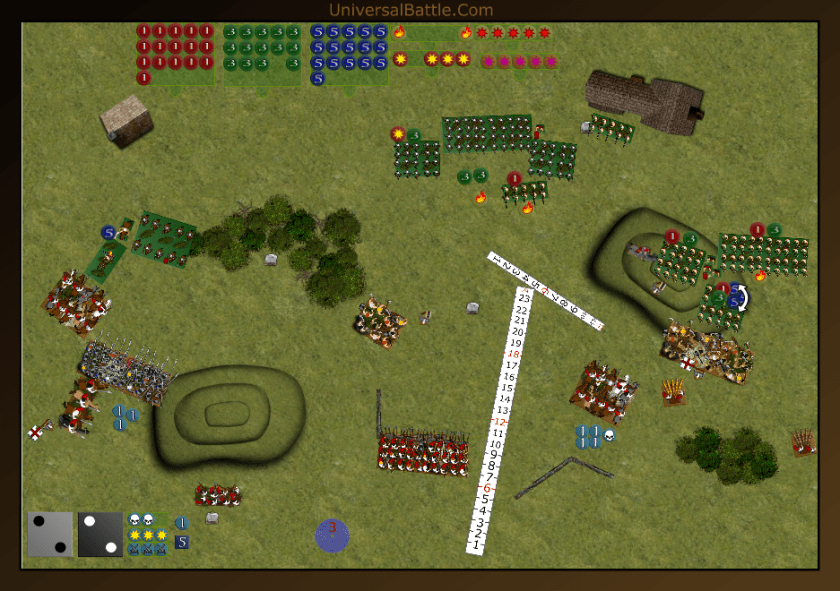
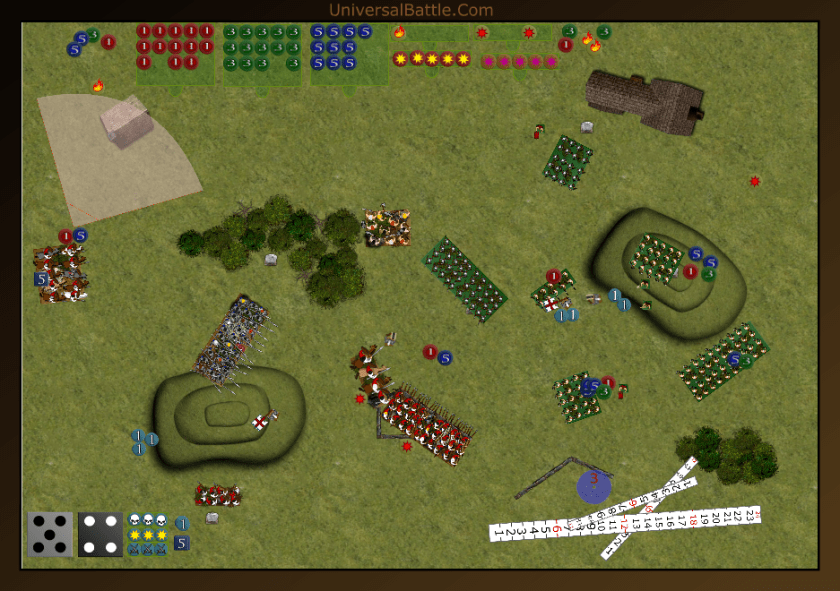
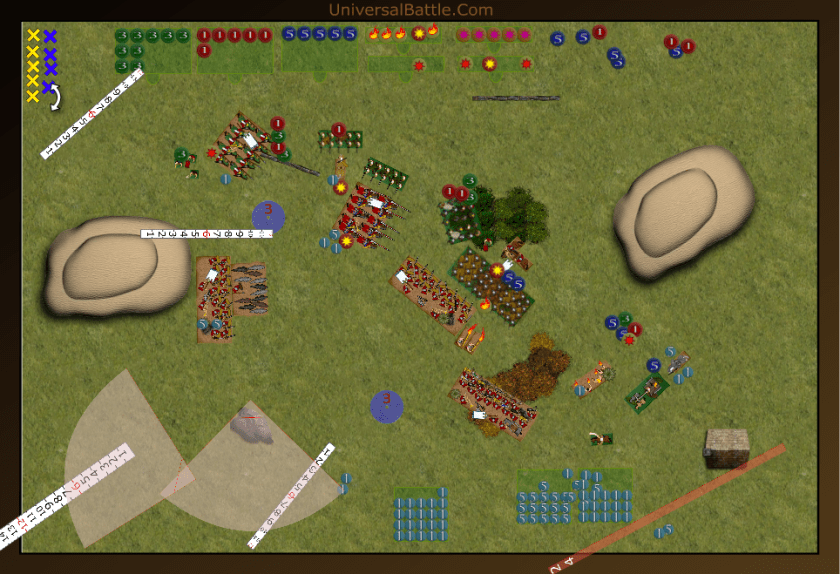
Rob: I didn’t anticipate that charge on Boudicca, so that was an error on my part. I may have to cede the western objectives and try to claim the east and center. On the plus side, my crazies held admirably. I knew there was some risk with the faster cavalry, but had I wavered them, I would be in a better position. I was happy the slingers became the target of the longbows as well. They cost me a lot less in the long run. So, the east is now shaping up. The berserkers on the hilltop counter charge Edward, and the others counter charge the heavy infantry, but are joined by the fanatics. Boudicca counter charges the lancers, and the pathfinder cavalry break towards the center to threaten the longbows. The spears and warriors begin the march up towards the center objective. The one slinger troop who can shoot, manages a wound against the lancers, but is not as lucky this time with the nerve test. Combat sees the heavy infantry dispatched with ease, but the other berserkers don’t do as well against Edward. They will now be taking a flank charge from the lancers, let’s hope they can hold. Boudicca does well in wounding the lancers, but she fails to waver or break them.
Stephen: It looks like the western flank has been ceded to the English, so lancers and pikes move to finish off the remaining Barbarian elements. Cavalry troop moves onto the hill to react to whatever the Barbarian cavalry will do next. They will be able to both protect the levy troop and support the longbows in melee. After checking the angles, the barbarian cavalry are actually in the front arc of the longbows so instead of turning to face, they once again take aim at the warrior regiment, this time finishing them off. Seeing that Edward has done his job admirably, the lancers charge the exposed flank of the berserkers. With their pathfinder ability, routing the crazy men should be a cinch. Unfortunately, the berserkers all seem to be ancestors to the Vikings and refuse to die (rolled a 1,2 for the nerve test which was just enough for the rallied berserkers to live). Edward meanwhile destroys the slingers hiding their pillage counter by the building, ensuring that other forces must now be kept back to claim that objective. Organ gun does a couple of wounds to the already fatally wounded berserkers but, true to form they again refuse to die (double 1’s on nerve again!)
Turn 4:
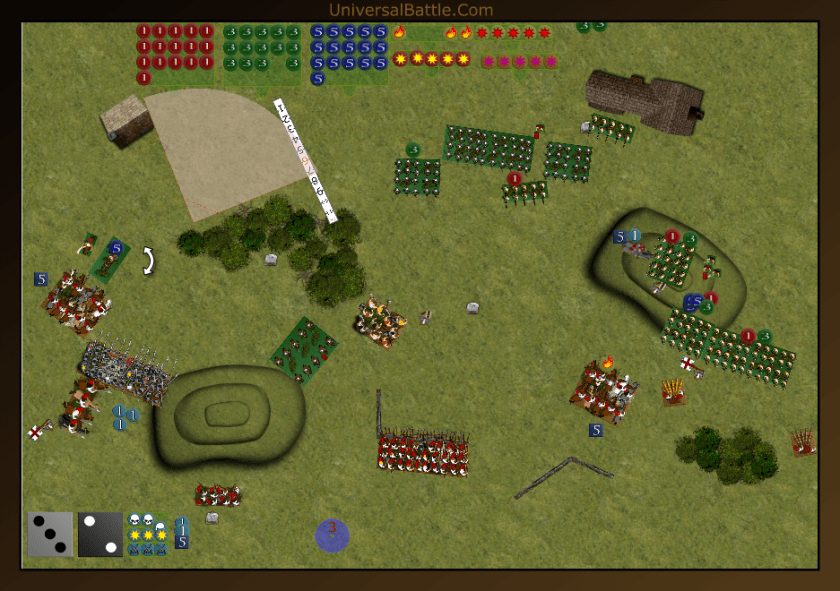
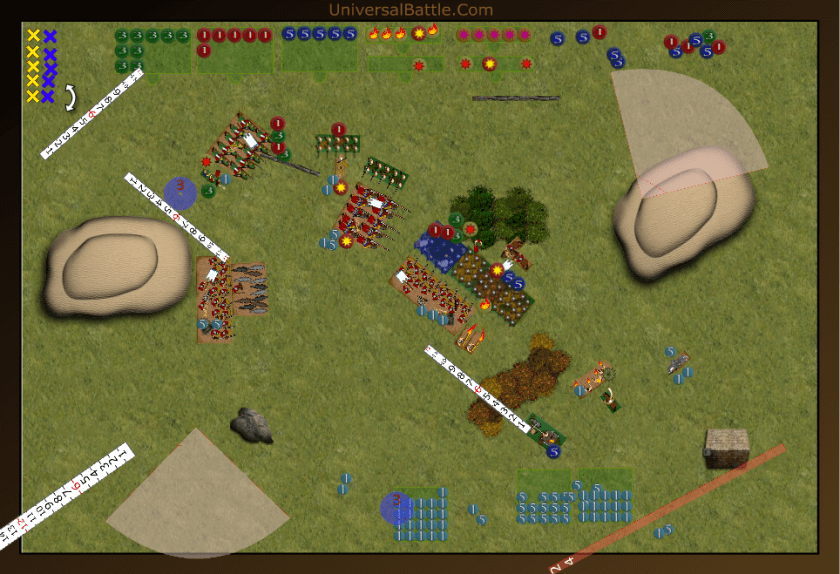
Rob: Good lord those berserkers are resilient. Both regiments of them. The fanatics and berserkers decide those organ guns need to go, and charge the guns. The slingers charge the musician, and the berserkers counter charge the lancers. The mounted musician counter charges as well. It’s not great, but there is a chance he could waver or destroy them, and that would be huge. The spears advance up the center to threaten the warriors, and challenge the centre objective. My cavalry is now in a bit of a bind, so moves into a position where any charges against them will be frontal and hindered. Both guns are removed from play, as are the lancers. The slingers waver the musician as well. The mounted musician fails to wound the lancers, and that will be the end of my western flank, I assume.

Stephen: On the western flank, Lancers finish off the musician and together with the pikemen, turn towards the middle of the field. Longbows decide to trust in their (apparently effective) daggers and charge the remaining Barbarian cavalry with help from the other troop. Combined they do just enough to rout the regiment and are now in good position to contest the center objective in the last turn. Warriors that are now threatened by the spearmen horde decide discretion is a rather large part of valor and sneak outside the hordes arc. With the eastern flank almost lost to the undying berserkers, Edward steels himself and charges in to the already fatally wounded berserkers on the hill. Despite his elite abilities, he is unable to do a single wound to the regiment! Yet again, they survive. The musician and standard bearer take turns harassing the slinger troop to stop them moving towards the center objective or slowing down the English advance.
Turn 5:
Rob: This is where not knowing these new armies really takes it’s toll. Who would think that an archer unit is better in combat than at shooting? The best part is they can pick up their carefully emplaced stakes, run up, attack, bounce back and throw their stakes back in the ground and still get ensnare. They also get elite in melee as well, though many other missile units get it (or vicious) restricted to shooting attacks only. Long bows are as good as pikes, apparently, (and actually as good or better than elves.) I don’t know if this was intended, or if it’s just a consequence of special rules. I had really assumed the longbows were much worse than they are, with 7 attacks hitting on 5s, and wounding on 4s, and 20 attacks hitting on 6’s and wounding on 4s, I had a strong chance of holding, but instead it was 27 attacks on 5s. Even still, an average nerve roll would have only wavered me meaning I had a better than average chance of counter charging the cavalry troop with my fury. Drat!
Stephen: All the western flank forces now move into the middle to try and claim the center objective from the spearmen horde. Seeing the spearmen move a bit closer, the longbows see their opportunity, and charge the horde, locking them into place. Surprisingly, the cavalry troop manages to kill one of the invincible berserker regiments whilst a standard bearer and musician do their best to delay supporting forces.

Turn 6:
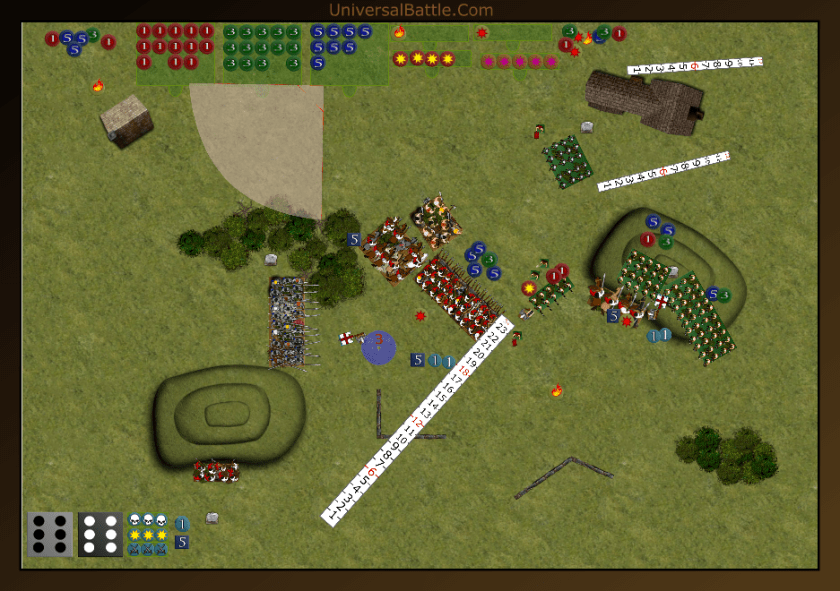
Rob: Again, we find those archers are dynamite. Everyone else should learn from my mistake and not expect archers to be worse in combat than at shooting. Not holding with my cavalry really cost me, since had I held, the long bows would likely have been unable to charge the spears, and the cavalry troop would have been dead to my counter charge. The spears can only counter charge now, and ensnare means they will not do well. Thus they will be flanked by the lancers and warriors unless I can pull off a miracle roll. I do move the musician, standard and carnyx over to support them.

Stephen: With the spearmen locked in combat (dubiously ensnared by portable stakes), the warriors and lancers charge the flank and easily rout the horde, capturing that objective. Buoyed from their recent success in Berserker termination, the cavalry troop charge the second of the regiments. As with Edward before them however, they fail to do a single wound to the regiment and no longer are able to contest their objective. Musician charges the flank of the slingers to stop them moving in and contesting the middle (in case of a turn 7).
The die was cast, and there would be no 7th turn. The English win it 3 to 2. Kill points were 1235 to Devean, and 785 to Briohmar, a 17-3 victory.
After thoughts:
Rob: So not holding those archers and cavalry troop up for another turn with my cavalry spelled the end of the game for me. Just that one nerve roll. Devean had his level of frustration as well with not being able to take out my crazies, but he did exceptionally well on the west, which made up for it in the end. Over all, I had a solid chance of winning this game before his secret combat weapon committed to melee. Well played, Stephen.
Stephen: I’d say the luck swung both ways. The western flank forces were lucky to be as successful as they were, yet the undying berserkers ruined the English chances in the east. With the deciding battle fought in the middle, on the last turn, it truly was anyone’s game right until the end. Longbows were surprisingly effective in melee as well as ranged and had they not been able to charge the spearmen on turn 5 the game would likely have been a draw. All in all, this was a great, tactically challenging game (though frustrating at times!) that could have gone either way. Thanks for the game Briohmar and all the best for the rest of the tournament!
***************************************************
Game 2
Barbarians Vs Byzantines – Dominate!
Initial Thoughts:
Rob: Well, I’ve played Swastakowey’s other army, but I haven’t faced this one so I’m not sure how this is going to play out. I am still playing the army based upon the models I have and want to do. Most other players have been more particular and picked armies that are stronger. Mine is fluffy. The anachronism is fully in play here again, as I am limited to ancients, and will be facing an army that is 1000 years more advanced than my own. The Genovese crossbows and cataphracts concern me. Also, the war dogs are much tougher than the maw beasts of the goblin army, or other hounds since they are large cavalry instead of regular cav. This means they have higher nerve and more attacks. I am also facing breath weapons, since Swas loves his always hits on 4 with lots of attacks. Basically, I’m seriously out gunned, and just need to get into combat and kill things fast.
Jayden: I am pretty confident for this match as my opponent has a low defense but hard hitting swarm army. Unfortunately for the Barbarians this means my shooting is going to hurt him. If he can close the gap to my shooting then it would be a big slaughter as it seems my list relies a lot on that shooting to be active. The map was pretty evenly made except the obstacles are on one side which I hoped would hinder my enemy a a little. All in all things are shaping up to be a good game for me.
Set Up:
Jayden won the roll and chose south.
Rob: Since this is a dominate, I am going to set just a bit differently than usual, I want the slingers covering the center, not that I think they’ll do much, but at least they present a threat. I want the fast stuff on one flank, to try to turn in and threaten in the center towards the end of the game. I chose to go with the east flank for this, since the hill will protect me early from the crossbow horde. I want the Fanatics on the west supported with the berserkers to present a legitmate threat on that flank as well. So my full deployment then, Fanatics with hardy veteran followed by standard, carnyx and musician, berserker regiment, 3 slinger troops, 2 warrior regiments with fury supported by a standard bearer, and a spear horde with fury. The east flank consists of a cavalry regiment with ambusher and fury, Buadicca, a mounted musician, another cavalry regiment with fury and fleet of foot, and a berserker regiment.
Jayden: Once deployment was done I regretted my flank choices greatly. Why on earth was my shooting and light elements on the side with all his cavalry? I would now have to play it very smart on that side to avoid losing some very pricey units. Center is a little weak too so I really need to win the left side and swing around to crush the middle assuming I still have a middle after my right side disaster. It is not clear but the deployment from left to right is: Green Cavalry, Wardogs, Warriors, Constantine Mounted, Cataphracts with Haste, Warriors, 2 * Greek Fire Throwers, Genoese Crossbowmen, Mounted banner and Musician, Levy horde, 2 * Naptha Fire Throwers, Hero mounted and skirmishers.
Turn 1:
Jayden: I push up as far as I can only giving 2 charges. My goal is to road block my enemies right flank while my range dunits pound them to dust. Levy, Hero, Skirmishers and the 2 mounted characters can all die to keep my shooting going. Crossbows and Naptha Throwers will really need to pull their weight this game. Center moves up as I am not scared of Slinger Fire given their track record. Left flank moves with the cover of the hill and hopefully will get a good first charge on his incredibly scary fanatics unit.

Rob: I have 2 charges I can do turn 1, and opt to take them, in the hopes my eastern flank can bust through in a hurry. I have to move the pathfinder cavalry out of the way first so Boudicca can charge the hero, granted, this will be a hindered charge since I have to go completely over the hill, but if I can defeat the hero, I have a strong position. After the queen charges, I move the berserkers behind the hill, and charge the hasty cavalry around them and into the skirmisher troop. Again, the idea is I should be able to break through and threaten the fire throwers. The center infantry advances into the woods, and the western infantry advance to the base of the hill. My shooting starts out dismally, and not a single sling bullet scores a hit, much less a wound on the cataphracts. Combat starts a bit better as the cavalry smash the skirmishers, and turn to face the threats ahead of them. Boudicca, however, only manages to waver the hero, and is stuck now.
Turn 2:
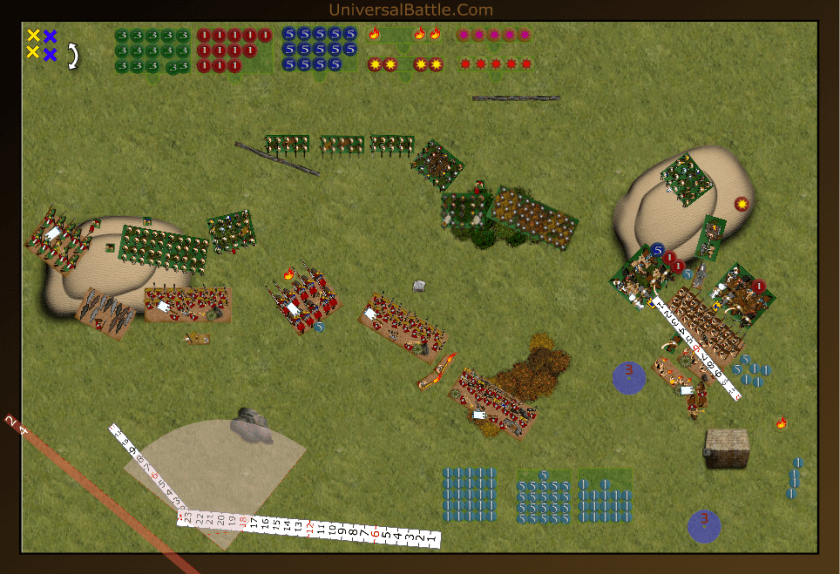
Note, we decided to change to the grass background because it makes it easier to see the bases.
Jayden: My enemies first turn could not have gone better for me (bar failing to waver the skirmishers) and now I can begin the continual sacrifice of my men to keep his cav back. The Naptha throwers do a meagre one wound (I am not impressed by this pricey unit so far) while the Crossbows do some serious hurt on the hill cavalry. The Slinger shooting keeps my center confident as I advance further. On the left I am in a great position and if I can make the most of that position I could then save the rest of my army from being crushed.

Rob: Boudicca again charges the hero, certain this time she can break him and over run into the Levy horde, which is also charged by the two cavalry regiments, one in the front and one in the flank. The Naptha fire didn’t do much damage at all, so I’m comfortable with this charge. The Center infantry advances as well, but the slingers hold where they are. The fanatics can’t quite charge the dogs, so instead move onto the hill out of the charge arc (almost) of the cavalry. I do position the standard bearer and musician to block a charge by them. Shooting sees some wounds on the cataphracts, but not enough to waver them because of the general’s presence. My first roll was a 12, but 17 was enough to rout, so on the re-roll they were able to stand. I would have preferred a waver result, actually. The combat also didn’t go my way.
Turn 3:
Jayden: Another great turn for me, on the left I have removed a regiment of Berserkers and the Fanatics are in a scary position. I spend about 20 minutes trying to find a way to flank those fanatics and cannot do so. Instead I aim for a very lucky overrun which never happens. On the center I do a little flame throwing to little effect. On the right I do exceptionally well removing 1 cavalry regiment and wavering the other. The Hero again holds the queen at bay. At this rate I don’t even need to worry about getting my left side over there to save their bacon.
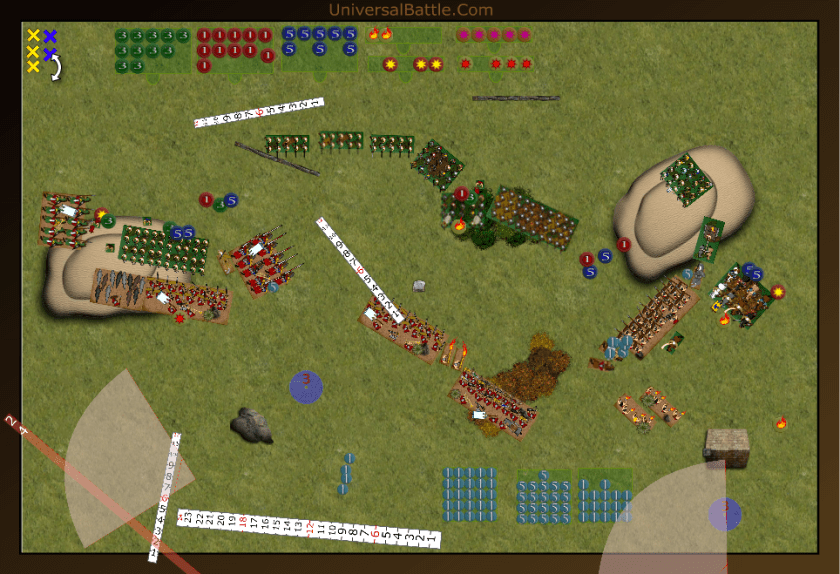
Rob: Ouch, that was a painful turn. 1 Cav regiment gone and another wavered from shooting negates their fury. Well, let’s see if I can pull off some kind of miracle. Otherwise this game is going to hell in a hand basket. I send the Berserkers into the warriors. Boudicca again tries to take out the hero, and the musician charges some napthas. I make a serious tactical error and choose to counter charge the warriors instead of the dogs, forgetting that they’re way better than in fantasy. My center advances a bit as well. Shooting sees one damage to the cataphracts, and no waver. In combat, the Fanatics waver the warriors, the berserkers break the other Levy, and Boudicca again wavers that stupid hero. The musician of course misses completely. He just needs 1 wound to stop them from shooting me.

Turn 4:
Jayden: War dogs ate the Fanatics alive and the cavalry failed to hurt the slingers in any meaningful way. Cataphracts removed a regiment of infantry and the flame throwers slowly roast the other regiment. Cavalry flank finally starts going bad as they are ready to start hurting me. On a bright note my Hero is still alive. All in all pretty good turn but could have been better. At this point Im pretty sure I have the game in the bag unless I mess something up bad. It’s just snowballing from here.
Rob: Well, my slingers held, which was pretty amazing. My berserkers were shot down in their prime, and one unit of warriors is gone while another is wavered. Not good. I had hoped to be clear on the east by this time, but still bogged down because of a stupid hero that refuses to die. I move the characters over to try to bail out the slingers, and Boudicca and the cavalry charge the naptha throwers. Should be easy kills. The slingers who were charged both counter charge, and the others flank the cataphracts. Combat is a miserable failure all around though. The western slingers do a wound and bounce (would have been better for them if they just stood where they were.) the middle slingers do a wound to the king, and waver him. The other slingers do a wound to the cataphracts and waver them. Boudicca routs her throwers, but the cavalry botch their attacks (1 wound out of 14 attacks) and the other ones hold their ground. Serious rubber lance syndrome here.
Turn 5:
Jayden: Time to really make sure the center is clear of enemies. Those slingers are doing better than most of his army! Not overly eventful turn, removed the cavalry that should already be dead and the center cannot hold any longer I hope. His heroes are now being pesky all around. There is only so much he can do now and frankly it’s all about getting those points ASAP.
Rob: My slingers appear to be the best combat force I have at the moment, and they again charge in, hitting Charlemaine and the cataphracts respectively. The three characters all charge the cavalry as well. My spears being wavered this time just pours salt on an open wound. Again, I pay for fury but it does me no good. The warrior regiment charges the horde with no hope of victory. My cavalry is also dead now, so my eastern flank is floundering as much as my western one did. Boudicca takes the flank of the crossbows, and the musician again charges the fire bombers. The queen gets lucky and kills the crossbows, but now will be facing the flame throwers. The musician again fails to hit. He sucks. The Slingers manage a wound on the king but he holds. The others, despite a massive 4 wounds on the cataphracts (that is amazing for slingers,) but re-roll a snake eyes, and my hopes are dashed. The staff section fails to hit, much less wound the cavalry. It’s pretty much over at this point.
Turn 6:
Jayden: Well the enemy queen annoyed me greatly, denying me a 19-1 win. So I burned her alive with everything I got. The center finally fell and the slingers finally died as well. This turn was truly a killing blow. Not a lot to report, I just hope his heroes don’t get a lucky kill.

Rob: I literally have nothing left, so I hie all my remaining characters into the center to at least score a couple of points. The die is thrown and there won’t be a turn 7, thankfully.
After Thoughts:
Jayden: My combat troops somehow managed to overcome his. Combined with my excellent shooting and cavalry I managed to do some big kills every few turns which made victory near assured before the game ended. Looking back a lot of my units were damaged and could have broken at any moment, however Brio was not able capitalize on this since army was in a worse state. I agree with Brio that taking a fluffy army capped at what models he owns (and he owns all of these I believe) really put it behind those of us who made forces specifically for the tournament. I think man of the match goes to the Hero who refused to break even though I threw him under the bus. War dogs eating Fanatics was amazing as well, I am very thankful Brio went to fight the warriors instead of the dogs, I think that move changed the entire game personally. All in all good game.
Rob: Well, I’m starting to feel like a Skaven (Ratkin) leader. I had a brilliant plan which fell apart because of inferior troops. Every charge seemed to go categorically wrong, except the slingers. The one significant error I made was counter charging the warriors instead of the dogs with the fanatics. That was a bad call. It all really started going wrong on turn 2 when I couldn’t break the Levy horde despite hitting them front and flank with cavalry. Then Boudicca also failed to break through which just made it worse. 3 turns she wavered that hero, and in the end he didn’t even die. Oh well, bottom of the pile for the tournament. I suppose I should go picking the best army instead of the one I want to use.
*************************************************
Barbarians Vs Egyptians – Push
Initial Thoughts:
Rob: I am actually terrified of this list in some ways. 2 legions of chariots. How the heck do I get rid of those things? I do know I don’t want the combat ones to hit me, so I have to do everything in my power to deny them a charge. I will sacrifice units as necessary to do so. He also has a troop of Mamuluk cavalry, but since it’s only a troop, I think I can deal with it. The other thing that is going to tear me up is his shooting. While shooting is not hugely effective in regular Kings of War, in historical it really does come into play significantly. One of the reasons is we don’t have flying shock troops to take down shooters. This matters a lot. I can already tell this is going to be a huge ruck right in the middle, so I plan on setting the majority of my infantry there, and trying to flank in with my cavalry and Boudicca. I’ve tried it the last 3 games ineffectively, but the theory is still sound.
Baldarov: This is my first game against the venerated Briohmar, and I am most worried about deployment. I live and die with my chariot legions, but their enormous footprint makes it difficult to get the rest of my army into good position, and I am sure my opponent will deploy good counters. I am hoping that my shooting can get some damage in and that, with the terrain hindering things in the middle, I can get the chariots fighting the good fight rather than getting sucked into a combat with chaff and then countercharged.
Set Up:
Rob won the roll for sides and chose south. As this is a Push scenario, after deployment we rolled for the number of loot counters, wouldn’t you know it, we came up with 3 each. This means there are a total of 7 scoring markers on the board, and each one on the enemy’s side of the table scores double.
Rob: I have 3 loot counters to spread around after deployment, but thankfully, it doesn’t affect most of my army, which is not nimble, and only moves 5 anyways. The 3 loot counter units will be identified in deployment with an (L) designator. I will try to avoid giving any loot to the fanatics since their job is to fight (and die as necessary.) Having won the roll off for sides, I chose the south to prevent him having the hill in his deployment zone. It won’t matter much, but it can have a bearing on the early game and his shooting. I set a regiment of warriors with fury on the western flank after dropping the 3 slinger troops on the hill. The intent of this regiment is to draw fire. I know, that’s not particularly a good mission, but that’s what it is. Maybe they can make it to combat, we’ll see. For the rest of my army, from west to east, I have a regiment of warriors with fury followed by a regiment of berserkers (L) with massive Warhammer, a standard bearer, a horde of spears with fury (L) behind the slinger troops, a regiment of berserkers (L), a musician, the horde of fanatics with hardy veteran followed by a carnyx blower and standard, and on the east flank I have a regiment of cavalry with fury and ambusher, Boudicca, a mounted musician, and another cavalry regiment with fleet of foot and fury.
Baldarov: Basically, my warriors and spearmen are shielded well and my chariot archer legion has good nerve and will play a more reserved role, so I give them the counters. I hope my regular chariots in the middle will be able to get off a good charge.
Turn 1:
Rob won the roll for first turn and opted to take it.
Rob: Having the slingers on the hill with their 30 inch range, I have clear shots with 2 of the 3 troops, and a covered shot with the center one. Thus my center stands fast on the hill. The western warriors run up the flank, and the cavalry advance on the eastern flank. The goal is a charge on the eastern archers on turn 2, and possibly a charge on the chariot horde as well, if offered. The right two slingers open up on the chariot legion, and cause some damage, but not much, while the western troop fails to wound the chariot archers.
Baldarov: I move the combat chariots up, thinking they are safe from a charge by being out of sight (unfortunately, they have a tiny bit in the forest and will be visible). I decide to leave the enemy cavalry regiment alone on the right and hope it dies from all of the shooting I have there. Everything else advances cautiously.
Turn 2:
Rob: Well, not only do I have a charge on the chariot horde and the eastern archers, I also have one on the cavalry troop with Boudicca. I happily take all 3. Sadly, my western warriors are wavered from shooting, again, looks like the 10 points spent on fury is wasted. The warriors by the woods are just a half inch out of charge range of the chariots, so advance enough to get in for next turn. The spears and berserkers advance through the slingers and into the woods, while the slingers all turn to face the chariot archers. All 3 troops let fly with their stones, and in the end, manage only a single wound. Combat sees the eastern archers slaughtered, but Boudicca wavers the cavalry troop. This is not how this was supposed to go, as she will likely be facing a flank charge from the mamaluks. The cavalry, in typical fashion botch their attacks and cause a trifling 2 wounds to the chariots, and of course fail to waver them.
Baldarov: I try to get help on the right, counter charge in the center, and hope the chariot archers can take down an enemy regiment before combat. If I charge with them they would be hindered and hitting on 6s, so I stay back and shoot.
Turn 3:
Rob: The eastern (hasty) cavalry charge the bolt thrower next, since it is a significant threat to them. Boudicca, now wavered thanks to not being in range of the mounted musician (boy did I screw that one up, missed it by half an inch,) backs her chariot up so at least the mamaluks will only have a frontal charge this time. The musician charges the cavalry troop as well, though my original intent was to hit the other bolt thrower. The fanatics take the hindered charge through the woods and into the chariot legion. The far western warriors advance towards the archers and bolt thrower, while the other warriors charge up the hill and into the chariot archers. The slingers have no valid targets so they advance up behind the spearmen and berserkers. Combat sees the eastern bolt thrower destroyed, the musician wounds the cavalry, but they hold. The fanatics crush the chariot legion, as we hoped they would do, but the warriors barely manage a single wound against the chariot archers. At least they won’t be shooting next turn.
Baldarov: With the main chariots gone, I charge the fanatics with everything I can in order to rout them. I forget that my warrior horde will be hindered and hitting on 5s due to the terrain they start on, and I also forget that my skirmishers don’t double attacks on the flank. This takes what looked like a slam-dunk combat and turns it into a bit of an uphill battle to kill the fanatics in one turn. Unfortunately, I don’t rout them.
Turn 4:
Rob: Wow, the fanatics held. There will be a reckoning now. Sadly, my western warriors are gone after drawing just a bit too much fire. Thus I commit fully in the center. The fanatics counter charge the warriors, the berserkers charge the skirmishers, the spears charge the braves, and the other berserkers charge up the hill into the chariot archers. In the east, Boudicca again charges the mamaluks, while the cavalry charge the cav troop instead of the bolt thrower. We again have no shooting round, so it’s on to combat. My cavalry defeats the troop, but have nowhere to go. Boudicca wavers the Mams. The berserkers crush the skirmishers despite being hindered, and reform. The Fanatics have a great round of combat and slash through the warriors, and the spears do the same to the braves. The other berserkers don’t do well against the chariot horde though, and bounce off. Currently this puts my fanatics with 2 loot, each berserker has 1, and my spears have 1. So 6 (1 completely across center line) to 2 at this point.
Baldarov: Losing both the warrior horde and the braves was a killer, and the game is now likely out of reach. The mamluks and chariots do what they can to keep the fight going, and the spears sacrifice themselves to save the chariots, and the bolt thrower goes after the cavalry.
Turn 5:
Rob: Sometimes I hate headstrong! Oh well, now the fight in the center is all we’ve got left. The fanatics drop the 2 loot counters and charge the spear regiment with the grenade. They are joined by the spear horde; we don’t want them shooting again, even though they missed last turn. The western berserkers again charge the chariot archers, and the mounted standard charges the eastern bolt thrower. The eastern berserkers pick up a loot counter, and the slingers all maneuver to face the mamaluks now except the one that moves to pick up the other dropped loot. Combat sees the spear regiment crushed easily, and the chariot archers wavered. Looking good, except for that cavalry troop about to come back through the forest at us. The spear horde picks up the loot counter the enemy spears were carrying. The standard misses with all 3 attacks on the bolt thrower. The score now is at 6 to 1.
Baldarov: (Note the picture was a bit delayed so it shows some barbarian movements.) With the game out of reach, all there is left is to try to kill whatever we can, especially the fanatics. The mamluks move into the woods to try to attack enemy loot-carriers on turn 6 if possible.
Turn 6:
Rob: The Fanatics take the big fat flank of the chariot archers. The berserkers hit them from the front as well. The spear horde reforms to face the mamaluks coming through the woods, and the slinger troop drops its loot and moves to stop the berserkers from getting rear charged. Shooting sees all 3 slinger troops fail to wound the mamaluks, and fighting sees the demise of the chariot archers. The berserkers grab the loot the chariots had, and advance over the hill. Thus at the middle of six, I am now ahead 6 to 0, with 1 counter unclaimed.
Baldarov: The general and archers attack the fanatics in a heroic attempt to salvage life. The bsb on the bottom also attempts to go out in a blaze of glory vs. the skirmishers, and the mamluks attack the slingers in the center. They succeed in their tasks, but it is too little, too late. Turn 7 or not, the Egyptians have lost.
The die is cast at a 2; there will not be a turn 7. Loot counters put the Barbarians up at 10 (4 fully across the center line) to 0. The barbarians win with a 16-4 final score having killed 1470 and lost 1290.
After Thoughts:
Rob: Well, this was certainly a bloodbath. I knew from the start I needed to over-power in the center, but it’s a shame my cavalry again did so poorly. Clearly, standard cavalry are not as good in historical battles as in fantasy battles. Basically, they’re common grunts on horses. They only hit on 4s and only get TC1. They have let me down countless times now, so I need to think of other options. Unfortunately, with Barbarians, they’re all you get as a flanker; that or chariots. Chariots have already proven to be lacking though. The game itself played out mostly how I envisioned it, except for the loss of my whole eastern flank. That being said, they held out for a long time, so despite all dying, they still performed their purpose in allowing me the win. The western flank warriors sucked up hits for 3 full turns before dying, so we can consider them successful, and the heroes of the game are the fanatics who took out the warrior horde, the chariot horde, and aided in the destruction of the chariot archers.
Baldarov: My plan on the flanks worked (though not as I had envisioned), but the center just didn’t. Allowing my chariots to be charged by the fanatics was poor generalship on my part by leaving them in the woods against a smart opponent, and when I was unable to break the fanatics with the big combats in the center, things turned on a dime against me. I love my chariots, but I have thus far not used the legions effectively. I figured I could handle their footprint since I am accustomed to chariot hordes with my Empire of Dust, but it has been rougher than expected. Still, I feel that one must go big or go home. The chariots give my army character, and I’m sure that if I were a better player they could make the difference for me, but I’m not there yet. I also should have brought a musician!
