So, my new job has kept me from playing and writing as much as I’d like, and life has definitely gotten in the way as well. The switch has been made to a new interface on UB, and these will be my first UB2 batreps. I hope you all can get used to the graphics, which I find not as good as UB1, but the interface itself is better, and much more forgiving. Without further ado, let’ get to the reports.
Abyss Vs Night Stalkers: Dominate
Abyss V Stalkers – Dominate!
Initial Thoughts:
Today I am playing my old nemesis, Fyrax. He and I did the most towards play-testing ratkin back during beta testing for Uncharted Empires. Most recently I faced him using an MSU Herd list. Today, he’s busting out the Night Stalkers, which should be a great match up. As he uploaded his units, I thought to myself, “When’s he gonna stop?” 13 Drops is a lot for elite armies like the stalkers. One of the great things about the Stalkers is that they don’t need to spend points on inspiring, they just borrow it from the other player. That means to inspire my guys in a fight, I have to inspire his as well. It also means that his units are vulnerable in the early going since my inspirers won’t be within 12 inches on the first turn or two. During this report, I do plan on spelling out my thought processes ala decision cycle, than I have in the past.
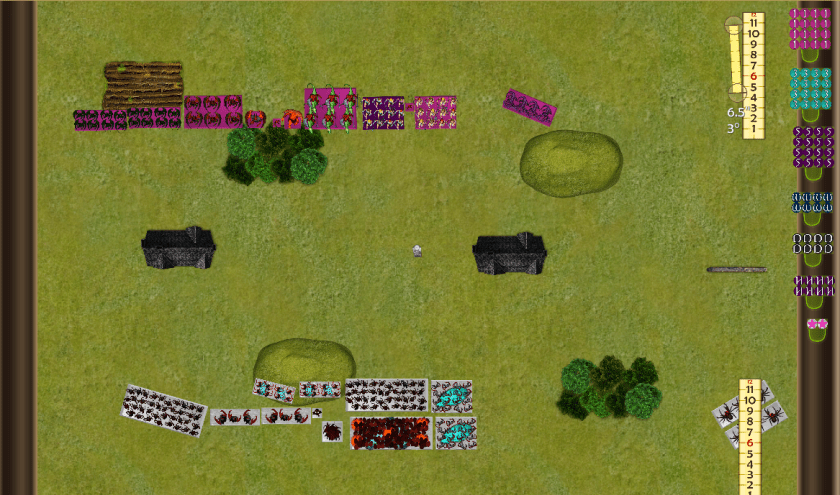
Set Up:
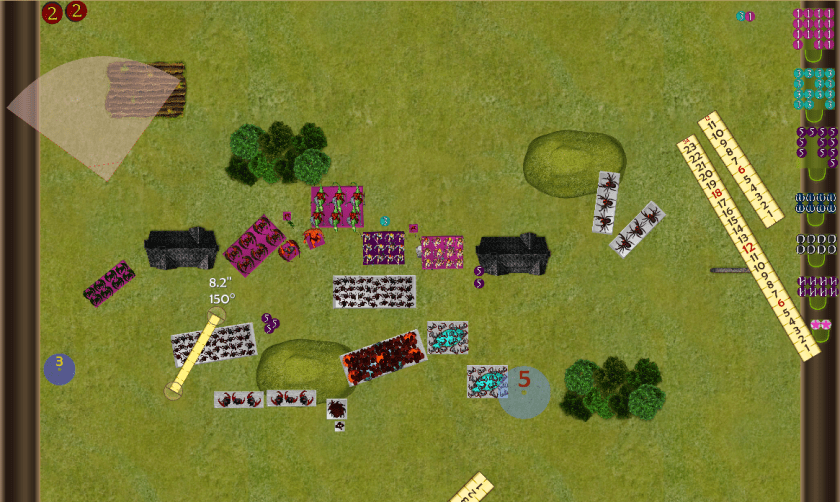
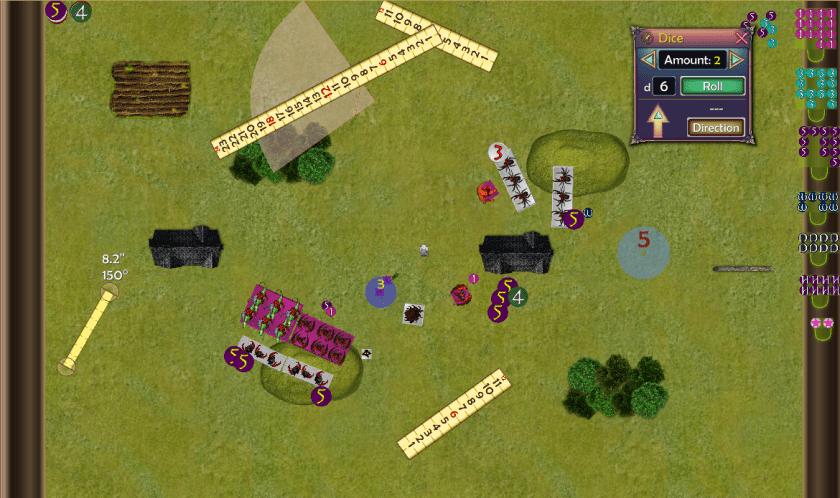
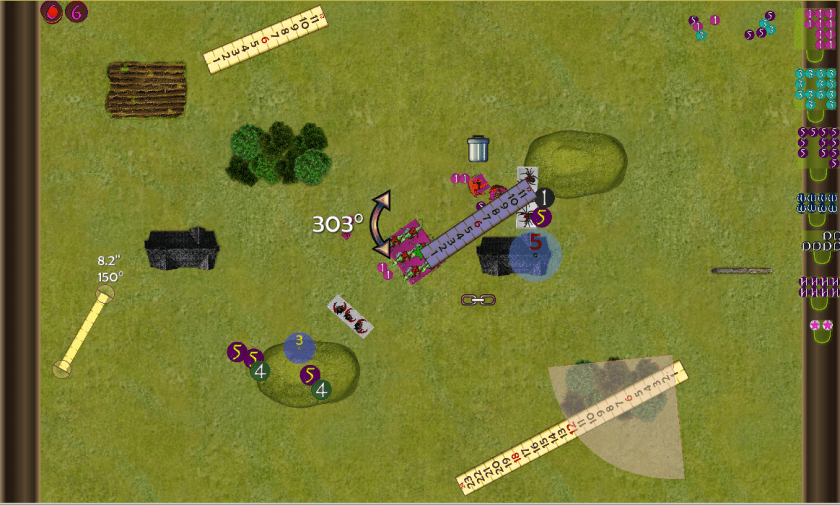
I won the roll off for sides and I chose the top. This was just to deny his shooters the field which would hinder charges against his specters. It does mean his specter will be up on the hill, making nice fat lightning rods out of themselves, if he goes along with my plan. Since this is a Dominate scenario, I want to keep everything tight and on a single flank as much as possible. I do have air superiority, and more mobility than Fyrax does, so I just might be able to pull it off using a single echelon formation. Being a Night Stalker player as well, I know the weaknesses of the army, and am prepared to deal with them. The first is that he has nothing with a defense higher than 5, and that is only with the butchers. Tortured Souls and Horsemen should be able to deal with that threat, provided there’s no surge shenanigans. Plus the house on the left gives me some cover to advance. The big open center is daunting, but with some well placed lightning, it should be safe for the succubus regiments to advance and hold.
My sequence of drops went: hellhounds, gargoyles, gargoyles, succubi, succubi, harbinger, horsemen, souls, Bael, Lord of Lies, and harbinger. From left to right that means Gargoyles, gargoyles, tortured souls with haste, Bael, Harbinger with boomstick, LoL, horsemen with pathfinder, Succubi with Helm of the Ram, harbinger with Lute of Insatiable Darkness, Succubi with Blood of the Old King, and finally, hellhounds with healing brew.
The thought here is that the gars on the far flank will be able to use the house to get into a charge position on the specters. They are also the pawns who will die to save other units. The souls and horsemen are the real damage dealers, and with their respective ranges, they should be able to define the charges they want to take. Bear in mind, He has 3 tarpit hordes, and I need to take them down in one shot, or I’ll be hung up in danger. The LoL, Boomstick Harb and Bael will use the woods for cover, and zap the specters on the hill in the early game, and then be free to charge. The succubi are the middle, their job is to hold in the center. and the hellhounds are to be used as a blocking force either to set up charges on the fiends or the reapers.
Fyrax recognized as I did, that the main effort was going to be center mass, and he stacked his army in 2 tiers to run up the center. He also put 2 regiments of fiends out on the right flank as his flanking force. Solid plan all around. I do have to watch myself a bit since he has shamblers and a surge caster. His army then, from left to right: horde of scarecrow, butcher regiment, specter troop followed by another butcher regiment, a second specter troop followed by a horror with surge 6 and bane chant and the planar apparition. He then has another scarecrow horde followed by a bloodworm horde, then Reaper regiment with strength brew followed by another reaper regiment with Brew of Sharpness. Finally, out on his far flank he has 2 regiments of fiends.
Turn 1:
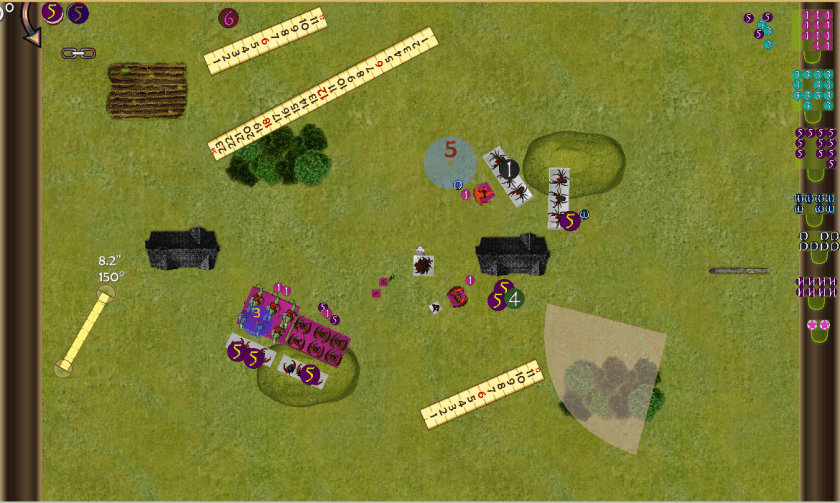
Fyrax won the roll for firsties, and generously elected to let me go. This gives him the advantage of being able to run his guys into scoring position at the final turn. I’m fine with it though, as it lets me set the tone of the game early on. The gars head down the line quickly to set up flank attacks on the specters and butchers. The souls move out and anchor their flank to the building, giving them a lot of choice for charges in the center. The 3 lightning casters advance through the woods into range, while the horsemen succubi and hellhounds ease forward in the center. All 3 lightning casters let fly on the right specter troop, and blast it back to the Utter Dark from which it came. Good shooting to start it off.
The specters are the first target since they do pack some punch with their firebolts. If I can rid myself of them early, it gives me a significant advantage. The rest of my priorities of attack are to the hordes being hit with combination charges, then the reapers, which are really scary, and then the fiends and butchers. The butchers are the least of my worries in the early game since they’re slow moving and De5+. They will be dealt with in hand to hand combat rather than shooting. Thus my action is advance and shoot a priority target. his reaction is either going to be cautiously advance or draw back. If he draws back, I will press forward even more aggressively. If he advances, I am not against turn 2 combination charges.
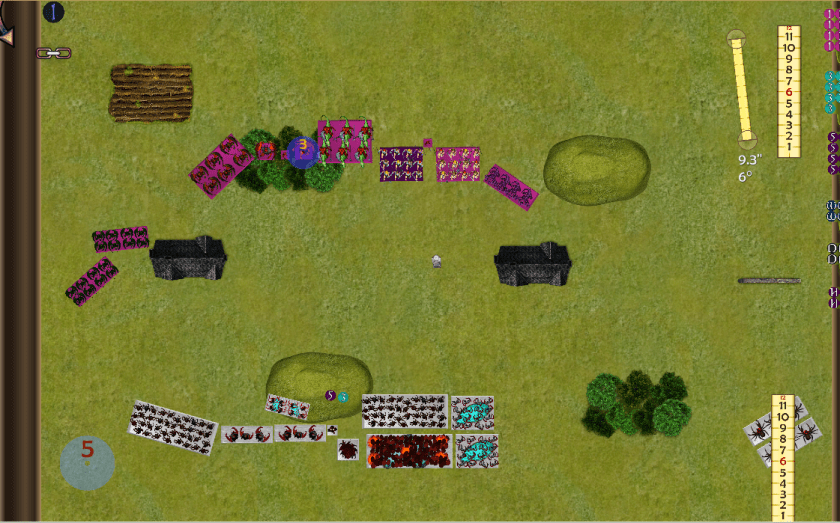
Fyrax does advance on line in the center and shoots the fiends down the right flank. This is fine because they won’t become a threat until turn 3 at least. his left flank holds where it is, anticipating a throw away charge by the gargoyles. He does advance the specter troop into range of the tortured souls. For his only shooting, the specters botch their firebolts on the souls, and the turn passes.
I did anticipate a more aggressive move on the left, but the whole combat team holding fast can still work to my advantage. So his action cycle then is: Move up into striking position, and shoot what he can. My expected reaction is to charge the left scarecrows with both gar troops, and charge my flyers in on the specters and other crows. His counter action then is to charge my committed units with the butchers and reapers.
Turn 2:
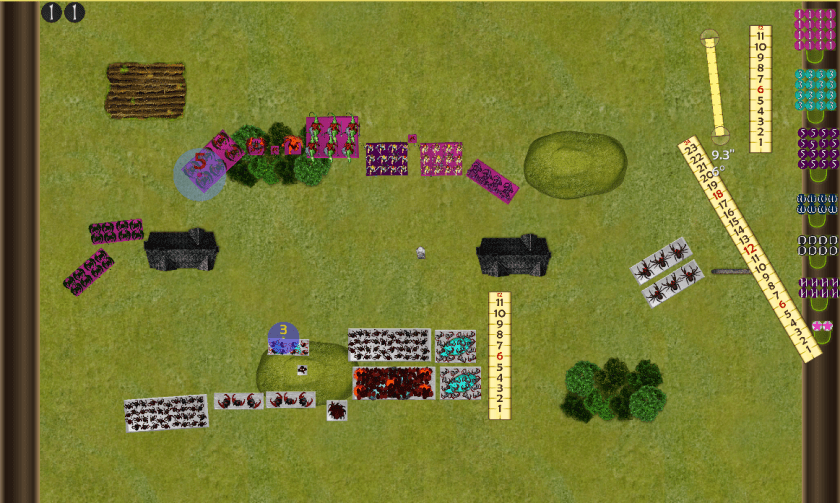
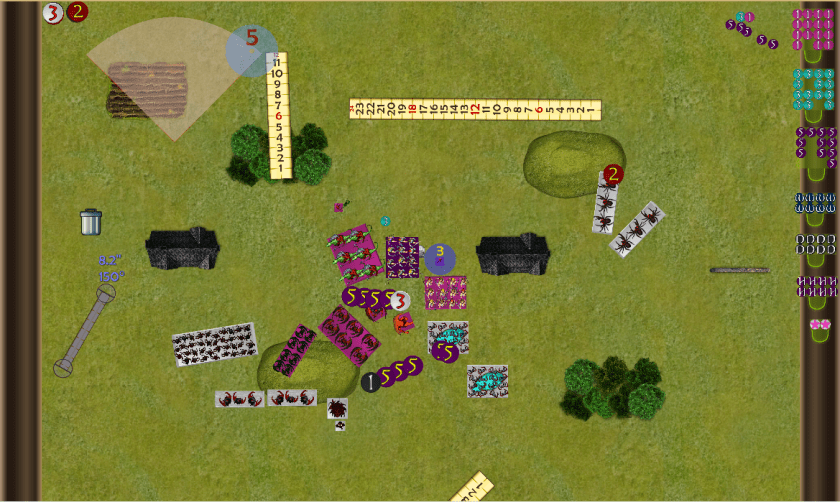
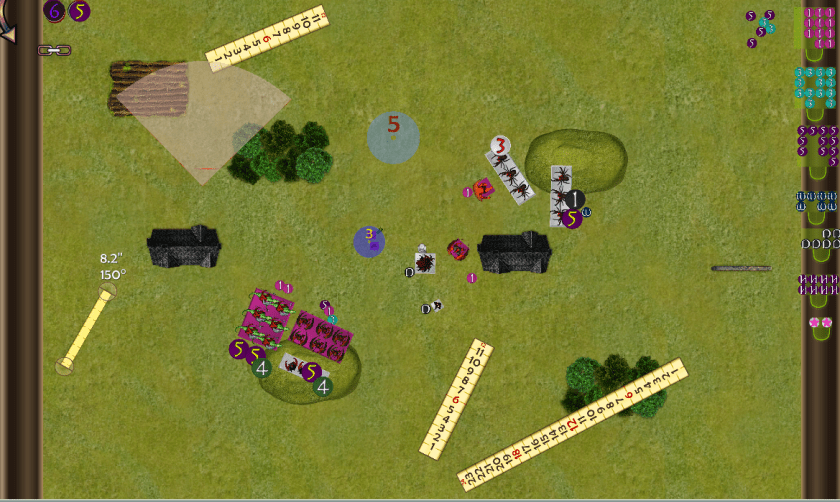
Staying well within my plan and priorities, the only charge I take this turn is into the flank of the specter troop with gargoyles. 80 points for 100 points of shooting is a fair trade any day. The center creeps forward with the force projection intent, but also with the intent of luring in chargers that I can manage. Thus, the hellhounds are well within range of the reapers, and the succubi are in range of a scarecrow horde. That said, all units are out of arc and range of the fiends. The building is my friend in this regard. It does get a bit tight with the souls, horsemen LoL and Bael, and the Boomstick harb is going to be shooting with cover. The lightning lets fly, and does a grand total of 5 damage to the center scarecrow horde; not nearly as good as the first turn shooting. Oh, well. The one combat sees the specters mortally wounded, and sent back to the darkness that spawned them. The gars turn to face the inevitable charge of the butchers.
My action then is to position my center for combination charges, kill the specters, and sacrifice the hellhounds. The expected reaction is for Fyrax to charge the gargoyles with both butchers, charge and kill the hellhounds, and charge the scarecrow horde into the TC succubi. My counter action is to charge the reapers, combi charge the scarecrows, and combi charge the bloodworms. Thus stacking almost my entire force in a 2 tier defense of the center.
Fyrax does take the full bait. He does send the reapers into the hounds and the crows into the succubi, but he flank charges the gars with the scarecrows and the butchers hold in place so they can move towards the center fight. He no longer has any offensive shooting, so it’s only healing from the planar apparition I have to worry about now. As anticipated, the fiends move forward and are now in a position to threaten my flank, so I will have to start dealing with them now. The apparition heals all the damage on the crow horde, with an extra heal to spare (yep, he hit 6 out of 7 on a 4+.) Combats go as expected with the gars and hellhounds being slaughtered, and the crow horde bouncing off. The reapers back off 2 inches after killing the hounds hoping this will create an opening in my line. I’m pretty certain he expects me to charge across the frontage with the gars and souls into 1 crow horde and the characters and TC girls into the other crow horde. This allows his follow on forces to engage me.
Turn 3:
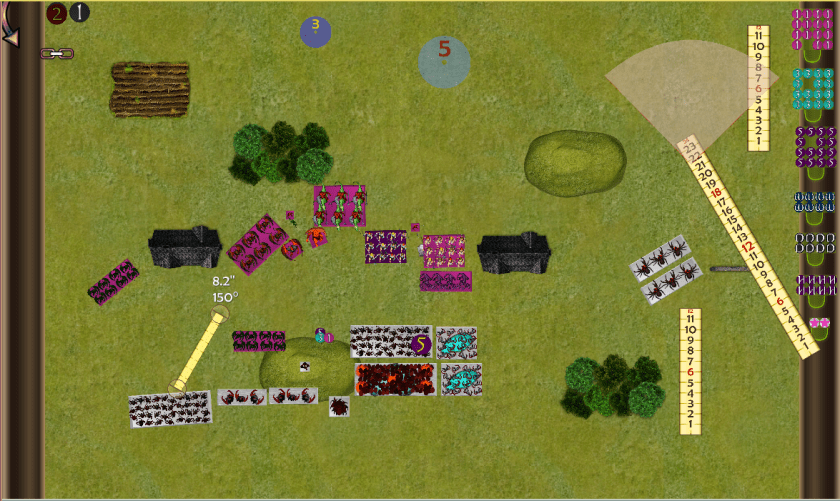
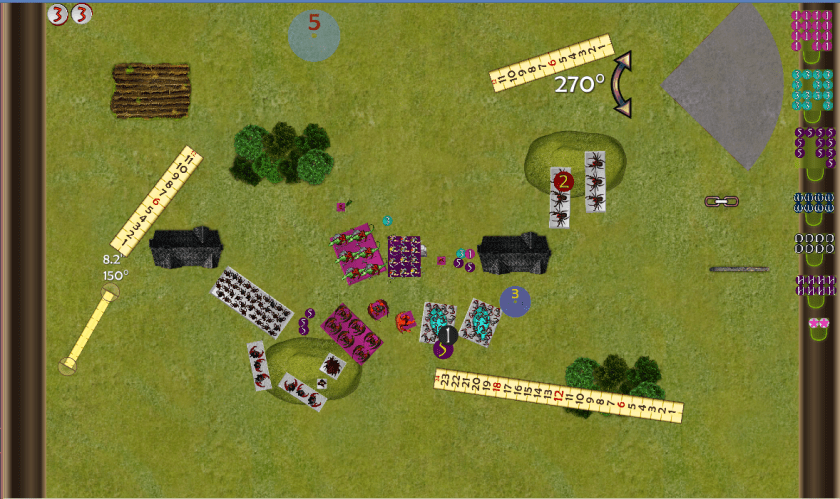
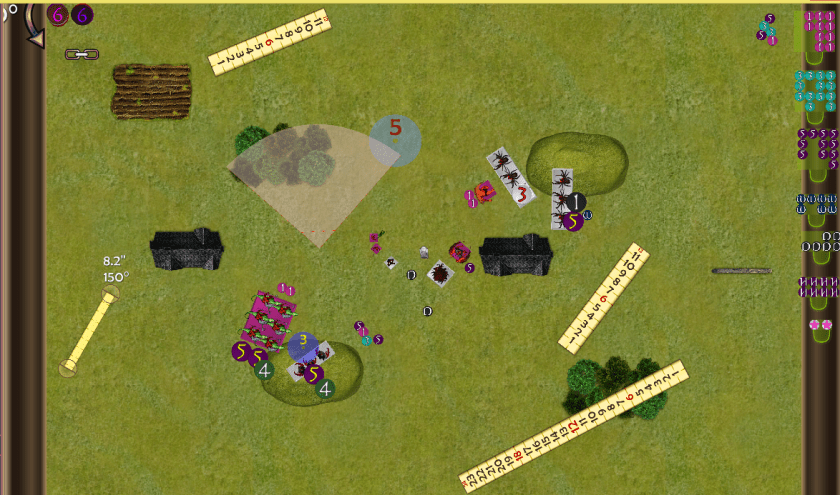
Fyrax leaves a lovely chunk of space between the scarecrows and bloodworms. My first combination charge is a triple charge on the worms with Bael, LoL, and souls. The old blood girls charge the reapers (CS2 type) and the other girls and horsemen charge the crow horde. blowing these combats could really cost me, so I’m doing everything in my power to not lose them. The Boomstick Harb moves into extreme range on the lead fiend regiment, and the remaining gars flap over to block the butchers from charging in. Shooting sees the BC harb fail to cast BC (1,1) but the Boomstick does 2 damage to the fiends. I resolve the bloodworm fight first, and the worms die a horrible, squishy death. The souls turn to face the butchers, while the LoL and Bael face the reaper threat. The horsemen and Succubi crush the scarecrows, and turn back to back to face the incoming fiends and other scarecrow horde. The Succubi use their blood, and cause significant damage to the reapers, who, thanks to the inspiring presence of the LoL develop a case of courage and hold.
Overall, everything is still going according to the plan. Not breaking those reapers is going to hurt, but I don’t think it’ll be game ending. The charge in depth really sets the conditions for my follow on moves, as I have units ready to flank in both directions. What I expect to happen next is: dual reaper charge on succubi, dual butcher flank charge on gars, scarecrow move towards the center fight, and possibly get surged into the horsemen. The fiends will also finally be in position after this move to engage.
Fyrax’s moves are just about what I expected them to be. The only surprise is that he parks the apparition between my souls and the butchers. Kind of not what I wanted, but it is a solid move. The horror doesn’t try to surge the crows either, which leaves them in a precarious spot as my souls can now see them to flank charge. Fyrax’s advantage in units is starting to show, as I am now significantly outnumbered, and fighting in all directions in the center, but I am in the center which is the condition for victory. The Apparition heals 4 wounds on the reapers, who then go on to crush the old blood succubi. The butchers eradicate the gargoyles as expected; no snake eyes for me.
Turn 4:
The horsemen and souls take the combination charge on the crow horde. The LoL does the unexpected and flies off to near the building where she can take on the fiends. The TC girls charge the undamaged reapers and Bael charges the wounded ones. Shooting is lousy and causes only 2 wounds out of 10 shots on the fiends, but does waver them, so it’s still a score of sorts. The BC harb finally succeeds as well, and the girls go on to cause 15 wounds to the reapers. All they need is a 3 to break, naturally, snake eyes pops, and the reapers will continue the fight. Bael easily sees off the other reapers, but now has to worry about the insanely courageous reapers, and can’t move to intercept the butchers or fiends. The souls and horsemen wipe out the crow horde, and turn to face the oncoming butchers.
Right, so the double 1 interrupted my decision cycle more than any move Fyrax has made. Knowing my opponent and his army has been of significant benefit to me thus far, and I think it can still prove useful. All I have to do is nick the reapers and they die, so that is at least in my advantage since I still have 4 shooting capable units. Wavering the fiends was also beneficial. Suddenly, I don’t look so outnumbered.
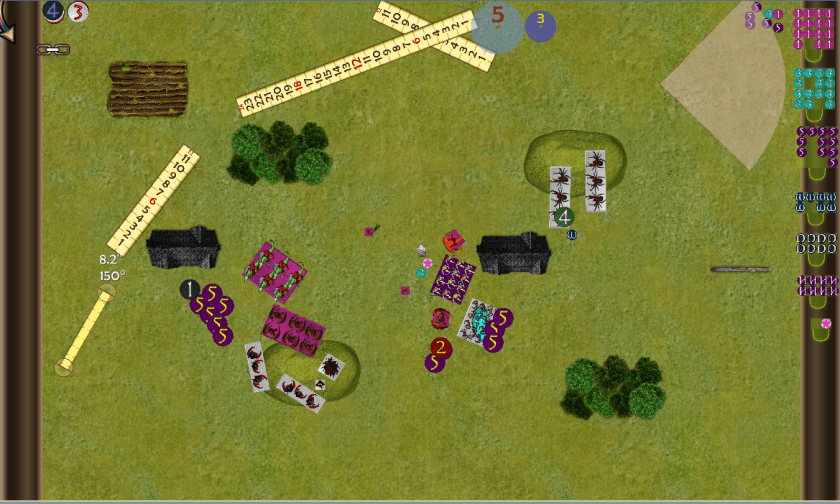
The only unanticipated move at this point is the apparition rear charges Bael instead of healing the reapers. The reapers do counter charge the girls, and the butcher troops both charge the souls. I wanted this to happen since the souls have a solid chance of holding and the horsemen can then commit. The other fiends advance through the wavered ones and turn to face the center fight, looking for a tasty rear charge. The horror, you remember the bane chanting horror right? The horror springs to life and bane chants the apparition, who goes on to do a soggy 2 wounds on Bael. The reapers wipe out the girls, but realize their precarious position, and reform to face Bael. Had they advanced, they might have made it out of his charge arc, but it was risky. Instead Bael has a front charge on them. The Butchers go on to do 8 wounds to the souls, who hold.
Well the melee is now general and tight. I’m still outnumbered, but not by much, and I still control the center. All in all, I still have a chance. I should be able to break both Butcher regiments, and move back to center, break the reapers, again waver the fiends and stop the other fiends’ advance.

Turn 5:
Bael charges the reapers, the LoL charges the lead fiends, the souls counter charge the right butchers and the horsemen charge the left regiment. The 2 harbingers get into position to snipe the wavered fiends, and waver them again. Damn! Those things never die against me. (Mine always die when they’re working for me.) Combat sees the reapers driven from the field. The LoL does 3 wounds to the fiends, but they hold easily. The Horsemen do 10 wounds to the butchers, who hold(!). The souls do a slightly under average roll and cause 5 wounds to the others, who also hold. Still, as of right now, I’m leading 2 to 1 for points.
Both butchers counter charge, as do the fiends. The horror charges Bael in the hopes of stopping him from casting or charging something with his TC. The apparition heals 2 wounds on the front fiends, who go on to cause a single point of damage on the LoL. The horror fails to hit Bael, and the butchers both fail to break their targets.
Turn 6:
This is it, baby! Make or break time. I don’t realize which direction the apparition is facing, so I place Bael with my back to him. The souls, horsemen, and LoL all have another go at their respective targets. Shooting is atrocious as out of 9 shots, we only manage a single wound, but it’s enough to waver the fiends again. The LoL does 2 wounds, and the fiends hold. The horsemen do 4 wounds and their butchers fall. They turn to face center and the other butchers’ flank. The souls do even worse this time, causing only 4 wounds out of a statistical 6, and top it off with a snake eyes for nerve. Crud, now I lose the souls for sure.
The apparition gets its second rear charge on Bael. Oops. The fiends again charge the LoL and the Butchers get another attack on the souls. Just to be difficult, the horror also charges the BC Harb. The souls are banished back to the abyss. You’d think, after giving to him twice, Fyrax would return the snake eyes favor, but no, not him. The butchers turn to face the horsemen. I still have 1 trick up my sleeve, so worry not, friends and neighbors. The horror botches his attack, and the apparition fails to break or waver Bael. If the game ends here, it’s 2 to 1 my favor. The die is cast, and there will be a turn 7.
Turn 7:
The LoL and Bael go after the fiends. The horsemen, having seen the butchers survive such a beating, decide they want to eat a softer target and charge the horror. This is by design, as if I break the thing I can over run into the apparition in the flank. I still have my TC intact, too. Plus it puts my regiment into scoring position. The 2 harbingers open fire on the wavered fiends, and miss altogether, now they can move, after 3 turns of doing nothing. The horsemen don’t even slow down, they just crush the horror under their hooves and slam into the apparition, who dies with an awful hiss. They turn back to face the butchers. Bael and the LoL kill the fiends as well, and the LoL backs up while Bael, who regenerated 4 of his 5 wounds, braces for impact on the very edge of scoring position. It is now 4 nil, with one last set of moves for Fyrax. The butchers shamble into scoring range, and the fiends charge Bael for all they’re worth. As the dust settles, the fiends bounce back just out of scoring position, and he game ends 4 to 2. A 17-3 victory for the Abyss.
After Thoughts:
There was a point in this game where I thought is was going to be a solid rout, but then the snake eyes hit for the first time, and it got a whole lot tougher. The second snake eyes wasn’t as crucial, as the game was pretty much over at that time, but it still kind of wounded my pride losing the souls so close to the end. Still, they did their part to break 2 hordes, and held the butchers out of the fight. Pretty much everything went according to the general plan. I lost more units than I wanted to, but it still played out pretty much as I intended. Those non-dying fiends, though, are way better in regiments than my hordes of them are. Can’t figure that one out. Bael and the LoL are still a solid killing force, either with lightning or hand to hand, and I’m very happy with this army as it stands right now.
