Introduction:
So, today I got to play against Lord Avondale and his Brotherhood. He is getting ready for a tournament, so asked if I would mind playing his army at the 1250 points level, and on a 4 X 4 board. I don’t mind at all since it is sometimes fun to play at different levels of power. The smaller board also makes the tactics that much more important.
Initial Thoughts:
So against the Brotherhood, it is always going to be a challenging game. The knights are all solid choices for use, and his army, with 5 cavalry units and a beast is definitely going to be a challenge. I brewed up a quick list and was surprised to find I could fit 9 drops in it, and have a nice balance of fast movers, hard hitters, solid infantry, and even some shooting. I only took 2 magic items, but he only had 3. The one true benefit he has is that one of his knight units is inspiring, which gives him 2 inspiring sources, and I also have 2. It is possible we had too much terrain on the map, but we were both fine with it, so we decided to go with it.
Terrain Analysis:
With no pathfinder in my list, I want to take advantage of the relatively open ground on the left side of the screen. The woods in the middle and on the right are not really favorable ground for me to fight in, but I can get flyers into either wood on turn 1, and charge out unhindered. He has very little shooting as well, in fact he only has breath 10 on the beast and the Lute on his adjutant. Looking at the ground in general, if I get the option, I will take the top.
The objectives in Ransack make it a bit different than a standard Pillage scenario, since there is effectively more to be gained from certain objectives. With the placement, all 3 of the 2 pointers are on the right, so One should expect more force to be stacked there. But with the more open ground on the left, an echelon formation could bring forces to the flank relatively quickly.
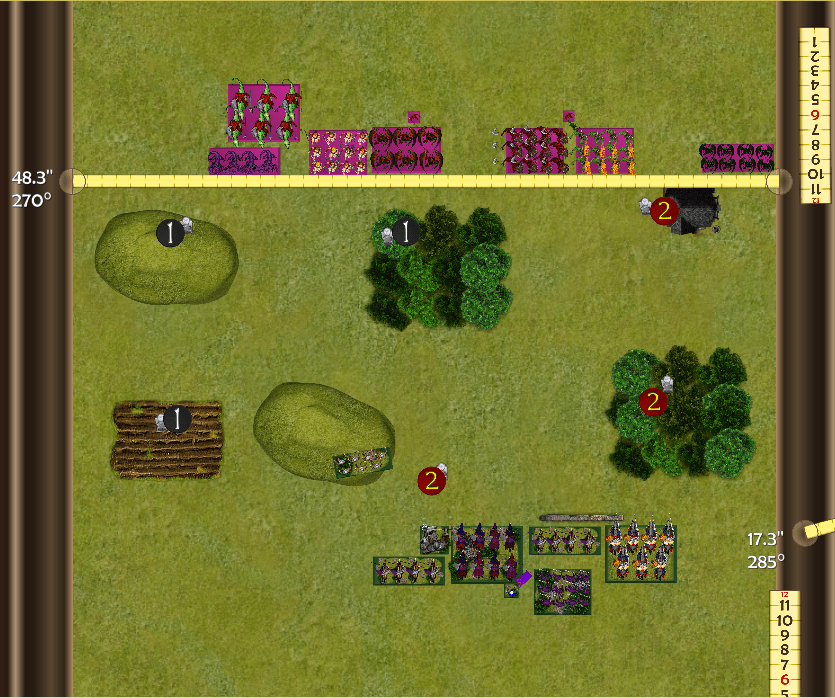
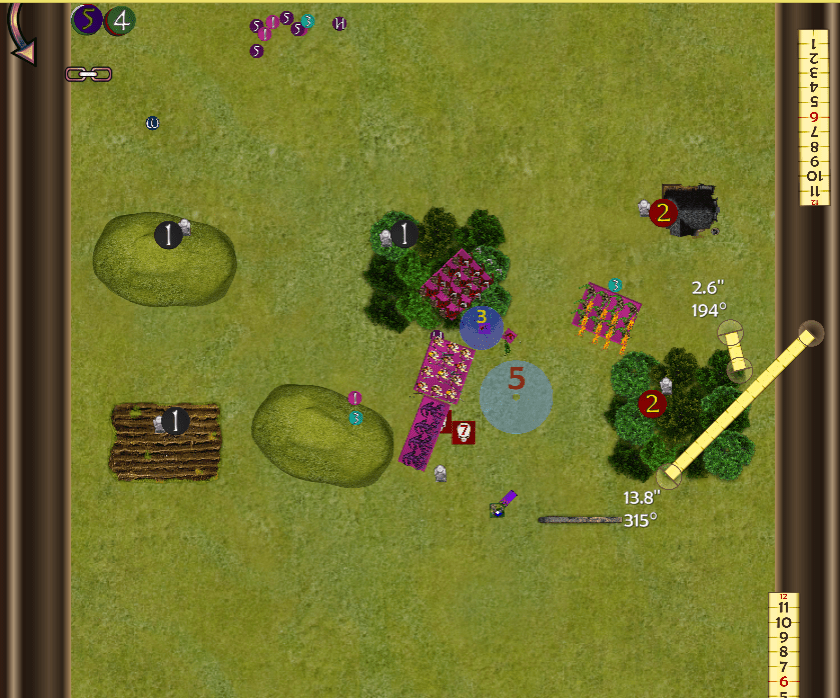
Set Up:
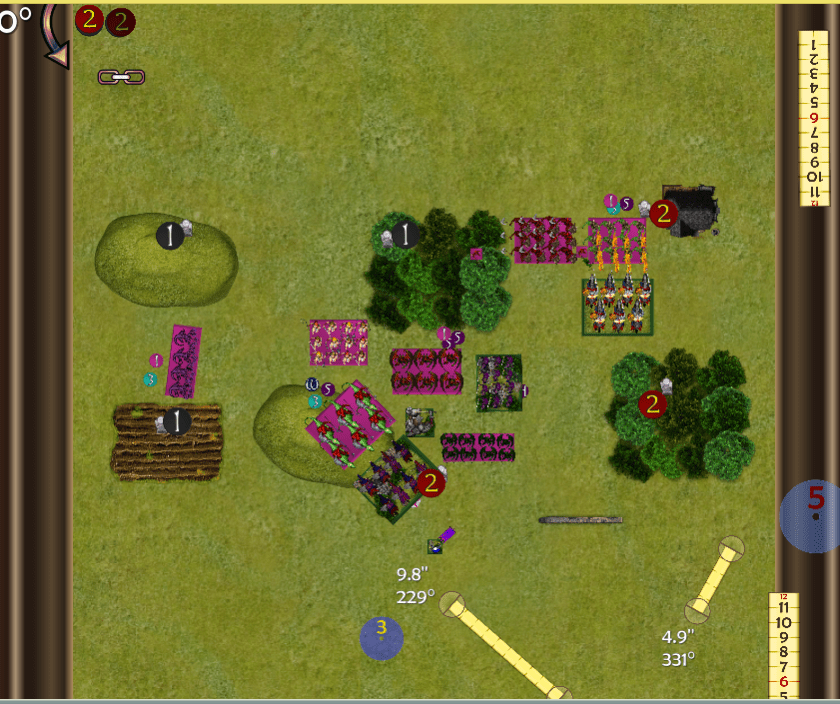
So, I win the sides choice, and go with the top, as I hoped to. I drop the gars on the extreme left as my first drop sine they are faster than anything he has, and the narrow gap actually favors them if I decide to keep them there to claim the 2 point objective. My next three drops are the flame bearers, lower abyssals and harbinger with the Griffin Banner. The next two drops are the succubi beside the forest and the hell hounds with a clear field of view across the table and into the center. I also drop the harbinger with Lute of Darkness where it can influence both the succubi and the lower abyssals. my final 2 drops are the horsemen offset behind the hell hounds and the tortured souls behind the forest. This last drop is a bit of a gamble. If I get first turn, I can control the entire center with them, but they are stuck behind the woods if he gets first turn.
Lord Avondale stacks everything center left, with Swain’s Rangers providing bowfire on the far right. His army, then from left to right: Swain’s Rangers and a forsaken beast with bad breath followed by a villein reconnoiterers troop, brotherhood knights regiment with brutal followed by an adjutant with the Lute, another recon troop followed by brotherhood knights on foot with CS1, and the redemption knights with pathfinder. He is set up rather defensively, but because he is closer to 2 of the 2 point objectives, it’s a pretty solid set. The rangers vanguard onto the hill to shoot clearly on turn 1.
Turn 1:
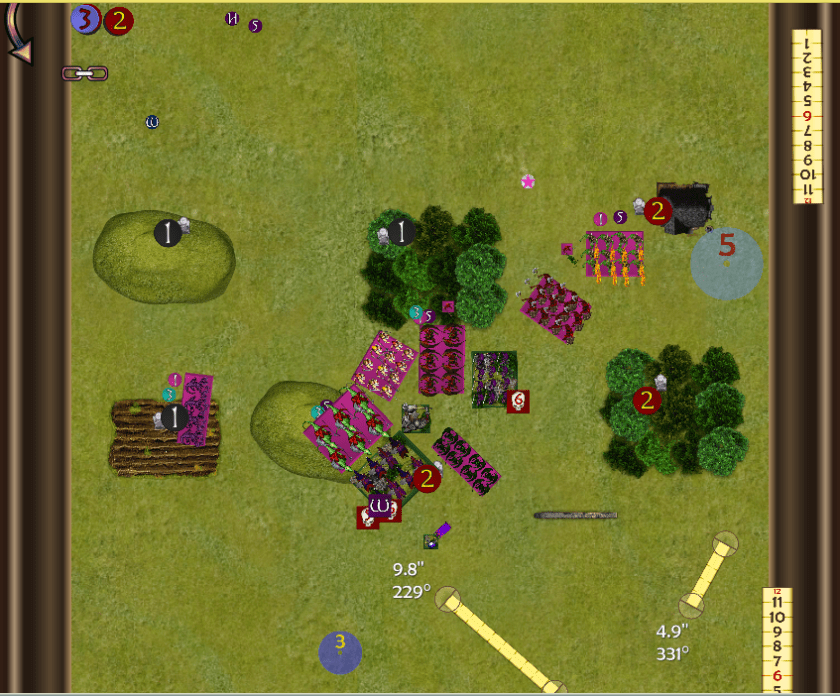
Well, the gamble pays off, and I get the first go. Since the flamebearers are only range 18, they won’t be shooting turn 1. I move the hounds up fast on the left to threaten Swain and the boys. Everyone else moves up right around 6 inches except the gars who take advantage of the redemption knights being behind the woods to position for flank attack threats.
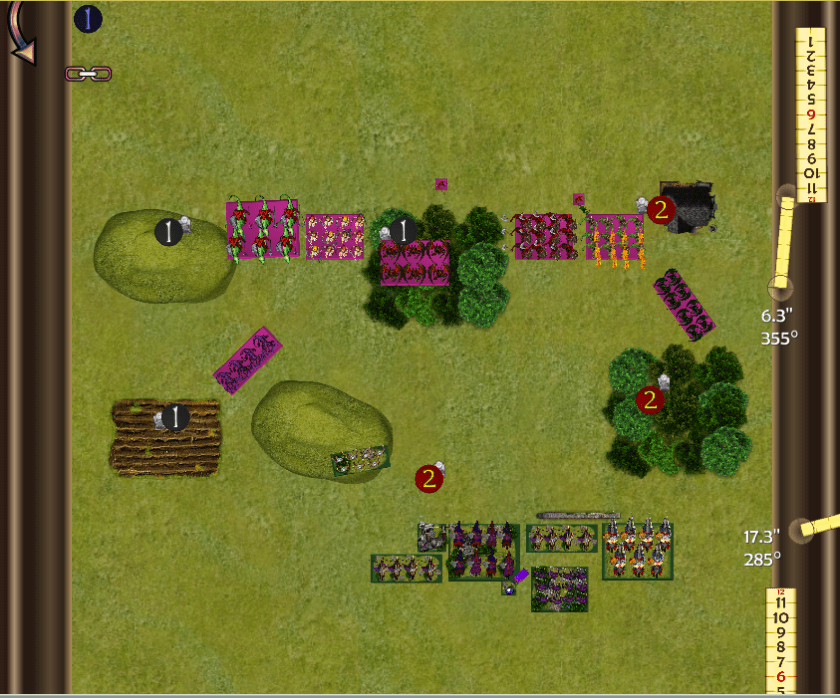
The rangers could charge the hounds, but stay on the hill instead. both recon troops advance into charge range and the rest advance as a group. The rangers open fire, and draw first blood, wavering the hounds, not exactly what I wanted, but it’ll be fine.
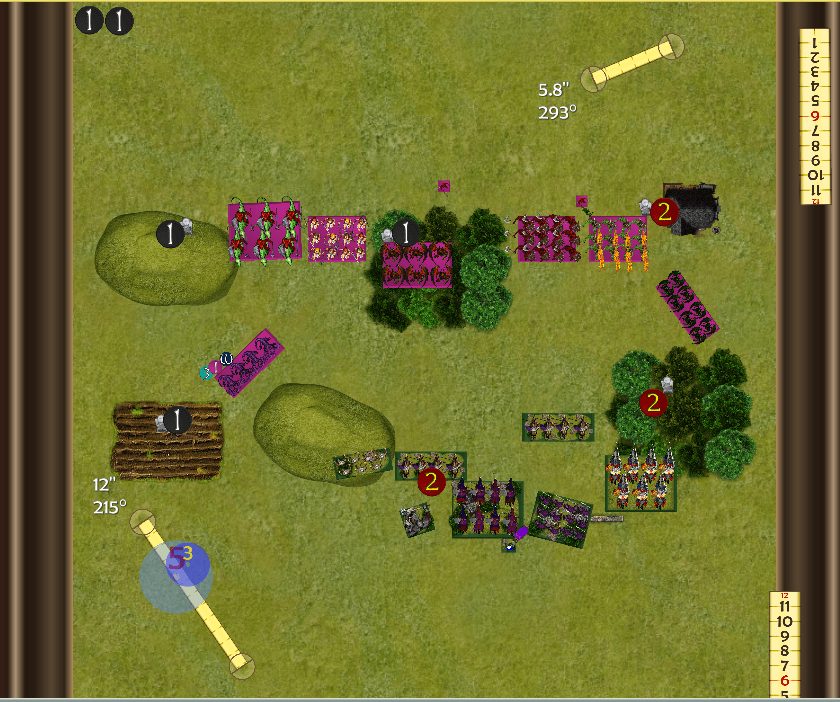
Turn 2:
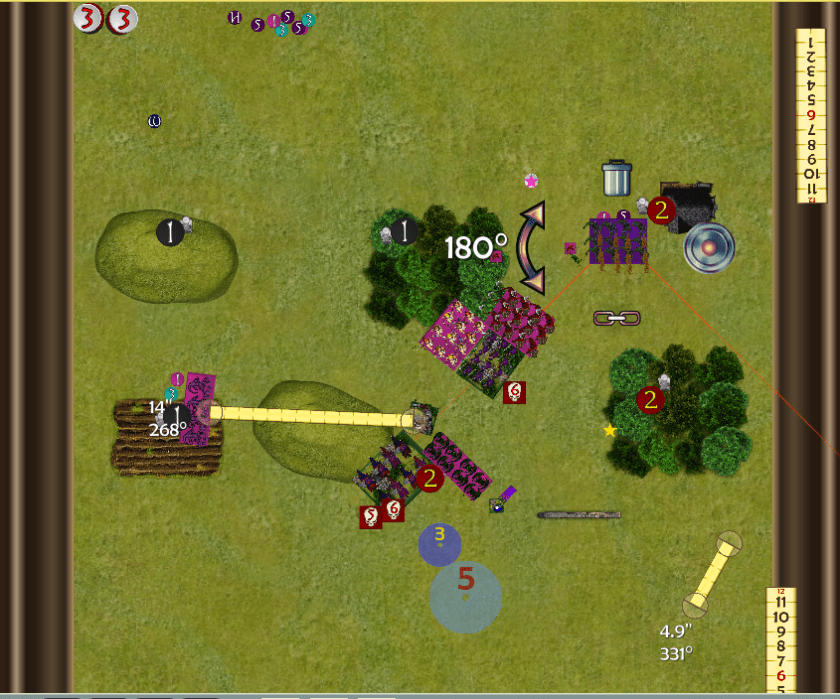
So, I have some obvious charges that I can take, but it is a matter of how I want to take them. the hounds being wavered limited only 1 option, but if I play it right, I should be able to remove 3 of his 7 units this turn. The hounds take advantage of being nimble, and shift off to the left to open space for the horsemen, who charge the rangers. I do the unexpected and combo charge the left recon troop with the gargoyles and the souls. The succubi move forward, while the flamebearers and lowers prepare to repel a charge from the redemption knights. The flamebearers and both harbingers open fire on the other recon troop, and burn it to ashes. The rangers are trampled easily, and the horsemen turn to threaten the whole center. The recon troop is also crushed. The souls back up 3 inches, which is just a touch farther than I’d have liked, while the gars turn to block the knights. The 3 inch back up was just enough to put a corner of the souls into the foot knights charge arc. A 2 inch back up would have been perfect. The beast and knights have charge options in the coming turn. No matter how they do it though, there will be charges coming back at them.
After several false starts, the beast and foot knights do a combined charge on the souls. the brotherhood knights charge the horsemen instead of the gars, which hurts a bit, and the redemption knights charge the flame bearers. The adjutant bane chants the knights, so they’ll be wounding easily. We go right into that combat, and the knights do 8 wounds, wavering the horsemen. they bounce back into the charge arc of the waiting gars. the beast and foot knights do 11 wounds on the souls, but a nerve roll of 6 keeps them in the fight. The redemption knights do significant damage to the flame bearers, but they are only wavered as well. The beast’s position keeps him safe from a succubus charge, unfortunately, but everybody else will be hit and hit hard.
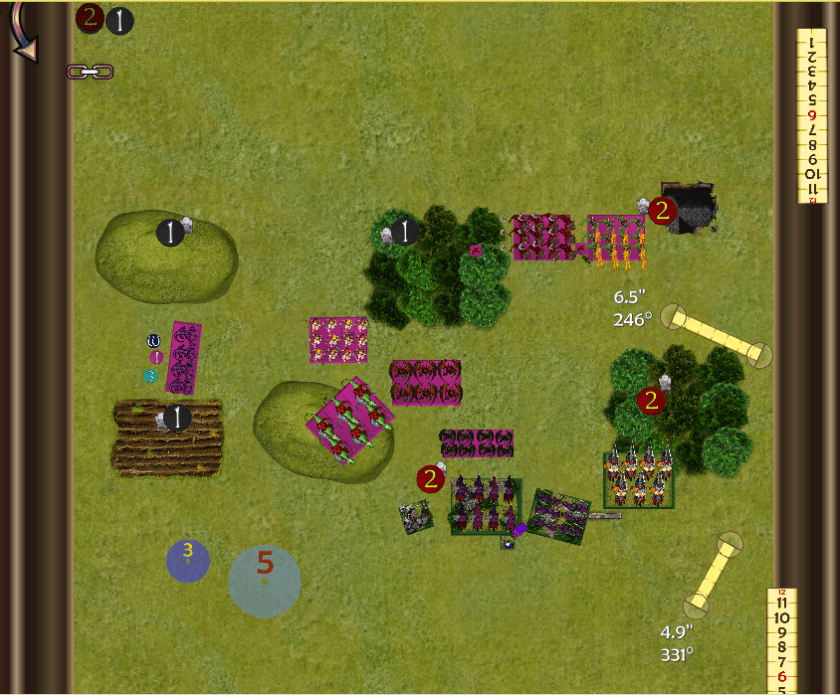
Turn 3:
The horsemen and gars hit the knights. The souls counter charge the foot knights, and the flamebearers and lowers charge the redemption knights. The only shooting I have is the griffin harb tries to shoot the adjutant, but misses, and the lute harb bane chants the lowers. The redemption knights fall under the onslaught, with the flame bearers themselves actually causing 4 wounds, and another 9 from the lowers. The foot knights take 6 damage, and hold, while the knights are wavered on 11 damage.
The knights fail their headstrong roll, and remain where they are. Because of this, the beast doesn’t charge the souls’ flank, instead it reforms to breathe on the horsemen. The footknights again charge the souls, and that is all the brotherhood have left. The adjutant tries to sneak past the gars, but is unable to get line of sight on the footknights. The beast does his breath trick, causing a single wound, but it is enough to send the horsemen back to the pit. The footknights defeat the souls as well, and turn to mitigate the threat of a double charge. (OK, I was getting into this game, and didn’t remember the picture until after I started moving.)
Turn 4:
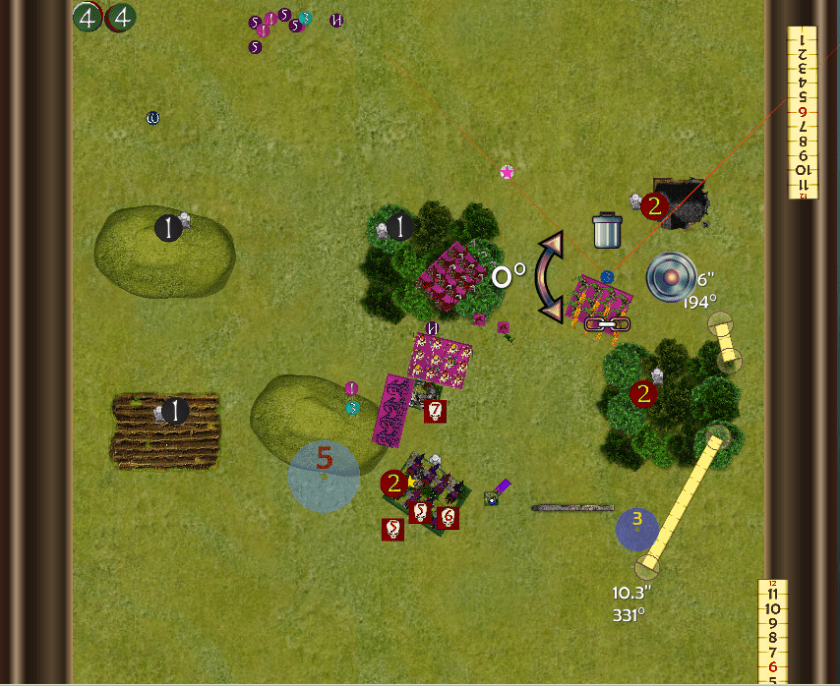
Well, the ht 4 beast is now exposed to the hellhounds, who happily take the charge. The succubi and lowers charge the footknights in the front and flank respectively. The gars again flank the knights. The Lute harb plays that funky music and bane chants the succubi, and I don’t remember why I didn’t take a shot with the other harb and flamebearers at the adjutant, but he is left alone for some reason. The gars do a somewhat amazing 5 wounds, bringing the knights to their break point, it looks like the gars will be the heroes of the match again, but on the re-roll for nerve, they hit the dreaded snake eyes, and the knights will get to fight back. The hounds do a pretty amazing roll, but fail to break or waver the best, and the footknights are slaughtered to a man.

The beast counter charges the hounds and the knights counter charge the gars. The adjutant bane chants them just for good measure, and the gars are, tragically destroyed. The beast apparently gets a whiff of its own breath, and finds it so noxious that he misses all of his attacks, and the hounds are free to re-engage. (Pic again taken late.)
Turn 5:
Well, there’s not much left to do. The succubi and hellhounds butcher the beast as an appropriate bar-b-q entree, the lower abyssals turn and move to claim the 1 point objective, and the the harbinger and flamebearers advance and let fly burning the last remaining knights to a crisp. The adjutant drops his loot and runs as fast as his legs can carry him off the field of battle. Victory to the Abyss.
After Thoughts:
Well, I almost thought those gars were going to make it through the battle. That snake eyes, though not a game changer, did crush their hopes for survival. There was some really good rolling and some really bad rolling on both sides of the table, but mostly the rolls that mattered most came out to where they should. The 11 shots on the knights in turn 5 came out to a single wound, but with them down already to 16 damage on a 15/17 nerve, the only hope they had was for a second snake eyes, and it just didn’t turn up. Lord Avondale made some good moves, but in the end, the abyss was strong enough to overcome them.
Playing at this point level is really different than a 2K game. Not having all of my normal items makes me appreciate the raw power of the abyssal list. I really like the way this list performed overall. The one “mistake” I made was a dice roll that came out a bit higher than I wanted. Had the tortured souls’ back up roll been a 1-4 all would have been well with them. The 6 put literally the rear corner of their base into the charge arc of the footknights.
